Aervoe Solar Link 240 User Manual
Page 4
Section 7
TECHNICAL INFORMATION
SPECIFICATIONS
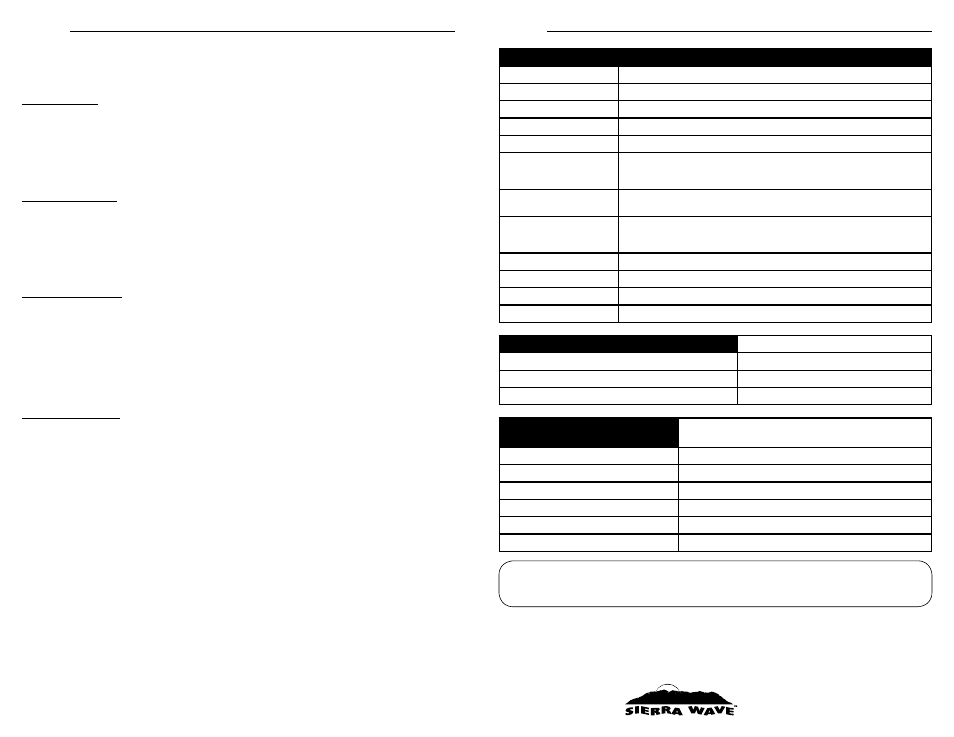
BATTERY TYPE
LiFePo4 (lithium iron phosphate) 20Ah - 14.2V
BATTERY LIFESPAN
2000+ cycles (cycle = charge and discharge)
PROTECTION CIRCUIT
Built-in over voltage, self discharge, and short circuit protection
FUSES (replaceable)
4A fuse (120V AC outlet) and 15A fuse (12V DC outlet)
DC INPUT POWER
14.6V/4A, 10A max
120V AC WALL CHARGER
Input: 120V AC, 100-240V, 50/60hz, 100VA
Output: 14.6V-15V DC, 4A
C-UL, FCC approved
12V DC VEHICLE CHARGER
Input: 11-30V DC (regulated)
Output: 14.6V DC, 4A
RATED OUTPUT POWER
(watt-hours)
AC 120V, 60hz, 400 watts max modified sine wave inverter, 210 watt-hours
12V DC - 15A, 240 watt-hours
USB 2.0 (5V-2A) - 2 ports, 240 watt-hours
OPERATING TEMPERATURE 32ºF TO 113ºF (0ºC TO 45ºC)
DIMENSIONS
9.84” x 4.33” x 7.68” (250 x 110 x 195mm)
WEIGHT
9 lbs. (4.5kg)
CERTIFICATIONS
CE, FCC, meets EU low voltage 2006/95/ED and EMC 2004/108/EC
SOLAR LINK 240 CHARGING TIME
Using #9530 30-Watt Solar Collector
6-8 hours (2 chained together)
Using #9580 80-Watt Solar Collector
6-8 hours
Using 120V AC Wall Charger or 12V DC Vehicle Charger
5-6 hours
OPERATING TIME
User is responsible for verifying the Solar Link is compatible
with wattage rates on your specific device.
#9505 Max Burton® Digital Stove To Go®
2 hours
Standard TV
8 hours
Small power tools
6 hours
Laptop (65-90 watts)
3-4 hours
Recharge a cell phone
20 times
Recharge a tablet computer
10 times
Aervoe Industries, Inc.
Gardnerville, NV 89410 • (800) 227-0196
www.aervoe.com • [email protected]
To estimate how many hours of power are in the Solar Link, find the watt hour draw of the device that you
wish to power and divide into 210W (120V AC) or 240W (USB & 12V DC). (EX: One 10-watt light = 21 hours
of continuous light)
Section 6
TROUBLESHOOTING
If your Solar Link fails to operate as specified, follow these troubleshooting steps to correct
the issue. If you still experience issues, please contact Aervoe Industries, Inc. at
www.aervoe.com or 800-227-0196.
Charging Issues
•
Ensure all cords are connected securely
•
Check power indicators on chargers and the Solar Link to make sure they are
operating
•
If using a solar collector to charge, ensure it is correctly positioned in direct sunlight
•
If using the 12V DC charger make sure the vehicle it is connected to is operating
•
Check that the fuses on the Solar Link have not blown
12V DC Output Fails
•
Check the Battery Meter to see if the Solar Link has sufficient battery charge available.
If not, follow the charging steps previously described.
•
Check to make sure that the 12V DC circuit protection fuse is not blown by removing
the 15A FUSE housing. Inspect the fuse and replace if needed with the same size fuse.
•
Check the 12V DC Out socket for obstructions or other visible damage
•
Verify the device being charged is not damaged
120V AC Output Fails
•
Check the Battery Meter to see if the Solar Link has sufficient battery charge available.
If not, follow the charging steps previously described.
•
Ensure the ON/OFF BUTTON and 120V AC POWER BUTTON have been activated and
the green and red lights are on
•
Check to make sure that the 120V AC circuit protection fuse is not blown by removing
the 4A FUSE housing. Inspect the fuse and replace if needed with the same size fuse.
•
Check the 120V AC Out socket for obstructions or other visible damage
•
Verify the device being charged is not damaged
USB 2.0 Output Fails
•
Check the Battery Meter to see if the Solar Link has sufficient battery charge available.
If not, follow the charging steps previously described.
•
Ensure the ON/OFF BUTTON is on and the green light is on
•
Check the USB port for obstructions or other visible damage
•
Verify the device being charged is not damaged
CS:10/12