Oklahoma Sound #PRC 400 User Manual
Page 8
8
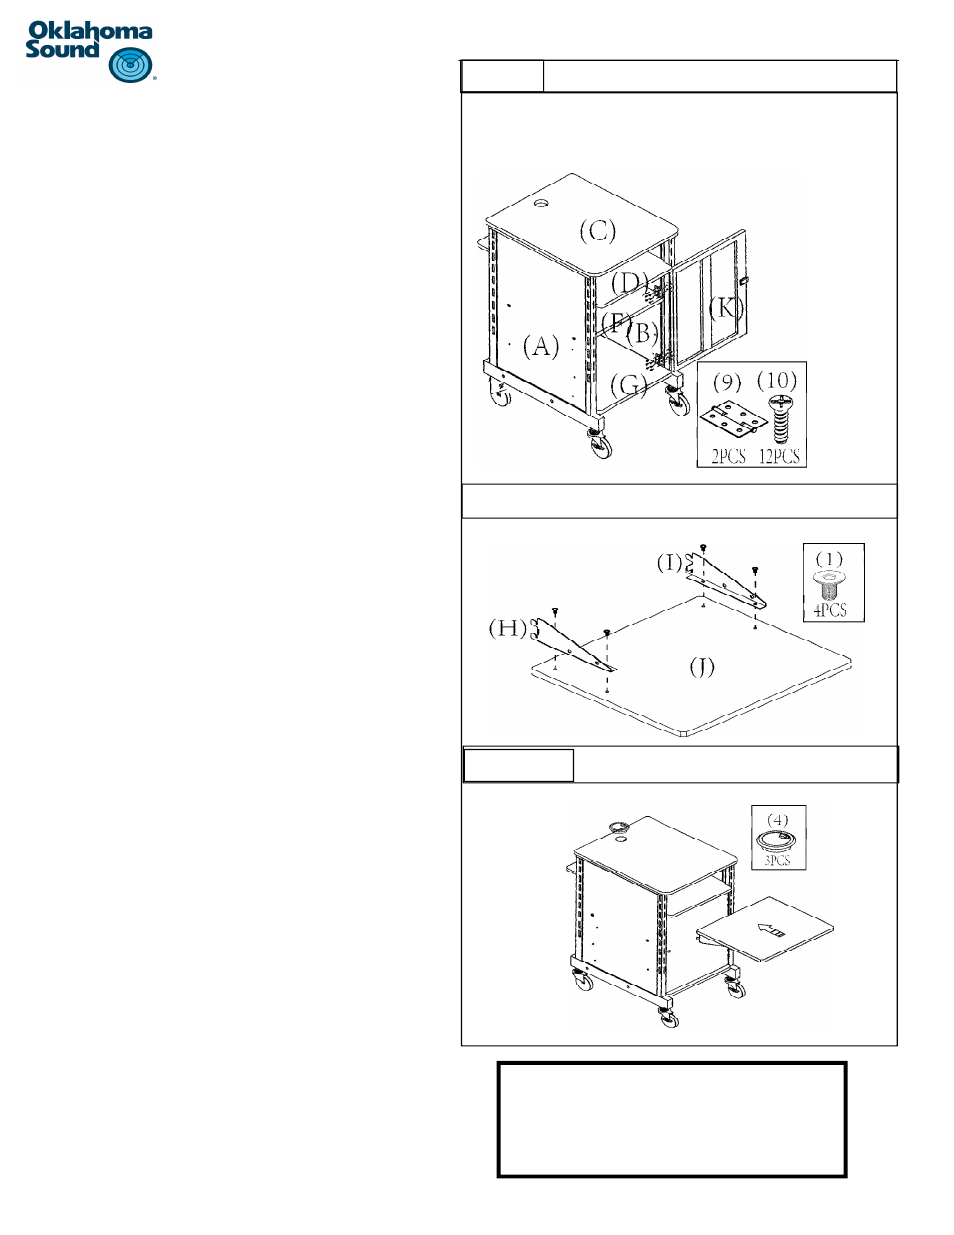
Step 9:
a) Gently turn the unit right side up and lock the casters
so the unit will not roll during assembly.
b) IdenƟfy the two hinges part #9. Align the three holes
on the leŌ part of the hinge over the three holes on
the edge of side panel #B. The right side of the hinge
should be on the outside of the unit.
c)
Be sure that the hinges are placed with the barrel of
the hinge facing inwards.
d) Once the hinges are in the correct posiƟon, use three
screws #10 to aƩach each hinge to the side panel.
Repeat this process for both upper and lower hinge.
e) Once the hinges are secured in place, hold up the
door panel #K in the open 90 degree posiƟon as
shown, and align the six holes on the edge of the
panel with the holes on the right part of each hinge.
f)
Once the six holes of the hinges are aligned to the six
holes on the side of the door panel #K, use six screw
#10 to aƩach the right part of hinges part #9 to the
door panel #K as shown.
Step 10:
a) IdenƟfy panel #J and lay it on a clean, soŌ surface
facing down with the holes facing upwards.
b) Locate the two supporƟng brackets #H and #I and lay
them over the panel as shown. The two tabs at the
end of the bracket should be at the edge of the pan-
els as shown.
c)
The two brackets should be facing inwards as shown.
d) Align the two holes on the brackets with the embed-
ded t-nuts in the panel
e) Once they are aligned use four bolts #1, two for each
bracket and thread them through the holes on the
bracket and into the t-nut.
f)
Use the hex key to Ɵghten the blots .
Step 11:
a) To aƩach the adjustable shelf #J to your unit, align
the two tabs on each bracket with the slots on the
edge of each side panel. One aligned slip them in and
gently push the shelf downwards to lock in place.
b) Locate the three grommets part #4 and insert them
into the surface shelf, projector shelf and adjustable
cabinet shelf.
STEP 9
STEP 10
STEP 11
CongratulaƟons!!! Your PRC 400 is
now fully assembled!!