Steel shingle installation guide – TAMKO MetalWorks User Manual
Page 4
Headwall Detail
(continued)
Pitch Transition Detail
(continued)
• Trim the headwall flashing so there are rounded corners that
overlap the shingle.
❺
Cut the flashing in order to wrap the
vertical wall around to the sidewall
❻
.
• The Headwall Flashing should be fastened against the
headwall using nails or screws every 18 inches on-center.
Install Headwall Flashing under the wall covering or existing flashings.
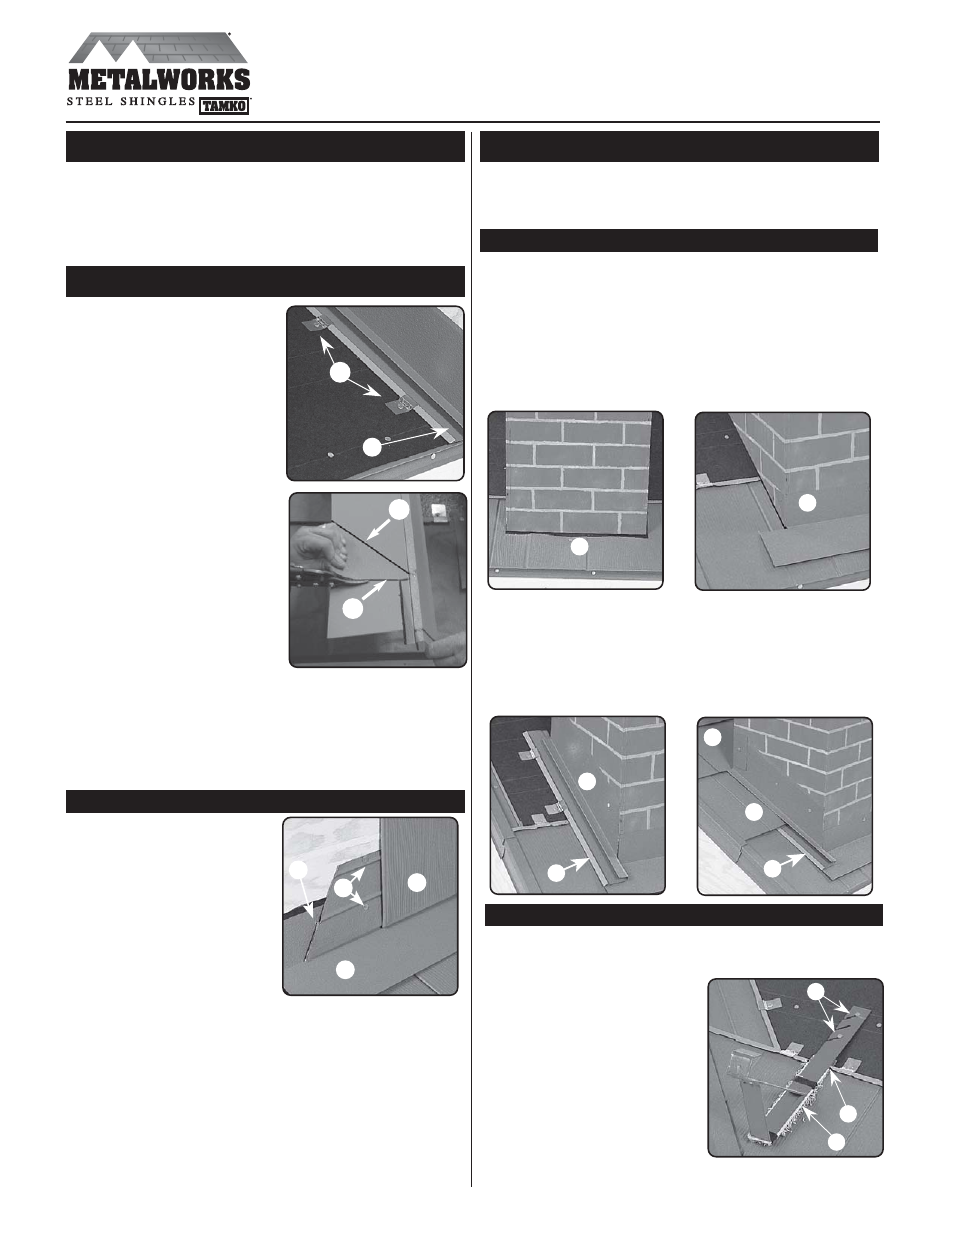
Sidewall Detail
• Install METALWORKS Sidewall
Flashing under wall covering
(siding, stucco) or existing
flashing wherever possible.
• When necessary cut a slot in the
wall in order to properly counter-
flash Sidewall Flashing.
• Ensure Sidewall Flashing
overlaps on top of the course of
shingles immediately below the
dormer or on top of the starter
strip at the eave
❶
.
• To join Sidewall Flashing, trim
lower flashing and slide
together with a 2 inch overlap.
• At a dormer, Sidewall Flashing is
cut
❷
and crimped
❸
under and
at an angle to be flush with the
front dormer wall.
• The bottom of the sidewall lock
area that is exposed on top of
the shingle should be cut and
folded under.
• Apply additional sealant at the
junction of the headwall and sidewall before fastening the
Sidewall Flashing.
• Fasten the Sidewall Flashing to the dormer wall 18 inches
on-center.
• Install the Sidewall Flashing to the roof deck with clips 24
inches on-center
❹
. Install the remaining shingles around
the dormer.
2
1
Steel Shingle Installation Guide
Page 4
Pitch Transition Detail
• Pitch transitions must be
addressed with METALWORKS
specialty materials such as Trim
Coil or Starter Flashing.
Do not simply bend the
shingles.
• Install TAMKO’s TW Metal and
Tile Underlayment or TW
Underlayment on top of the
last course of shingles under
the transition flashing.
• Complete lower roof and install
transition flashing using METALWORKS
Trim Coil over last course of shingles
❶
.
Bend Trim Coil as if forming headwall flashing, and attach
above the transition area using nails or screws 18” o.c.
❷.
Flashing should overlap last course of shingles minimum
3-1/2 inches. Also lap underlayment over the top portion of
the transition flashing. (not shown)
• Install METALWORKS Starter Flashing over transition flashing
❸
. Bend the Starter Flashing’s edge to lay flat and create lock
for next course of shingles. Fasten Starter Flashing 18” o.c.
two rows in staggered pattern.
• The first course of shingles above the transition locks to the
new starter installed over the transition flashing
❹.
Chimney/Skylight Detail
• Cut the last course of shingles below the chimney or skylight
as close as possible to the chimney/skylight
❶
.
• Install headwall flashing to the bottom of the chimney/skylight
using METALWORKS Trim Coil
❷. (refer to Headwall Detail
Section)
• Install Sidewall Flashing to the sides and extend over the last
course of shingles below chimney/skylight
❸
and over
headwall flashing
❹. (refer to Sidewall Detail Section)
• Finish shingles around chimney/skylight
❺
.
• Cut and fold back top lock of shingles(s) directly above the
chimney/skylight and install a pan flashing
❻
using
METALWORKS Trim Coil so that the next course of shingles
will lap over the flashing.
• Counter-flash and apply sealant as necessary.
• Large chimneys on steep roofs may require a cricket or
saddle.
Roof Jacks
• Place protective padding (i.e. carpet, foam insulation)
under roof jack to prevent damage to the shingle on
which it rests
❶
.
• Cut and fold back the top lock of
shingle to allow for roof jack
insertion
❷.
• Place roof jack on shingle and
nail through slot in roof jack
above shingle
❸
.
• Notch and open bottom lock on
shingle directly above roof jack
and install the shingle over the
jack.
• After roof jack has been
removed, fold opened section of
bottom lock back into place and apply sealant.
1
2
3
4
1
2
3
4
3
4
5
4
5
6
1
2
3
3
2
4
• For a gambrel transition, install METALWORKS Starter
Flashing at the transition point. Refer to page 2, “Starter
Eave/Flashing” section.
Cut Line
Crimp
Line