Heritage, Laminated asphalt shingles frederick, md – TAMKO HERITAGE User Manual
Page 4
Central District
220 West 4th St., Joplin, MO 64801
800-641-4691
10/12
Northeast District
4500 Tamko Dr., Frederick, MD 21701
800-368-2055
Southeast District
2300 35th St., Tuscaloosa, AL 35401
800-228-2656
Southwest District
7910 S. Central Exp., Dallas, TX 75216
800-443-1834
Western District
5300 East 43rd Ave., Denver, CO 80216
800-530-8868
Visit Our Web Site at
tamko.com
HERITAGE
®
LAMINATED ASPHALT SHINGLES
Frederick, MD
4
12"
12"
10"
5"
3"
5"
(CONTINUED from page 3)
(Continued)
No fasteners within
6" of centerline
Extend end shingle
12"–18" beyond
valley centerline
Extra nail in
end of shingle
Valley centerline
Underlayment
Minimum 36" wide sheet
of Nail Fast, Moisture
Guard Plus or 50 lb.
or heavier roll roofing
Place tip of shingle on the edge of
the vertical shingle, 2 inches back
from valley centerline and covering
the vertical shingle.
9. VALLEY APPLICATION
Over the shingle underlayment, center a minimum 36 in. wide sheet
of TAMKO Nail-Fast
®
, Moisture Guard Plus
®
or a minimum 50 lb. roll
roofing in the valley. Nail the underlayment only where necessary to
hold it in place and then only nail the outside edges.
IMPORTANT: PRIOR TO INSTALLATION WARM SHINGLES TO
PREVENT DAMAGE WHICH CAN OCCUR WHILE BENDING
SHINGLES TO FORM VALLEY.
After valley flashing is in place:
• Apply the first course of shingles along the eaves of one of
the intersecting roof planes and across the valley.
Note: For proper flow of water over the trimmed shingle,
always start applying the shingles on the roof plane that has
the lower slope or less height.
• Extend the end shingle at least 12 in. onto the adjoining roof.
Apply succeeding courses in the same manner, extending
them across the valley and onto the adjoining roof.
• Press the shingles tightly into the valley.
• Use normal shingle fastening methods.
Note: No fastener should be within 6 in. of the valley centerline,
and two fasteners should be placed at the end of each shingle
crossing the valley.
• To the adjoining roof plane, apply one row of shingles vertically
facing the valley and 2 in. back from the valley centerline.
Note: For a neater installation, snap a chalkline over the
shingles for guidance.
• To complete the valley, apply shingles on the adjoining roof
plane by positioning the tip of the first shingle of each row at
the 2 in. point from the centerline where the edge of the vertical
shingle has been applied, covering the vertical shingle.
FOR ALTERNATE VALLEY APPLICATION METHODS, PLEASE
CONTACT TAMKO’S TECHNICAL SERVICES DEPARTMENT AT
800-641-4691.
8. RE-ROOFING
Before re-roofing, be certain to inspect the roof decks. All plywood
shall meet the requirements listed in Section 1.
Nail down or remove curled or broken shingles from the existing
roof. Replace all missing shingles with new ones to provide a smooth
base. Shingles that are buckled usually indicate warped decking
or protruding nails. Hammer down all protruding nails or remove
them and refasten in a new location. Remove all drip edge metal
and replace with new.
If re-roofing over an existing roof where new flashing is required
to protect against ice dams (freeze/thaw cycle of water and/or
the backup of water in frozen or clogged gutters), remove the old
roofing to a point at least 24 in. beyond the interior wall line and
apply TAMKO’s Moisture Guard Plus
®
waterproofing underlayment.
Contact TAMKO’s Technical Services Department for more
information.
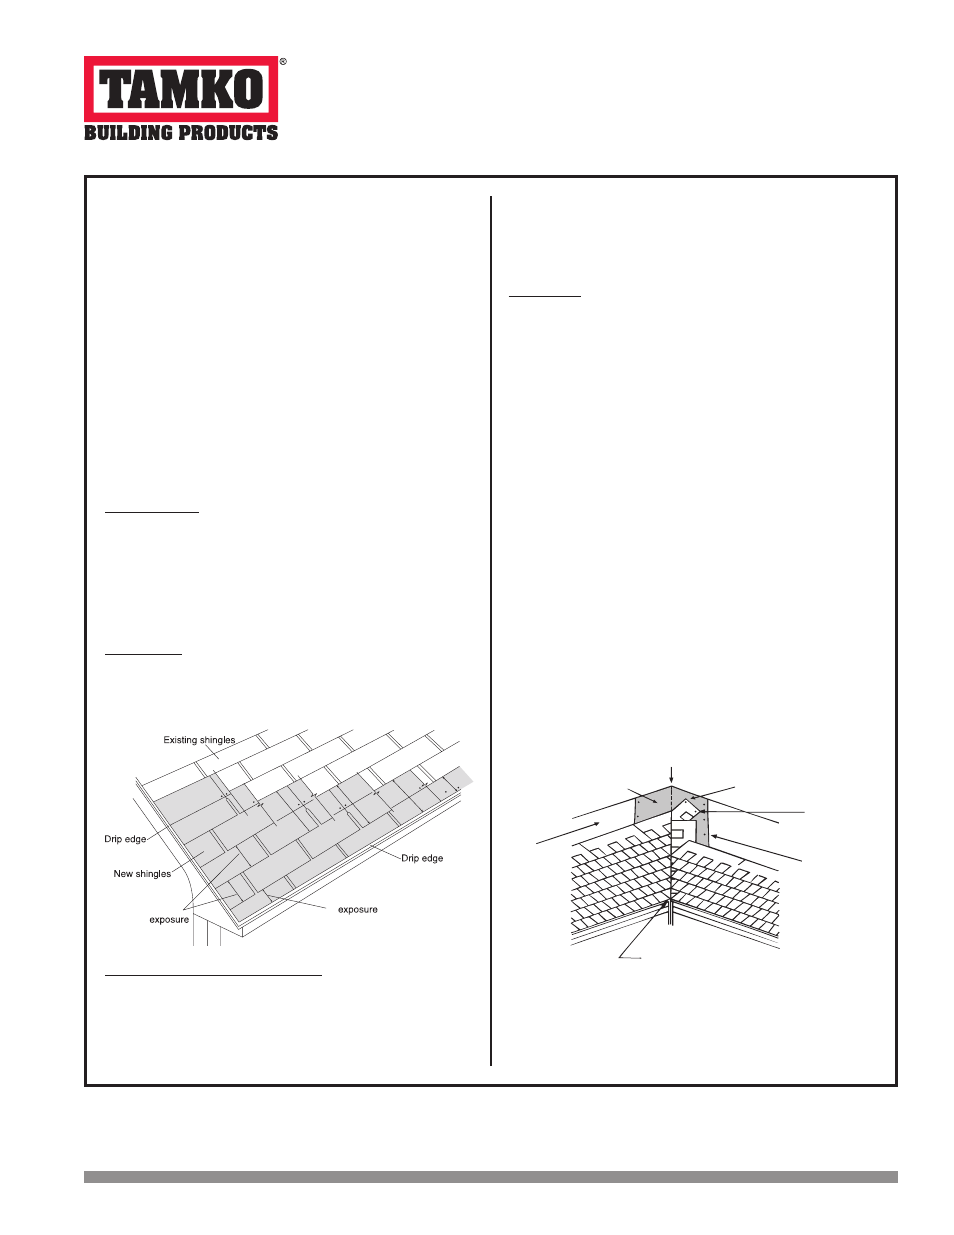
The nesting procedure described below is the preferred method
for re-roofing over square tab strip shingles with a 5 in. exposure.
Starter Course: Begin by cutting shingles into 5 × 36-3/8 inch
strips. This is done by removing the 5 in. tabs from the bottom and
approximately 2 in. from the top of the shingles so that the remaining
portion is the same width as the exposure of the old shingles. Apply
the starter piece so that the self-sealing adhesive lies along the
eaves and is even with the existing roof. The starter strip should be
wide enough to overhang the eaves and carry water into the gutter.
Remove 3 in. from the length of the first starter shingle to ensure
that the joints from the old roof do not align with the new.
First Course: Cut off approximately 2 in. from the bottom edge of
the shingles so that the shingles fit beneath the existing third course
and align with the edge of the starter strip. Start the first course with
a full 36 in. long shingle and fasten according to the instructions
printed in Section 3.
Second and Succeeding Courses: According to the off-set
application method you choose to use, remove the appropriate
length from the rake end of the first shingle in each succeeding
course. Place the top edge of the new shingle against the butt edge
of the old shingles in the courses above. The full width shingle used
on the second course will reduce the exposure of the first course to
3 in. The remaining courses will automatically have a 5 in. exposure.