Assembly for wall mounting – Weston Roma Apple & Fruit Crusher User Manual
Page 6
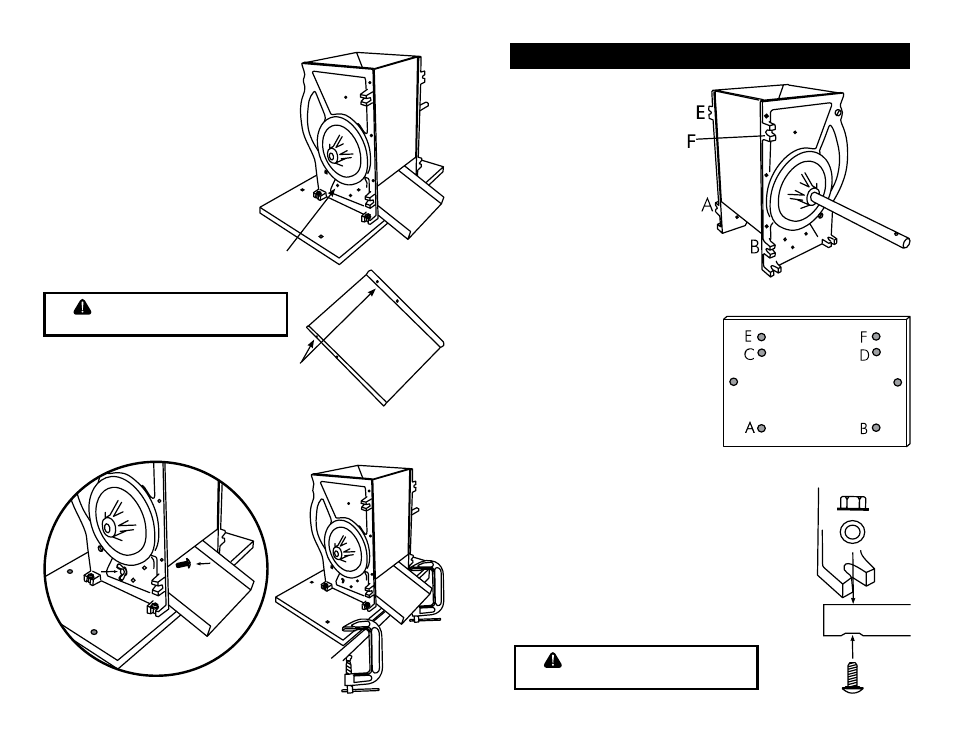
Hole 1
Figure 5
Figure 4
Hole 1
5. Slide the
Chute up into the Apple
Crusher Body
(Figures 4 & 5).
6. Line up Hole 1 of the
Chute to
Hole 1 of the
Apple Crusher. Secure
the
Chute to the Apple Crusher
Main Body using a Machine Screw
and
Wing Nut. Repeat on the other
side of the
Chute. Tighten both Wing
Nuts by hand
(Figure 6).
7. When
table-mounting
the
Crusher, make sure the Handle can
freely rotate. A table corner is an
ideal location.
8. Secure the
Crusher to the table
with the two
C-Clamps
(Figure 7).
Continue to Handle
Mounting Instructions
Figure 6
Figure 7
ASSEMBLY FOR WALL MOUNTING
Figure 8
YOU WILL NEED:
10mm Wrench or
an Adjustable Wrench
Two 3/8” Bolts and Washers
Wall Anchors
NOTICE: These instructions only
are for assembling the
Apple &
Fruit Crusher for wall mounting. It
is the user’s responsibility to properly
mount the
Crusher.
WARNING!: The Apple & Fruit
Crusher is very heavy. Make sure
the wall is solid and stable before
mounting the
Crusher to it. Failure
to properly mount the
Crusher may
result in serious personal injury!
1. Stand the
Apple Crusher Main
Body upright on a flat, level surface
with the Back Side facing toward
you.
2. Align holes A, B, E & F on the
Mounting Board with Feet A, B,
E, & F
(Figures 8 & 9)
. The side of the
Mounting Board with the stepped
holes should face toward you.
3. Secure the
Mounting Board to
the
Feet with the Carriage Bolts,
Flat Washers and Hex Flange Nuts
(Figure 10).
Use a 10-mm wrench or an
adjustable wrench to tighten the
Hex
Flange Nuts.
Continue to Step 4
Figure 10
Figure 9
Back Side
-6-
-7-
Foot
Mounting
Board
Stepped hole
in the
Mounting
Board
CAUTION!
To avoid personal injury, DO
NOT touch the stainless steel
Blades on the Wooden Drum.
CAUTION!
To avoid personal injury, DO
NOT touch the stainless steel
Blades on the Wooden Drum.