Save these instructions, Warning, General safety rules – Weston Roma Apple & Fruit Crusher User Manual
Page 4: Handle mounting instructions
GENERAL SAFETY RULES
WARNING!
1. To avoid personal injury, NEVER
reach into the Chute or Main Body. Keep
fingers and hands away from the Drum and
Crushing Blades at all times.
2. NEVER use your fingers to clear a jam,
clean the Drum or remove crushed fruit from
the Chute. Use the Wooden Fruit Scraper.
3. DO NOT crush nuts, fruits with pits
or large seeds, or other hard items in the
Crusher.
4. Tie back loose hair and clothing, roll up
long sleeves and remove ties and jewelry
including rings, bracelets and watches
before operating the Crusher.
5. DO NOT use the Crusher while under
the influence of drugs, medications, or
alcohol.
6. Make sure the Crusher is properly
mounted on a sturdy, stable structure before
use.
SAVE THESE INSTRUCTIONS!
Refer to them often and use them to instruct others.
READ AND FULLY UNDERSTAND ALL INSTRUCTIONS
AND WARNINGS PRIOR TO USING THIS UNIT. YOUR
SAFETY IS MOST IMPORTANT! FAILURE TO COMPLY
WITH PROCEDURES AND SAFE GUARDS MAY
RESULT IN SERIOUS INJURY OR PROPERTY DAMAGE.
REMEMBER: YOUR PERSONAL SAFETY IS YOUR
RESPONSIBILITY!
7. The Apple & Fruit Crusher is not a toy.
KEEP CHILDREN AWAY. NEVER leave
the Crusher unattended.
8. The manufacturer declines
responsibility for the outcome of any
improper use of this product.
9. Thoroughly wash the Crusher before
and after each use. See the “Cleaning
Instructions” section of this manual. The
Apple & Fruit Crusher is not dishwasher
safe.
10. The Fruit & Apple Crusher is for
household use only. Commercial use of
this product will void the warranty.
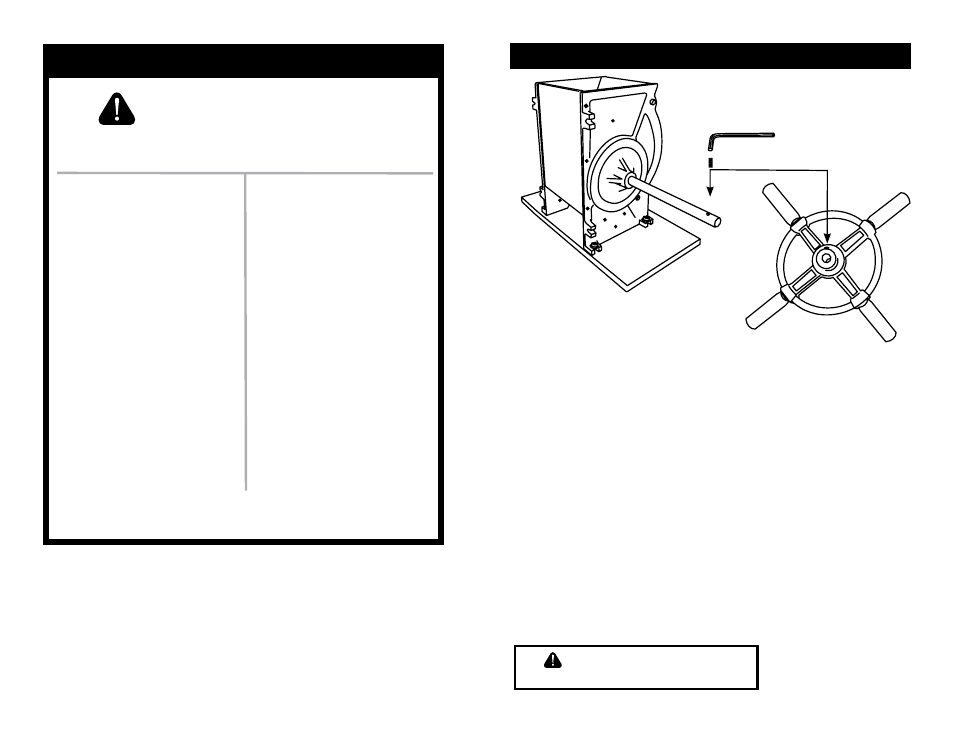
NOTE: The Apple & Fruit Crusher
comes with the
Handle already
mounted. Follow these instructions if
the
Handle should ever come loose or
to reinstall it after cleaning.
1. Loosen the
Set Screw on the
Handle with the provided Allen
Wrench. Note: It is not necessary to
completely remove the
Set Screw from
the
Handle.
2. Slide the
Handle onto the Shaft.
Align the
Handle Set Screw Hole with
the
Shaft Set Screw Hole
(Figure 14).
3. Using the
Allen Wrench, tighten
the
Set Screw to the Shaft. NOTE:
If the
Handle slips on the Shaft while
turning, the
Set Screw is not correctly
aligned or tightened. Repeat steps 1-3
until the
Handle is secure.
Figure 14
HANDLE MOUNTING INSTRUCTIONS
Shaft
Set Screw
-4-
-9-
CAUTION!
To avoid personal injury, DO
NOT touch the stainless steel
Blades on the Wooden Drum.