Installing the motor onto the pasta machine – Weston Roma 2-Speed Electric Motor Attachment User Manual
Page 6
-6-
The
2-Speed Electric Motor eliminates the need for the c-clamp when setting up
your pasta machine.
1. Position the pasta machine on your work
surface with the drive holes of the
rollers facing you.
Figure 6
2. Locate the
Motor Mounting Bracket and
lay it on the work surface in front of the
drive holes.
3. Insert the
Bracket Mounting Bolt through
the hole in the
Motor Mounting Bracket
and position it into the hole that is used by
the c-clamp.
Figure 6
4. After aligning the
Bracket Mounting
Bolt with the c-clamp hole, attach the
Elongated Washer to the back of the Bolt.
Using the included
Allen
Wrench,
securely tighten the
Motor Mounting
Bracket to the pasta machine.
Figure 6
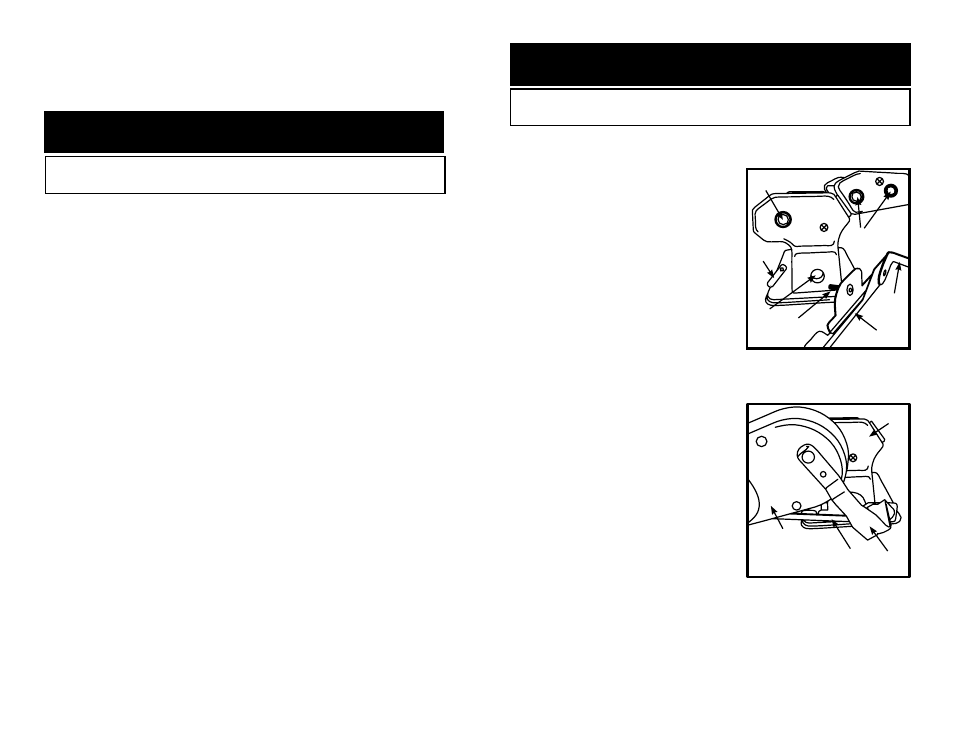
5. Next, rotate the
Movable Arm clockwise to
the far right. This will allow easy access for
Motor placement.
6. Hold the
Motor with the Power Switch
facing up and the
Motor Shaft pointing
toward the pasta machine.
7. Line up the
Motor Shaft with the drive hole
on the pasta machine and rotate the
Motor
into place, allowing the left part of the
Motor to come to rest on the Motor
Mounting Bracket.
Figure 7
8. After
Motor is positioned on the Motor
Mounting Bracket, rotate the Movable
Arm counter-clockwise so it is positioned
on the
Motor.
Figure 7
9. Once
Motor is attached and you have
verified the
Power Switch is in the off
position (O), plug the unit into the power
source.
INSTALLING THE MOTOR ONTO
THE PASTA MACHINE
WARNING! Before cleaning, assembling or disassembling the Motor
Attachment, make sure the Motor is in the OFF Position (O) and the PLUG
IS REMOVED FROM THE OUTLET/POWER SOURCE!
Motor
Mounting
Bracket
Enlongated
Washer
Bracket
Mounting
Bolt
C-Clamp
Hole
Movable
Arm
Drive
Hole
Drive
Hole
Pasta
Machine
Movable
Arm
Motor
Mounting
Bracket
Motor
Figure 7
Figure 6
-7-
NOTE: This Motor DOES NOT have a reverse speed. If the Roma Tomato Strainer
should become jammed:
1. Switch the
Motor off immediately
2. Unplug the
Motor from the power source
3. Pivot the
Movable Arm away from the Motor
4. Remove the
Motor from the Roma Food Strainer and Sauce Maker.
5. Either insert the manual handle and rotate counter clockwise to free
the jam, or remove the splash guard/discharge chute and the stainless
screen to free the jam. If you remove the screen and squirt guard to
remove the jam, reassemble the Roma Food Strainer and Sauce Maker
before reattaching the
Motor and connecting to the power source.
REMOVING A JAM FROM THE ROMA FOOD
STRAINER WITH THE MOTOR ATTACHMENT
WARNING! Before cleaning, assembling or disassembling the Motor
Attachment, make sure the Motor is in the OFF Position (O) and the PLUG
IS REMOVED FROM THE OUTLET/POWER SOURCE!
Follow all operating and assembly instructions for the Roma as before, except now
instead of turning the handle, simply turn the
Motor ON by selecting either slow
speed (Setting I) or high speed (Setting II).