Weston Roma 2-Speed Electric Motor Attachment User Manual
Page 5
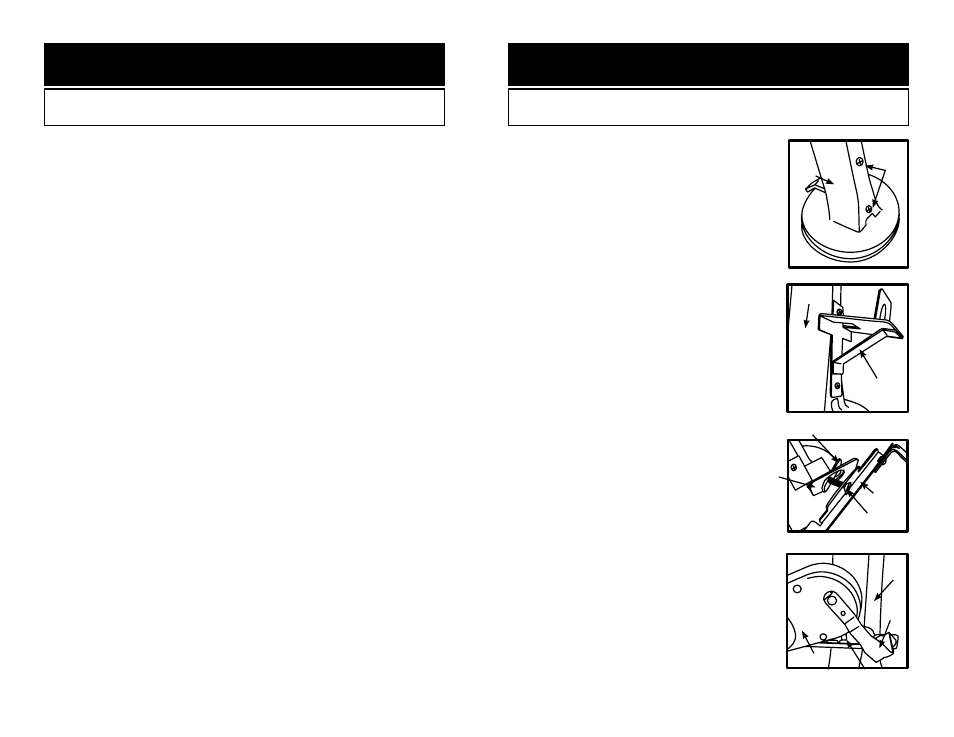
1. Making sure that the Roma food strainer &
sauce maker is securely mounted to the
work surface, remove the two screws from
the neck of the Roma body.
Figure 2
2. Attach
Roma Mounting Bracket to Roma
using the two screws that were removed in
#1.
Figure 3
3. Insert the
Bracket Mounting Bolt through
the hole in the
Motor Mounting Bracket.
Attach the
Elongated Washer to the back
of the
Bolt loosely.
4. Slide the
Enlongated Washer on the
Motor Mounting Bracket into the large
hole of the
Roma Mounting Bracket by
inserting the long end of the
Enlongated
Washer first followed by the shorter end.
Figure 4
5. Position the
Motor Mounting Bracket so
it is horizontal.
6. Using the supplied
Allen Wrench, tighten
the
Bracket Mounting Bolt firmly, securing
the
Motor Mounting Bracket to the Roma
Mounting Bracket.
7. With the Power Switch of the Motor facing
up, line up the
Motor Shaft with the drive
hole on the Roma, and rotate the
Motor
into place. Allow the left side of the
Motor to come to rest on the Motor
Mounting Bracket.
Figure 5
8.
After the
Motor is positioned on the Motor
Mounting Bracket, rotate the Movable
Arm counter-clockwise so it is positioned
on the
Motor.
Figure 5
9. Once
Motor is attached and you have
verified the
Power Switch is in the off
position (O), plug the unit into the power
source.
INSTALLING THE MOTOR ONTO
THE ROMA FOOD STRAINER & SAUCE MAKER
WARNING! Before cleaning, assembling or disassembling the Motor
Attachment, make sure the Motor is in the OFF Position (O) and the PLUG
IS REMOVED FROM THE OUTLET/POWER SOURCE!
Figure 2
Figure 3
Figure 4
Figure 5
Neck of
Roma
Remove
these
screws
Roma
Mounting
Bracket
Neck of
Roma
Enlongated
Washer
Bracket
Mounting
Bolt
Motor
Mounting
Bracket
Roma
Mounting
Bracket
Roma
Movable
Arm
Motor
Mounting
Bracket
Motor
-5-
-8-
1. Follow instructions 1 through 6 of the “INSTALLING THE MOTOR ONTO THE
PASTA MACHINE” instructions.
2. Line up the
Motor Shaft with the drive hole on the pasta machine attachment
and rotate the
Motor into place, allowing the left part of the Motor to come to
rest on the
Motor Mounting Bracket.
3. After
Motor is positioned on the Motor Mounting Bracket, rotate the Movable
Arm counter-clockwise so it is positioned on the Motor.
4. Once
Motor is attached, and you have verified the Power Switch is in the off
position (O), plug the unit into the power source.
ATTACHING THE MOTOR ONTO
THE PASTA MACHINE ATTACHMENTS
WARNING! Before cleaning, assembling or disassembling the Motor
Attachment, make sure the Motor is in the OFF Position (O) and the PLUG
IS REMOVED FROM THE OUTLET/POWER SOURCE!