Water cooler installation – Vortech 1997-2003 Ford 5.4 F-150/Expedition User Manual
Page 11
P/N: 8N020-130
© 2005 Vortech Engineering, LLC
All Rights Reserved, Intl. Copr. Secured.
19SEP05 v1.0 97-03F150PwrClr(8N020-130v1.0)
5
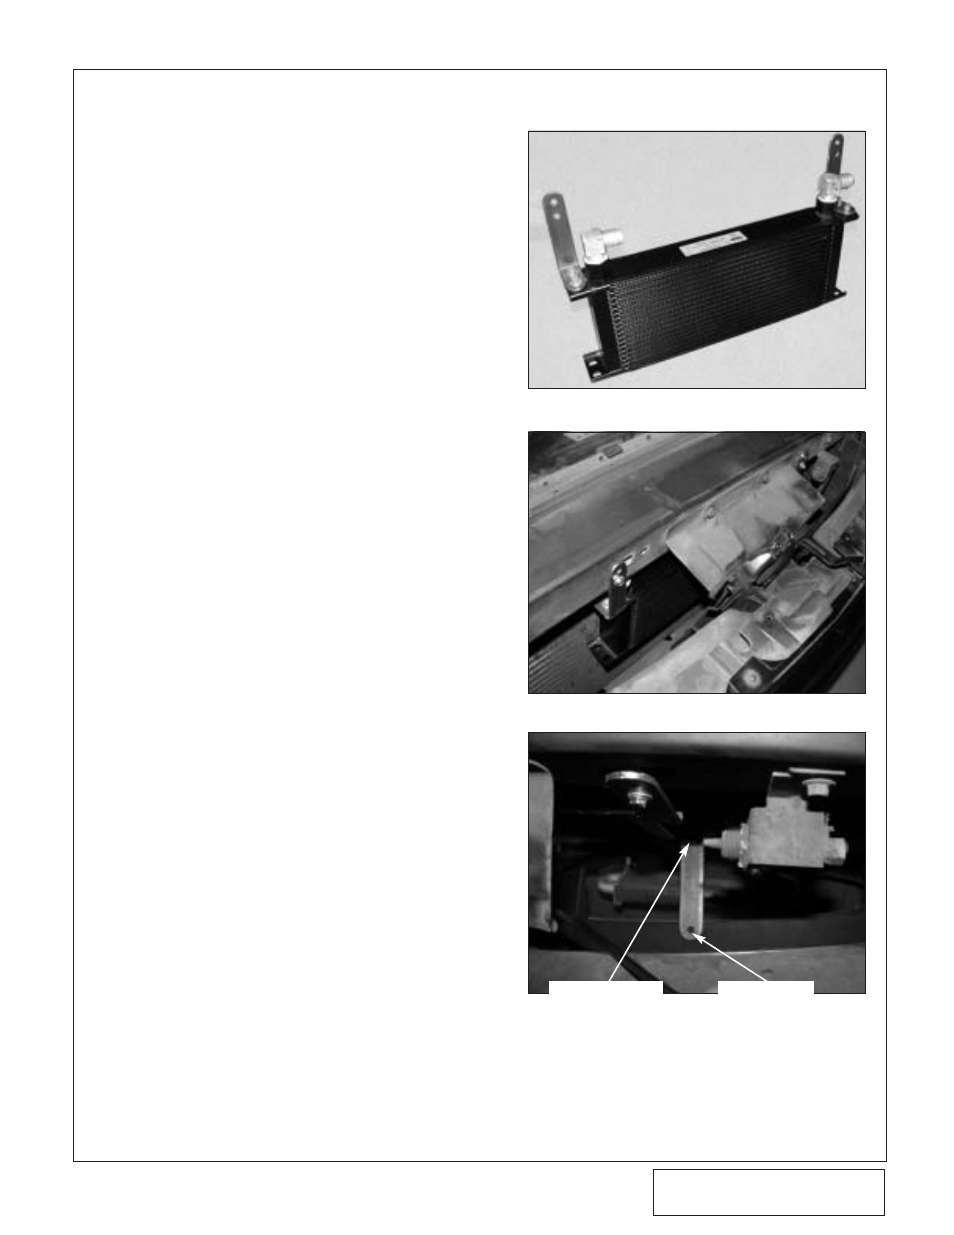
5. Water Cooler Installation
A. If not already removed, take off the
plastic cover over the radiator. This will
allow access to the area behind the grill
and in front of the radiator.
B.
Locate the supplied Setrab cooler and L-
shaped brackets. Attach the brackets to the
top of the tabs on the Setrab cooler. (See
Fig. 5-a.)
C.
Position the cooler behind the grill with the
L-shaped tabs pointing upward. Align the
tabs along the side of the cross-member
and mark locations of the four Ø3/32" pilot
holes to be drilled. (See Fig. 5-b.)
D.
Drill the holes and temporarily mount the
water cooler.
E.
Locate the supplied lower mounting brack-
et. Using the supplied 1/4" hardware secure
one end of the bracket to the forward-most
hole on the lower driver’s side flange of the
cooler. Point the bracket toward the grill.
(See Fig. 5-c.) Mark where the hole sits
over the rear grill support rib. Use a sheet
metal screw to secure the bracket to the
grill.
For the following steps, see Fig. 5-d:
F.
Locate the 4" x 12" x 90° molded hose.
Connect the short end of the supplied 90°
hose to the top fitting on the installed water
reservoir. Using a hose mender and sup-
plied length of hose connect the open end
of the 90° hose to the lower fitting on the
charge cooler. Route the hose along side
the passenger’s side of the radiator snaking
down to the upper brass fitting.
G. Using a section of Ø3/4" hose connect the
discharge of the water pump to the passen-
ger’s side 90° fitting in the setrab water
cooler. Route the hose near the frame rail
in front of the radiator and up to the
installed cooler.
H.
Using the supplied Ø3/4" hose, connect the
driver’s side fitting in the Setrab cooler to
the upper 90° fitting in the setrab water
cooler. Route the hose to the passenger’s
side of the radiator passing by the core
support, up to the charge cooler.
I.
Secure all ends with the supplied nylon
ratchet clamps.
Fig. 5-a
Fig. 5-b
Fig. 5-c
CONNECT TO LOWER
D-SIDE TAB ON
SETRAB COOLER
SECURE TO THE
REAR OF THE
FACTORY GRILL