TracRac IM Toolbox Mount Kits User Manual
Page 2
TracRac Inc. 994 Jefferson St. Fall River, MA 02721 l 800-501-1578
Instruction Manual
Toolbox Installation - 41000
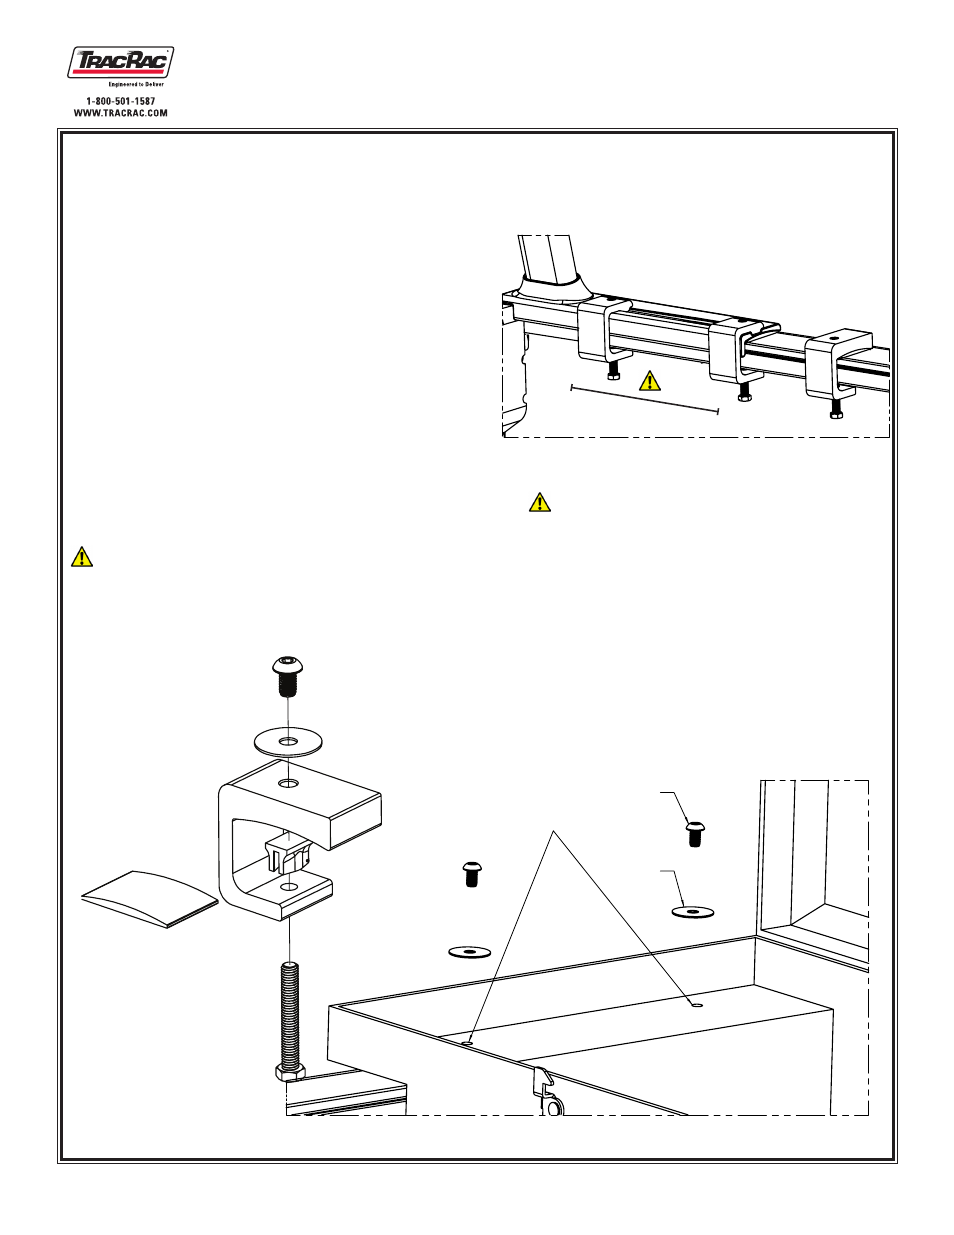
Remove the front 2 clamps from either side of the
1.
front rack and replace with TB Front Clamps (Figure
1)
Take one of the TB Rear Mounts and thread a 3/8”-16
2.
HHCS in through the bottom of the clamp.
Take the C-Channel Clamp Foot and place it on top of
3.
the 3/8” HHCS (Figure 2)
Repeat Steps 2 & 3 for the opposite TB Rear Mount.
4.
Place the Rounded Shims on the sidewall of your
5.
truck, approximately 2” to 3” behind the upright
bases as illustrated (Figure 1) This distance will vary
depending on the size of the toolbox
Mount the assembled clamps (Step 1-3) onto the
6.
rounded shims and torque down the HHCS to 14 lb-ft
using a 9/16” socket and torque wrench. Re-torque
the TB Front Clamps to 14 lb-ft.
Place your toolbox on top of the clamps and secure
7.
it by using the 3/8” washer and the 3/8”-16 BHCS.
Torque the BHCS to 27 ft-lbs. (Figure 3)
Note: When positioning the toolbox, please note that
there is sufficient clearance for the lid to open so that it
does not scratch the uprights.
Customer Drilled
Holes
Figure 2
Figure 3
N
ote
: B
e
sure
to
keep
the
ruBBer
shim
uNder
the
Base
wheN
tighteNiNg
the
clamps
max distance possible
Figure .1
Button Head
Cap Screw
3/8 Washer
IMPORTANT: If your toolbox does not come
with pre-drilled holes/slots that line up with
the threaded clamps, you will need to position
you toolbox in the desired location, mark the
necessary hole locations, remove the toolbox
and then drill either a 13/32” or 7/16” clearance
hole. After the holes are drilled you will be able
to mount your toolbox.