F-27c stryker instruction manual, Step 1, Step 2 – ParkZone PKZ4200 User Manual
Page 2: Transmitter charging the aircraft battery
THR ELE AIL RUD T/V
3
F-27C Stryker Instruction Manual
Congratulations on your purchase of the ParkZone
®
F-27C
Stryker
™
Charge and Fly
™
park flyer. Your F-27C has come with
everything needed to get you in the air—all in one box! You will
only need to attach the vertical fins, attach the nose, and charge
the battery pack prior to flight.
Everyone at ParkZone is committed to giving you the most enjoy-
able flight experience you can have. In order to ensure a safe and
successful flight, we ask that you do not fly until you have read
these instructions thoroughly.
Warning: We knocked this one out of the park!
This is a high-performance airplane and is not a toy. The F-27C
Stryker is capable of flying at speeds exceeding 80 miles per hour
(129 kilometers per hour), so it is intended for highly experienced
and expert radio control pilots only. We suggest that this airplane
is flown only at AMA approved flying sites. It travels much too fast
to be flown in a “typical” park setting, even if this is where you
usually fly your park flyers and even if there are many acres of
space. Never fly where you may place anyone’s safety in jeopardy.
Crash damage is not covered under any warranty.
Warning:
Your F-27C Stryker comes with a 3S Li-Po battery pack that must
be handled carefully at all times. Failure to follow the charging
instructions properly could result in a fire! You must use an appro-
priate Li-Po charger to charge your Li-Po pack. The one supplied
in the box with your F-27C Stryker will work very well.
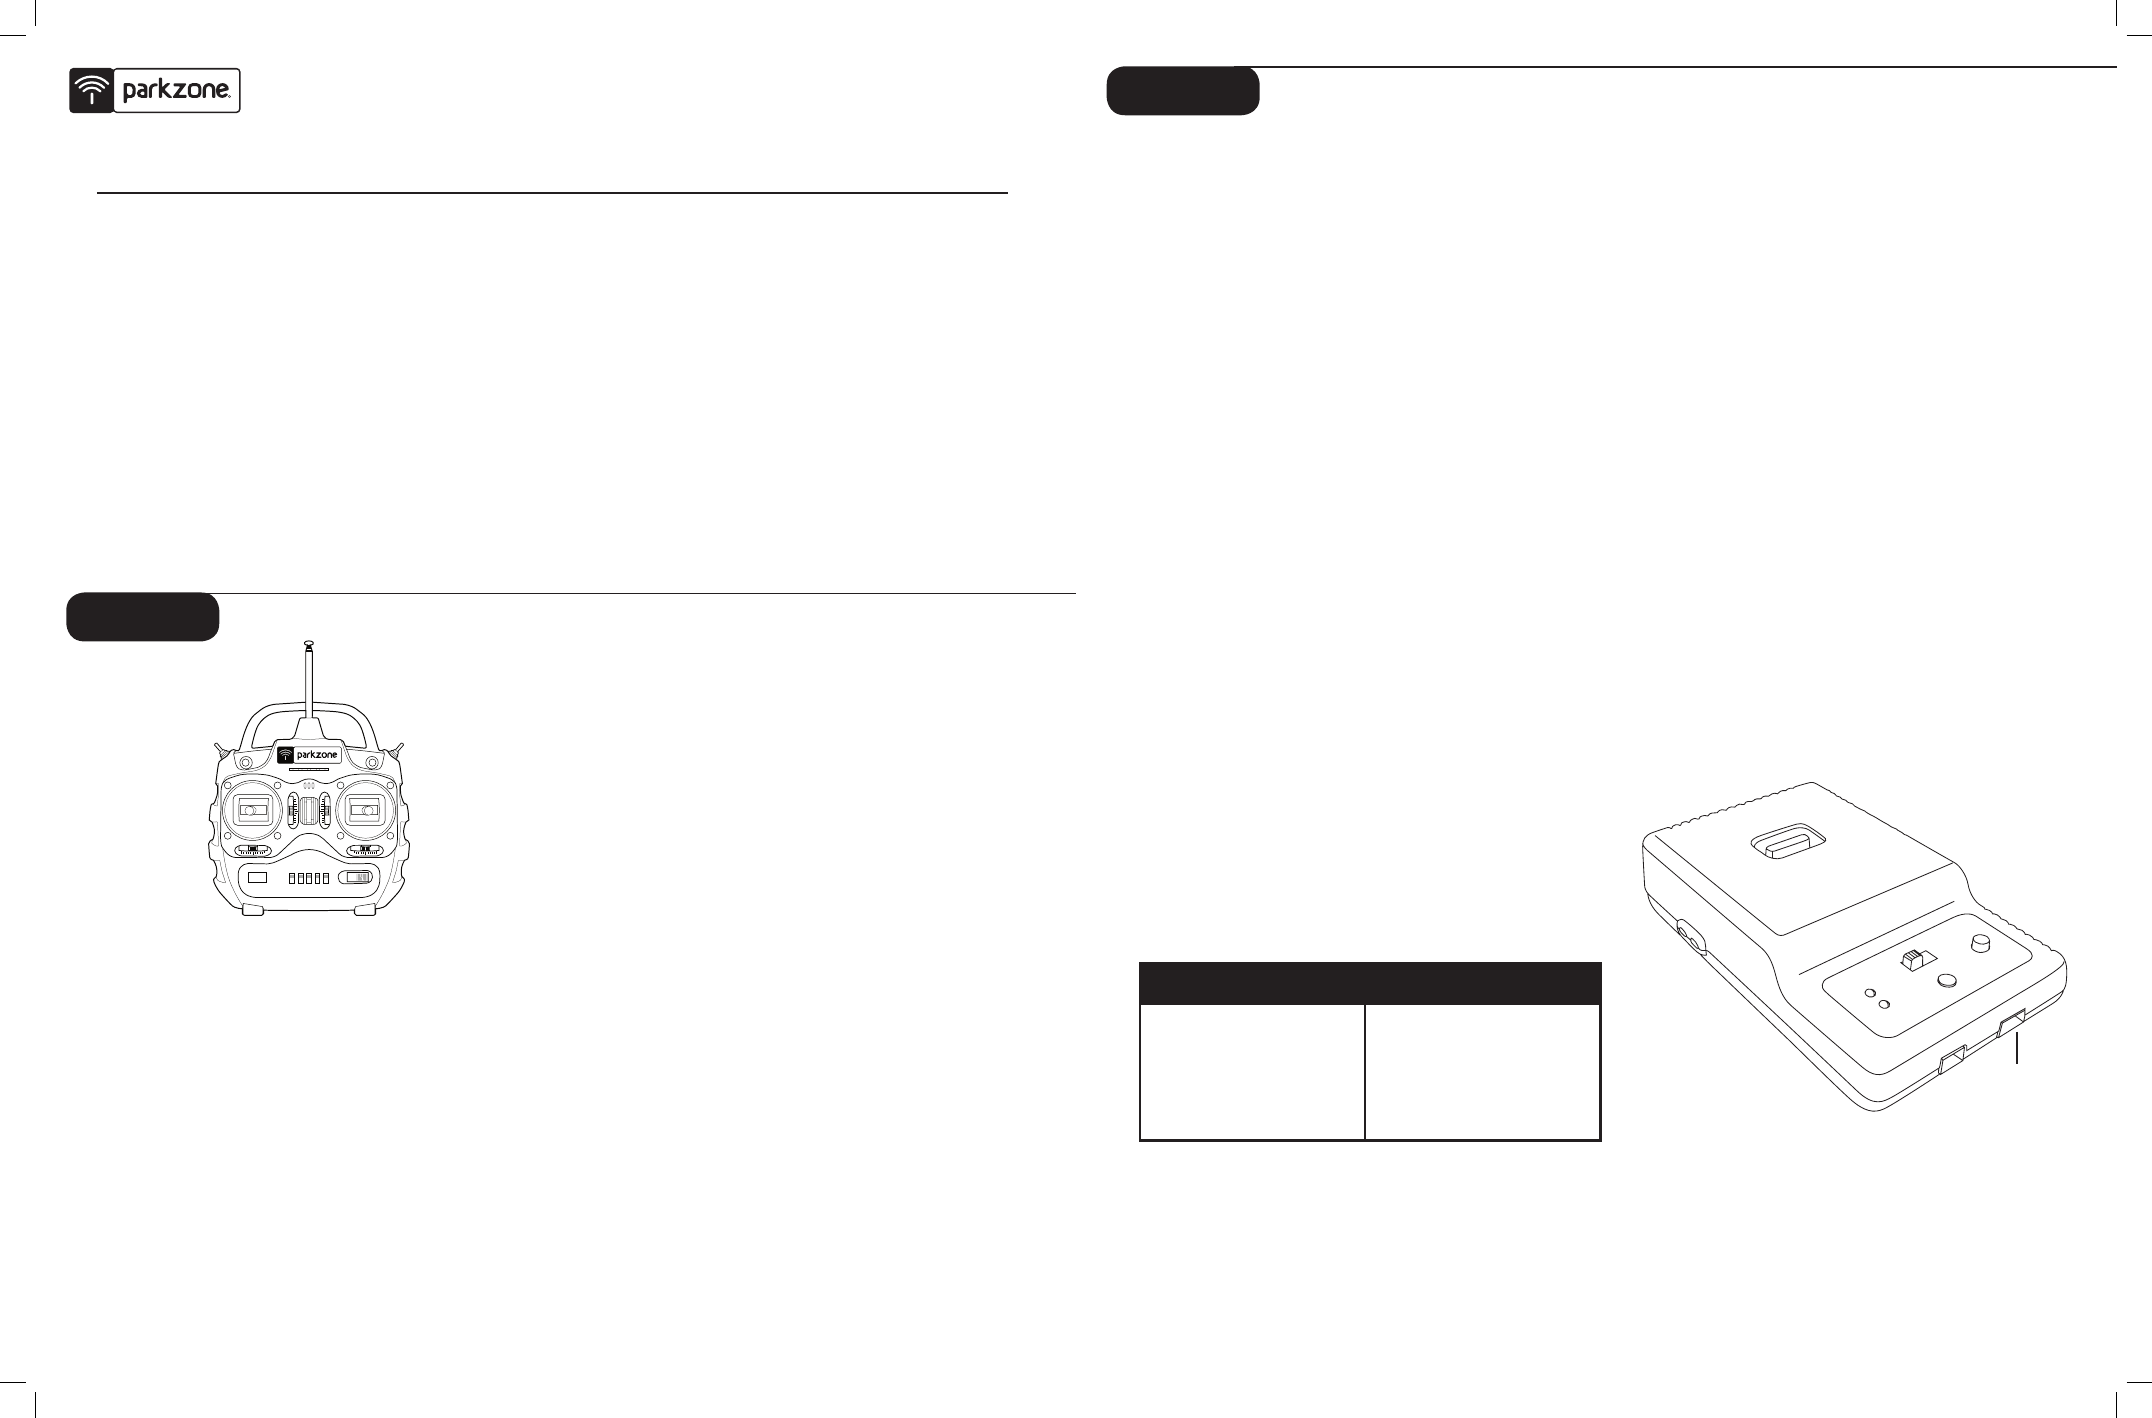
Step 1
Your F-27C Stryker comes with a fully proportional, 4-Channel,
72MHz FM radio system. Your F-27C Stryker also features industry
standard 3-wire servos, making the radio system usable in other
small electric aircraft. The servo-reversing feature of the transmitter
also makes the system ideal to use in another park flyer application.
Always make certain the various switches are set correctly for your
application prior to each flight.
Transmitter Features:
• Fully proportional, 4-Channel, 72MHz FM radio system
• Dual rate switch (high and low rates)
• Proportional trim adjustment
• LED battery voltage regulators
• Neck strap holder
• Charge jack for use with optional
rechargeable transmitter batteries
• Servo reversing option
• Comfortable ergonomic case design
Step 2
2
Your F-27C Stryker comes with a DC balancing charger and 3S
Li-Po battery. You must charge the included Li-Po battery pack
with a Li-Po specific charger only (such as the included charger).
Never leave the battery and charger unattended during the charge
process. Failure to follow the instructions properly could result in
a fire. When charging, make certain the battery is on a heat-resis-
tant surface.
DC Li-Po Balancing Charger Features:
• Charges 2- to 3-cell lithium polymer battery packs
• Variable charge rates from 300mAh–2A
• Automatically detects incorrect cell count selection
• Simple single push-button operation
• LED charge status indicator
• LED cell balance indicator
• Audible beeper indicates power and charge status
• Cigarette lighter input cord
Specifications
• Input power: 12V DC, 3A
• Charges 2- to 3-cell Li-Po packs with minimum capacity of 300mAh
• Variable charge rates from 300mAh to 2 amps
3S 11.1V 2200mAh Li-Po Battery Pack
The ParkZone 3S Li-Po battery pack features a balancing lead
that allows you to more safely charge your battery pack when
used with the included ParkZone Li-Po balancing charger.
To Complete the Charging Process
1. Attach the input cord of the charger to the appropriate power
supply (12V automobile cigarette lighter), or use the HBZ6513
and attach to 12V AC power supply. Once your charger has
been correctly powered up, there will be an approximate 3-
second delay and then you will hear an audible “beep” and the
green (ready) LED will flash.
2. Refer to the chart below to select the appropriate charge rates:
Warning: Selecting a charge rate higher than 1 x battery capacity
may cause a fire!
3. Select the proper number of cells that you will be charging,
either 2 or 3 cells.
4. Locate the safety charge lead on the battery pack. The charge
lead of a 3-cell Li-Po battery will plug into the larger 4-pin port
on the bottom right of the charger. A 2-cell pack will need to
plug into the 3-pin port on bottom left of the charger. Once
the battery is properly plugged into the correct port, it will
beep 3 times if it is a 3-cell, and twice if it is a 2-cell pack.
Once this is done, you are ready to proceed to charge the
battery pack.
5. Push the start button to begin the charging process. Once this
is done, the charger will make an audible beep that matches
the cell count, and then the red (charge) LED will begin to
flash. Do not adjust the current once the charger has begun
to charge.
Note: At times, the green LED may also flash during the charging
process, indicating that the charger is balancing one or more of
the cells at the same time it is charging the battery pack. When
this is occurring, the red and greed LED’s will both be flashing. It
will not always be necessary for the cells to be balanced.
6. When the battery pack is fully charged, you will hear an audible
beep for about 3 seconds, and the green LED will be solid. The
LED will remain solid until the battery pack is unplugged from
the charger. Always unplug the battery from the charger imme-
diately upon completion. Failure to do so could cause a fire.
The stock setup for all of the servo reversing switches on the
transmitter is set for the following:
Throttle: Normal Elevator: Normal Aileron: Reverse
Rudder: Either
Mix: Reverse
The following statement applies only to the receiver that is
sold in the USA:
This device complies with part 15 of the FCC rules. Operation
is subject to the following two conditions:
1. This device may not cause harmful interference; and
2. This device must accept any interference received, including
interference that may cause undesirable operation.
Changes or modifications not expressly approved by the party
responsible for compliance could void the user’s authority to
operate the equipment.
To Test the Transmitter:
1. Insert the 8 AA batteries that are included into the transmitter.
2. Turn the switch on to ensure that the batteries have been
installed correctly. The LED’s on the transmitter should
glow brightly.
If during operation the transmitter makes a repeated “beep”
sound, it is your warning that it is time to replace the transmitter
batteries, and you should land your plane immediately.
300–400mAh
300mAh
500–1000mAh
500mAh
1000–1500mAh
1A
1500–2000mAh
1.5A
2000mAh +
2.0A
BATTERY CAPACITY
MAX. CHARGE RATE
TRANSMITTER
CHARGING THE AIRCRAFT BATTERY
3S Port