Hanna Instruments HI 98129 User Manual
Page 2
Taking measurements
Select either EC or TDS mode with the
SET/HOLD button.
Submerge the probe in the solution to be tested. Use plastic
beakers to minimize any electromagnetic interferences.
The measurements should be taken when the stability symbol
on the top left of the LCD disappears.
The EC (or TDS) value automatically
compensated for temperature is shown
on the primary LCD while the secondary
LCD shows the temperature of the sample.
pH ELECTRODE MAINTENANCE
• When not in use, rinse the electrode with water to minimize
contamination and store it with a few drops of storage
(
HI 70300) solution in the protective cap after use. DO
NOT USE DISTILLED OR DEIONIZED WATER FOR STORAGE
PURPOSES.
• If the electrode has been left dry, soak in storage solution for
at least one hour to reactivate it.
• To prolong the life of the pH electrode, it is recommended to
clean it monthly by immersing it in the
HI 7061 cleaning
solution for half an hour. Afterwards, rinse it thoroughly with
tap water and recalibrate the meter.
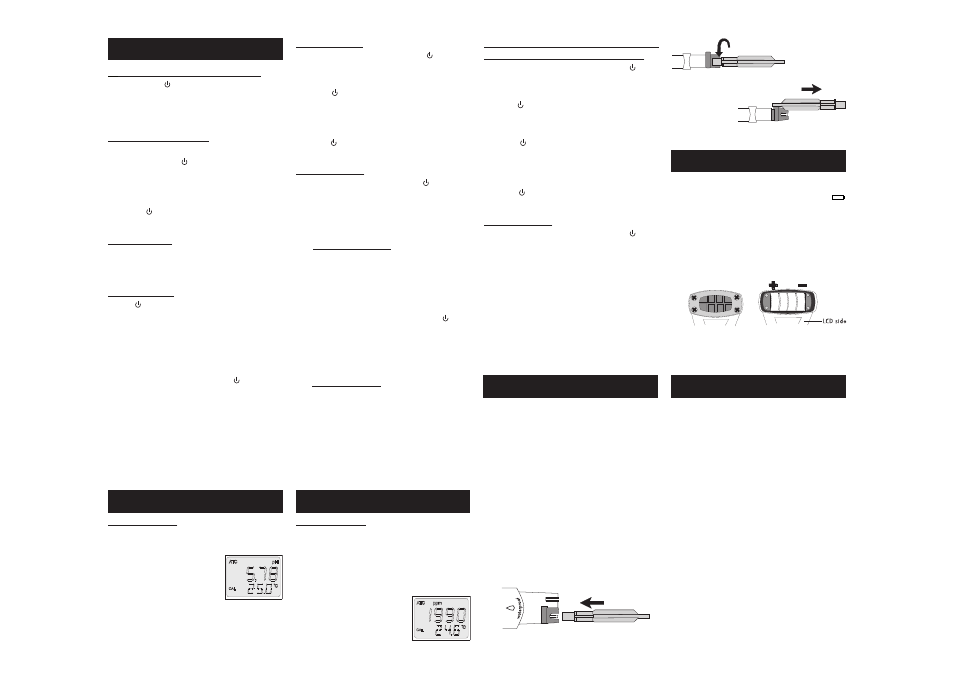
• The pH electrode can be easily replaced by using the supplied
tool (
HI 73128). Insert the tool into the electrode cavity as
shown below.
• Rotate the electrode counterclockwise.
Calibration buffer set
• From measurement mode, press and hold
/MODE until
“
TEMP” and the current temperature unit are displayed on
the lower LCD (E.g. “
TEMP °C”).
• Press the
/MODE button again to show the current buffer
set: pH 7.01 BUFF (for pH 4.01/7.01/10.01) or pH 6.86
BUFF (for NIST set, pH 4.01/6.86/9.18).
• Press the
SET/HOLD button to change the buffer value.
• Press the
/MODE button to return to the normal measuring
mode.
Calibration procedure
From measurement mode, press and hold the
/MODE button
until “
CAL” is displayed on the lower LCD. Release the button.
The LCD will display “
pH 7.01 USE” or “pH 6.86 USE” (if
you have selected the NIST buffer set). The “
CAL” tag blinks
on the LCD.
For a single-point pH calibration, place the electrode in any
buffer from the selected buffer set (eg. pH 7.01 or pH 4.01 or
pH 10.01). The meter will recognize the buffer value automatically.
If using pH 4.01 or pH 10.01, the meter will display “
OK” for
1 second and then return to the normal measuring mode.
If using pH 7.01, after recognition of the buffer the meter will
ask for pH 4.01 as second calibration point. Press the
/MODE
button to return to measurement mode or, if desired, proceed
with the 2-point calibration as explained below.
Note: It is always recommended to carry out a two-point
calibration for better accuracy.
For a two-point pH calibration, place the electrode in pH 7.01
(or 6.86 if you have selected the NIST buffer set). The meter
will recognize the buffer value and then display “
pH 4.01 USE”.
Rinse the electrode thoroughly to eliminate cross-contamination.
Place the electrode in the second buffer value (pH 4.01 or
10.01, or, if using NIST, pH 4.01 or 9.18). When the second
buffer is recognized, the LCD will display “
OK” for 1 second and
the meter will return to the normal measuring mode.
The “
CAL” symbol on the LCD means that the meter is calibrated.
OPERATIONAL GUIDE
ACCESSORIES
pH MEASUREMENTS & CALIBRATION
EC/TDS MEASUREMENTS & CALIBRATION
To change the EC/TDS conversion factor (CONV) and
the temperature compensation coefficient b (BETA)
• From measurement mode, press and hold the
/MODE
button until “
TEMP” and the current temperature unit are
displayed on the lower LCD. Eg. “
TEMP °C”.
• Press the
/MODE button again to show the current conversion
factor. Eg. “
0.50 CONV”.
• Press the
SET/HOLD button to change the conversion factor.
• Press the
/MODE button to show the current temperature
compensation coefficient b. Eg. “
2.1 BETA”.
• Press the
SET/HOLD button to change the temperature
compensation coefficient b.
• Press the
/MODE button to return to the normal measuring
mode.
Calibration procedure
• From measurement mode, press and hold the
/MODE
button until “
CAL” is displayed on the lower LCD.
• Release the button and immerse the probe in the proper
calibration solution:
HI 7031 (1413 µS/cm) for HI 98129
and
HI 7030 (12.88 mS/cm) for HI 98130.
• Once the calibration has been automatically performed, the
LCD will display “
OK” for 1 second and the meter will return
to normal measurement mode.
• Since there is a known relathionship between EC and TDS
readings, it is not necessary to calibrate the meter in TDS
The “
CAL” symbol on the LCD means that the meter is
calibrated.
• Pull the electrode out by using the other side of the tool.
• Insert a new pH electrode following the above instructions in
reverse order.
BATTERY REPLACEMENT
The meter displays the remaining battery percentage every time
it is switched on. When the battery level is below 5%, the
- +
symbol on the bottom left of the LCD lights up to indicate a low
battery condition. The batteries should be replaced soon. If the
battery level is low enough to cause erroneous readings, the meter
shows “
0%” and the Battery Error Prevention System (BEPS) will
automatically turn the meter off.
To change the batteries, remove the 4 screws located on the top of
the meter.
Once the top has been removed, carefully replace the 4 batteries
located in the compartment while paying attention to their polarity.
Replace the top, making sure that the gasket is properly seated in
place, and tighten the screws to ensure a watertight seal.
HI 73127
Replaceable pH electrode
HI 73128
Electrode removal tool
HI 70004P pH 4.01 solution, 20 mL sachet (25 pcs.)
HI 70006P pH 6.86 solution, 20 mL sachet (25 pcs.)
HI 70007P pH 7.01 solution, 20 mL sachet (25 pcs.)
HI 70009P pH 9.18 solution, 20 mL sachet (25 pcs.)
HI 70010P pH 10.01 solution, 20 mL sachet (25 pcs.)
HI 77400P pH 4 & 7 solutions, 20 mL sachet (5 each)
HI 7004M
pH 4.01 solution, 230 mL bottle
HI 7006M
pH 6.86 solution, 230 mL bottle
HI 7007M
pH 7.01 solution, 230 mL bottle
HI 7009M
pH 9.18 solution, 230 mL bottle
HI 7010M
pH 10.01 solution, 230 mL bottle
HI 70030P 12.88 mS/cm solution, 20 mL (25 pcs.)
HI 70031P 1413 µS/cm solution, 20 mL (25 pcs.)
HI 70032P 1382 ppm solution, 20 mL (25 pcs.)
HI 70038P 6.44 ppt solution, 20 mL (25 pcs.)
HI 70442P 1500 ppm solution, 20 mL (25 pcs.)
HI 7061M
Electrode cleaning solution, 230 mL bottle
HI 70300M Electrode storage solution, 230 mL bottle
To
turn the meter on and to check battery status
Press and hold the
/MODE button for 2-3 seconds. All the
used segments on the LCD will be visible for a few seconds,
followed by a percent indication of the remaining battery life
(Eg. “
% 100 BATT”).
To change the temperature unit
To change the temperature unit (from °C to °F), from measurement
mode, press and hold the
/MODE button until “TEMP” and
the current temperature unit are displayed on the lower LCD (E.g.
“
TEMP °C”).
Use the
SET/HOLD button to change the temperature unit, and
then press the
/MODE button twice to return to normal measuring
mode.
To freeze the display
Press the
SET/HOLD button for 2-3 seconds until “HOLD”
appears on the secondary display.
Press any button to return to normal mode.
To turn the meter off
Press the
/MODE button while in normal measurement mode.
“
OFF” will appear on the lower part of the display. Release the
button.
Notes:
• Before taking any measurement make sure the meter has
been calibrated.
• To clear a previous calibration, press the
/MODE button
after entering the calibration mode. The lower LCD will display
“
ESC” for 1 second and the meter will return to normal
measurement mode. The “
CAL” symbol on the LCD will
disappear. The meter will be reset to the default calibration.
• If measurements are taken in different samples successively,
rinse the probe thoroughly to eliminate cross-contamination;
and after cleaning, rinse the probe with some of the sample
to be measured.
Taking measurements
Select the pH mode with the
SET/HOLD button.
Submerge the electrode in the solution to be tested.
The measurements should be taken
when the stability symbol on the
top left of the LCD disappears.
The pH value automatically compensated for temperature is
shown on the primary LCD while the secondary LCD shows the
temperature of the sample.