Hanna Instruments HI 95706 User Manual
Page 5
5
Range
0.0 to 15.0 mg/L
Resolution
0.1 mg/L
Precision
±0.2 mg/L @ 6.0 mg/L
Typical EMC Deviation
±0.2 mg/L
Light Source
Tungsten lamp with narrow band interference filter @ 525 nm
Light Detector
Silicon Photocell
Method
Amino Acid Method, adapted from Standard Method for the Examination
of Water and Wastewater
. The reaction between phosphorus and the
reagents causes a blue tint in the sample.
Environment
0 to 50°C (32 to 122°F); max 95% RH non-condensing
Battery Type
1 x 9 volt
Auto-Shut off
After 10' of non-use in measurement mode;
after 1 hour of non-use in calibration mode.
Dimensions
180 x 83 x 46 mm (7.1 x 3.3 x 1.8")
Weight
290 g (10 oz.).
REQUIRED REAGENTS
Code
Description
Quantity/test
HI 93706A-0
Phosphorus Reagent A
10 drops
HI 93706B-0
Phosphorus Reagent B
1 packet
Precision is how closely repeated measurements
agree with each other. Precision is usually
expressed as standard deviation (SD).
Accuracy is defined as the nearness of a test
result to the true value.
Although good precision suggests good accuracy,
precise results can be inaccurate. The figure
explains these definitions.
In a laboratory using a standard solution of 6.00
mg/L phosphorus and a representative lot of
reagents, an operator obtained with a single
instrument a standard deviation of 0.2 mg/L.
SPECIFICATIONS
PRECISION AND ACCURACY
16
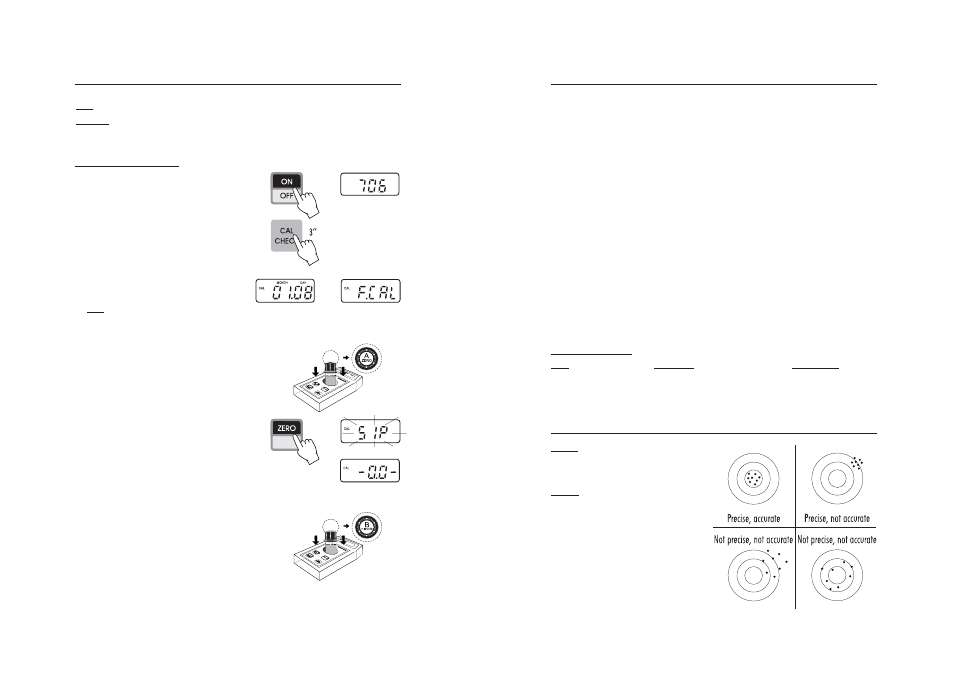
CALIBRATION PROCEDURE
• Turn the meter on by pressing ON/OFF.
• When the LCD displays “706”, it is ready.
• Enter the calibration mode by holding CAL CHECK
for three seconds
.
• The date of the last calibration appears (e.g.:
month “01”, day “08”). “F.CAL” means that
the factory calibration is selected.
Note: at this point it is possible to reset the
instrument to restore FACTORY CALIBRATION,
see instructions page 18.
• Place the CAL CHECK™ Standard Cuvet A into
the holder and ensure that the notch on the cap is
positioned securely into the groove.
• Press ZERO and “SIP” will blink on the display.
• After a few seconds the display will show “-0.0-”.
The meter is now zeroed and ready for calibration.
• Remove the cuvet.
• Place the CAL CHECK™ Standard HI 95706-11
Cuvet B into the holder and ensure that the
notch on the cap is positioned securely into the
groove.
Note: it is possible to interrupt calibration procedure at any time by pressing ON/OFF.
Warning: do not validate or calibrate the instrument with standard solutions other than the
HANNA
CAL CHECK™ Standards, otherwise erroneous results will be obtained.
or
CALIBRATION PROCEDURE