Hanna Instruments HI 96747 User Manual
Copper low range ism
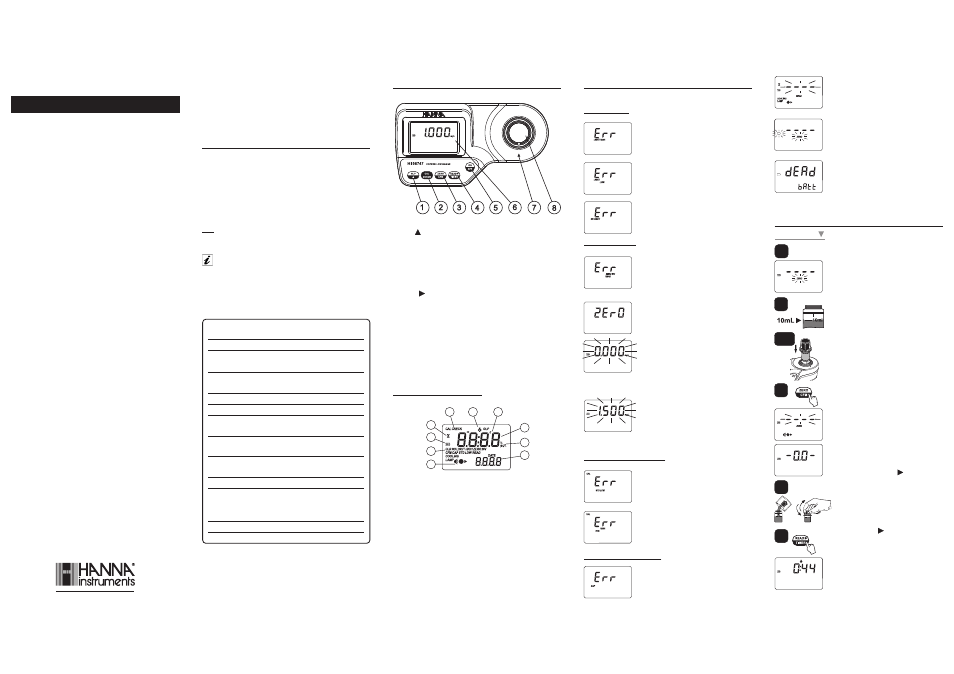
DISPLAY ELEMENTS DESCRIPTION:
1. The measuring scheme (lamp, cuvette, detector), appears during
different phases of zero or reading measurement
2. Error messages and warnings
3. The battery icon shows the charging level of the battery
4. The hourglass appears when an interval checking is in progress
5. Status messages
6. The chronometer appears when the reaction timer is running
7. The month, day and date icons appear when a date is displayed
8. Four digit main display
9. Measuring units
10. Four digit secondary display
10
8
5
2
9
7
3
4
6
1
Range
0.000 to 1.500 mg/L
Resolution
0.001 mg/L for
measurement
0.01 mg/L for
calibration and validation
Accuracy
±0.010mg/L ±5% of reading
@ 25°C
Typical EMC Deviation
±0.001 mg/L
Light Source
Tungsten lamp
Light Detector
Silicon Photocell with narrow band
interference filter @ 560 nm
Method
Adaptation of the USEPA approved
bicinchoninate method.
Environment
0 to 50°C (32 to 122°F);
max 95% RH non-condensing.
Battery Type
1 x 9 volt
Auto-Shut off
After 10' of non-use in
measurement mode;
after 1 hour of non-use in
calibration mode;
with last reading reminder.
Dimensions
192 x 102 x 67 mm (7.6 x 4 x 2.6")
Weight
290 g (10 oz.).
INSTRUCTION MANUAL
HI 96747
HI 96747
HI 96747
HI 96747
HI 96747
Preliminary examination
Please examine this product carefully. Make sure that the instrument is
not damaged. If any damage occurred during shipment, please notify
your Dealer.
Each HI 96747 Ion Selective Meter is supplied complete with:
• Two Sample Cuvettes and Caps
• 9V Battery
• Instruction Manual
Note:
Save all packing material until you are sure that the instrument
works correctly. Any defective item must be returned in its original
packing.
For more details about spare parts and
accessories see “Accessories”
Dear Customer,
Thank you for choosing a Hanna product. This manual will provide you
with the necessary information for the correct use of the instrument. Please
read it carefully before using the meter. If you need additional technical
information, do not hesitate to e-mail us at [email protected].
Functional description
Errors and warnings
Copper Low Range ISM
Technical specifications:
1. GLP/ key: press to enter
GLP mode. In calibration mode press to
edit the date and time.
2. CAL CHECK key: press to perform the validation of the meter, or
press and hold for three seconds to enter
calibration mode.
3. ZERO/CFM key: press to zero the meter prior to measurement, to
confirm edited values or to confirm factory calibration restore.
4. READ/ /TIMER key: In
measurement mode, press to make a
measurement, or press and hold for three seconds to start a pre-
programmed countdown prior to measurement. In
GLP mode press to
view the next screen.
5. ON/OFF : to turn the meter on and off.
6. Liquid Crystal Display (LCD)
7. Cuvette alignment indicator
8. Cuvette holder
Light High:
There is too much light to perform
a measurement. Please check the preparation of
the zero cuvette.
Light Low:
There is not enough light to perform
a measurement. Please check the preparation of
the zero cuvette.
No Light:
The instrument cannot adjust the
light level. Please check that the sample does
not contain any debris.
Inverted cuvettes:
The sample and the zero
cuvettes are inverted.
Zero:
A zero reading was not taken. Follow the
instructions of the measurement procedure for
zeroing the meter.
Under range:
A blinking “0.000” indicates
that the sample absorbs less light than the zero
reference. Check the procedure and make sure
you use the same cuvette for reference (zero)
and measurement.
Over Range:
A flashing value of the maximum
concentration indicates an over range condition.
The concentration of the sample is beyond the
programmed range: dilute the sample and re-
run the test.
Standard Low:
The standard reading is less
than expected.
Standard High:
The standard reading is higher
than expected.
ON ZERO READING:
ON SAMPLE READING:
DURING CALIBRATION PROCEDURE:
OTHER ERRORS AND WARNINGS:
Cap error:
Appears when external light enters
in the analysis cell. Assure that the cuvette cap
is present.
Cooling lamp:
The instrument waits for the
lamp to cool down.
Battery low:
The battery must be replaced
soon.
Dead battery:
This indicates that the battery
is dead and must be replaced. Once this
indication is displayed, the meter will lock up.
Change the battery and restart the meter.
Measurement
3
5-6
8-9
2
Measurement procedure
1• Turn the meter on by pressing ON/OFF.
2• When the beeper sounds briefly and the
LCD displays dashes, the meter is ready.
The blinking “ZERO” indicates that the
instrument needs to be zeroed first.
3• Fill the cuvette with 10 mL of unreacted
sample, up to the mark, and replace the
cap.
4• Place the cuvette into the cuvette holder
and ensure that the notch on the cap is
positioned securely into the groove.
5• Press ZERO/CFM and the lamp, cuvette
and detector icons will appear on the display,
depending on the measurement phase.
6• After a few seconds the display will show
“-0.0-”
. The meter is now zeroed and
ready for measurement.
7• Remove the cuvette.
8• Add the content of one packet of HI
95747-0
Copper Low Range reagent.
9• Replace the cap and shake gently for 15
seconds.
10•Replace the cuvette into the cuvette
holder and ensure that the notch on the
cap is positioned securely into the groove.
11•Press and hold READ/
READ/
READ/
READ/
READ/ /TIMER
/TIMER
/TIMER
/TIMER
/TIMER
for three
seconds.
The display will show the
countdown prior to measurement. The
beeper is playing a beep at the end of
countdown period.
Alternatively, wait for 45 seconds and just
press READ/
READ/
READ/
READ/
READ/ /TIMER
/TIMER
/TIMER
/TIMER
/TIMER.
In both cases, the lamp, cuvette and
detector icons will appear on the display,
depending on the measurement phase.
12•The instrument directly displays concentration
in mg/L of copper on the LCD.
4, 10
11
w w w . h a n n a i n s t . c o m