Hanna Instruments HI 8314 User Manual
Page 2
OPERATIONAL GUIDE
IST8314Z 08/12
INITIAL PREPARATION
The meter is supplied complete with a 9V battery. Remove the
battery compartment cover on the back of the meter, install the
battery while paying attention to its polarity.
Always remove the electrode protective cap before taking any
measurements. If the electrode has been left dry, soak the tip in
HI 70300 storage solution for half an hour to reactivate it.
Connect the pH electrode to the DIN connector on the top of the
instrument.
Turn the meter ON by pressing the
ON/OFF key.
The instrument will display all used tags for
few seconds followed by the battery percentage.
TAKING pH MEASUREMENTS
To take a pH measurement simply submerge
the electrode tip (at least 4 cm / 1½") into
the sample to be tested.
Select the pH mode. Shake briefly and wait
a couple of minutes for the reading to
stabilize. The display will show the pH value
automatically compensated for temperature
variations.
In order to take accurate pH measurements,
make sure that the instrument has been calibrated for pH before use.
If measurements are taken in different samples successively, it is
recommended to rinse the electrode thoroughly to avoid
cross-contamination. After cleaning, rinse the electrode with some
of the sample to be measured.
TAKING ORP MEASUREMENTS
Connect the ORP electrode to the DIN
connector on the top of the meter.
To enter the "mV" mode (ORP, Oxidation
Reduction Potential) turn the instrument
ON and press the
mV key.
To take the mV measurement of a sample submerge the ORP
electrode tip (at least 4 cm / 1½") into the solution to be tested.
Wait a few minutes for the reading to stabilize.
TAKING TEMPERATURE MEASUREMENTS
Turn the instrument ON, press the
TEMP key
and allow the reading to stabilize. To select
temperature unit press
TEMP key while in
temperature mode.
Note: If the reading is out of the specific range the range limit
is displayed blinking.
For greatest accuracy, frequent calibration of the instrument is
recommended. The instrument should be recalibrated for pH:
a) whenever the pH electrode is replaced
b) at least once a month
c) after testing aggressive chemicals
d) where extreme accuracy is required
PREPARATION
Pour small quantities of pH7.01 (
HI 7007) and pH4.01
(
HI 7004) buffer solutions into two clean beakers.
For accurate calibration use two beakers for each buffer solution,
the first one for rinsing the tip of the electrode, the second one for
calibration. In this way contamination of the buffers is minimized.
To obtain accurate readings, use pH7.01 (
HI 7007) and pH4.01
(
HI 7004) buffers if you are going to measure acidic samples, or
pH7.01 (
HI 7007) and pH10.01 (HI 7010) for alkaline
measurements.
If you need to calibrate the meter to NIST standards, use
pH6.86 (
HI 7006) instead of pH7.01 and pH9.18 (HI 7009)
instead of pH10.01.
PROCEDURE
• Connect the pH electrode and switch the meter ON.
• Remove the protective cap from the electrode, rinse the tip
with some pH7.01 solution, then immerse the electrode into
a pH7.01 buffer solution; stir gently and wait a couple of
minutes for thermal equilibrium to be reached.
Note: The electrode should be submerged approximately 4 cm
(1½") into the solution.
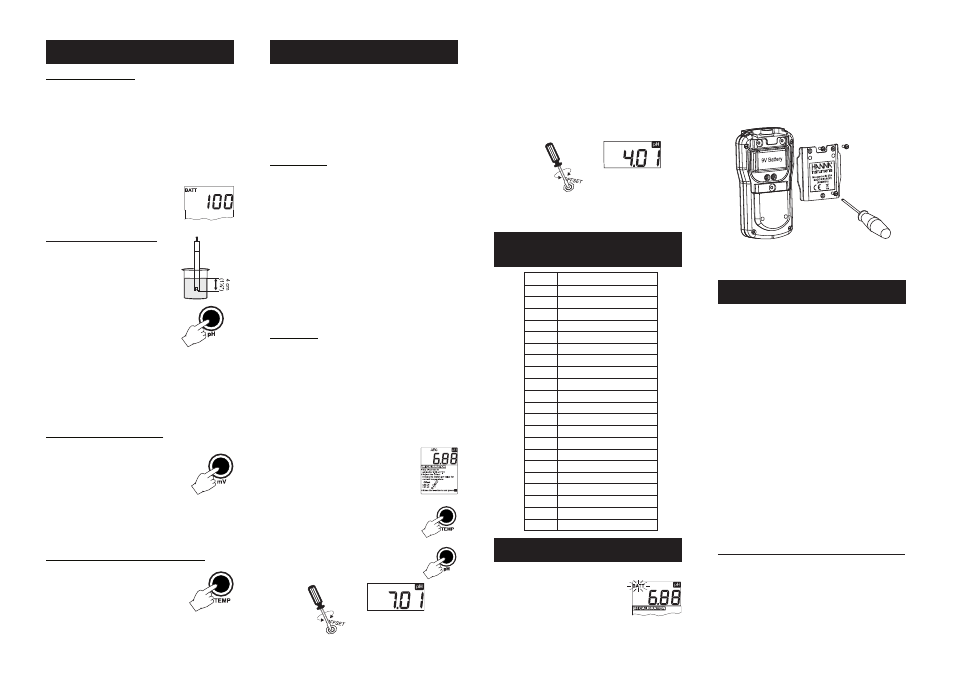
• Press
CAL. The calibration buffer is automatically recognized
and the corresponding help menu for offset /
slope calibration is displayed.
• Press the
TEMP key to read the temperature
of the buffer.
• Press the
pH key to read pH values. Stir
gently and wait for a couple of minutes.
• In 7.01/6.86 pH adjust the OFFSET trimmer
on the lower left of the front panel until LCD
shows the pH value at the noted temperature.
pH CALIBRATION
BATTERY REPLACEMENT
ACCESSORIES
HI 1217D
Double junction, gel filled pH-electrode with built-
in temperature sensor, DIN connector and 1 m
(3.3’) cable
HI 3618D
Platinum ORP-electrode with built-in temperature
sensor, DIN connector and 1 m (3.3’) cable
HI 4619D
Gold ORP-electrode with built-in temperature sensor,
DIN connector and 1 m (3.3’) cable
HI 7004M
pH 4.01 buffer solution, 230 mL bottle
HI 7007M
pH 7.01 buffer solution, 230 mL bottle
HI 7010M
pH 10.01 buffer solution, 230 mL bottle
HI 70300M Storage solution, 230 mL bottle
HI 7061M
General cleaning solution, 230 mL bottle
HI 7091M
Reducing pretreatment solution, 230 mL bottle
HI 7092M
Oxidizing pretreatment solution, 230 mL bottle
HI 731326 Calibration screwdriver (20 pcs)
HI 76405
Electrode holder
pH BUFFER VALUES
AT VARIOUS TEMPERATURES
This meter is powered by a 9V alkaline battery.
When ‘’
BATT’’ tag is displayed blinking
a low battery condition is indicated.
When the low battery indication appears,
only a few hours of working time are left.
It is recommended to replace the battery.
When the battery level is too low to ensure reliable measurements,
the meter turns off. It is recommended to replace the battery
immediately. Battery replacement must only take place in a
nonhazardous area using a 9V alkaline battery.
Unscrew the three screws on the rear of the meter, remove the
battery compartment cover and replace the 9V battery with a
new one, while observing the correct polarity.
Make sure the battery contacts are tight and secure before
replacing the cover.
0
5
10
15
20
25
30
35
40
45
50
55
60
65
70
75
80
85
90
95
7.13
7.10
7.07
7.04
7.03
7.01
7.00
6.99
6.98
6.98
6.98
6.98
6.98
6.99
6.99
7.00
7.01
7.02
7.03
7.04
10.32
10.24
10.18
10.12
10.06
10.01
9.96
9.92
9.88
9.85
9.82
9.79
9.77
9.76
9.75
9.74
9.73
9.74
9.75
9.76
TEMP pH VALUES
°C 4.01 7.01 10.01
4.01
4.00
4.00
4.00
4.00
4.01
4.02
4.03
4.04
4.05
4.06
4.07
4.09
4.11
4.12
4.14
4.16
4.17
4.19
4.20
• Press
pH.
• Rinse and immerse the pH electrode in pH4.01 or pH10.01
buffer (2
nd
calibration point) and stir gently.
• Press TEMP to read buffer temperature.
• Press pH to display pH reading.
• Wait a couple of minutes and adjust the SLOPE trimmer on
the lower right of the front panel until the LCD shows the pH
value at the noted temperature.
• Press
CAL.
The pH calibration is now complete.
Recommendations for Users
Before using this product, make sure that it is entirely suitable for your specific application
and for the environment in which it is used. Operation of this instrument may cause
unacceptable interferences to other electronic equipment, this requiring the operator to take
all necessary steps to correct interferences. Any variation introduced by the user to the
supplied equipment may degrade the instrument EMC performance. To avoid electrical shock,
do not use this instrument when voltage at the measurement surface exceeds 24 Vac or
60 Vdc. To avoid damages or burns, do not put the instrument in microwave ovens. For yours
and the instrument safety do not use or store the instrument in hazardous environments.