Important – EarthQuake W1265V User Manual
Page 24
Operator's Manual
Trail Warrior Quick Split 12-Ton Log Splitters
Check for parts online at www.getearthquake.com or call 800-345-6007 M-F 8-5
24
BaLL HITCH CONVERSION kIT
aSSEMBLy INSTRUCTIONS (SEE FIGURE 31)
1. Remove the pin style hitch assembly that came mounted to
the tongue of your log splitter.
2. Slide Adapter Tube onto the log splitter tongue until both
holes in the Adapter Tube align with the two matching holes
in the tongue. (See illustration on parts explosion, page 30).
3. Place 2" Ball Hitch Coupler onto the Adapter Tube so that both
mounting holes in the 2" Ball Hitch Coupler align with the two
matching holes in the Adapter Tube.
4. Secure all parts to the tongue with included two bolts, two flat
washers, two split lock washers, and two nuts. Tighten nuts onto
the bolts securely.
WARNING: DO NOT EXCEED 100 LB. AS THE MAXIMUM TONGUE
WEIGHT ON THIS LOG SpLITTER.
NOTE: THE W1265V LOG SpLITTER IS DESIGNED FOR OFF-ROAD
TOWING USE ONLY. DO NOT EXCEED 15 MpH.
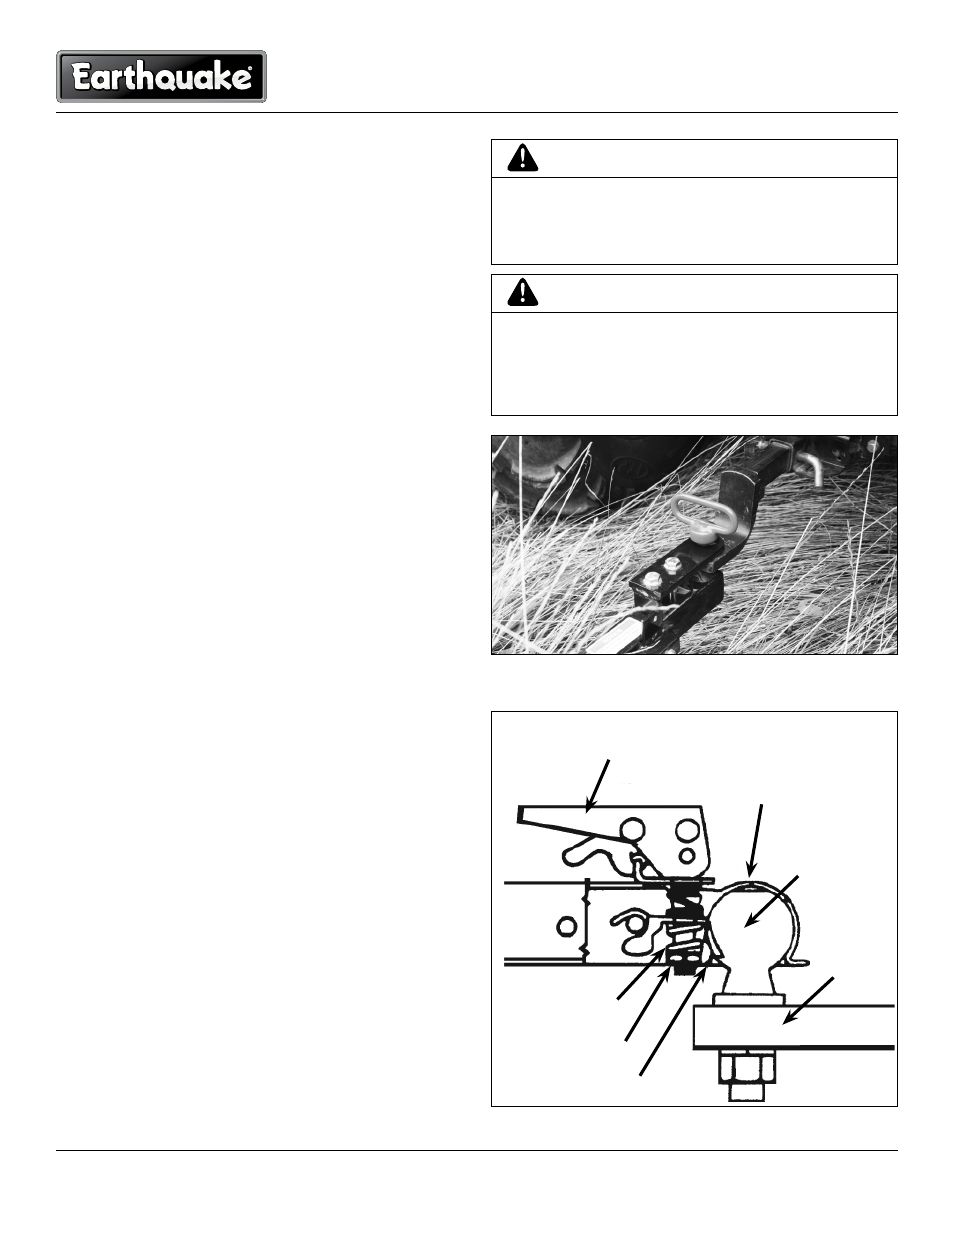
BaLL HITCH CONVERSION kIT OPERaTION
(SEE FIGURE 32)
1. Before using, adjust coupler locking pressure on ball. Put
handle in locked position with ball in coupler. Tighten locknut
against tension spring so that coupler is firmly on ball. The
proper adjustment allows handle to be released with moder-
ate pressure.
2. Pull up on coupler handle to open and place coupler over
ball. When ball is seated in ball socket, pull back on handle
to locked position.
3. Always check for tightness before towing and make sure
handle is in locked position.
NOTE: Hitch coupler is only to be used on a 2-inch ball hitch.
Do not use on a ball that is smaller than two (2) inches.
Figure 32: Ball hitch conversion kit
Figure 31: Pin style hitch illustration. NOTE: Use a hitch pin designed to
be used with your ATV or garden tractor.
OPERaTING THE SPLITTER (U.S. MODELS):
1. Set up the log splitter on a clear, level area and block the
wheels.
2. Place a log on the beam against the wedge. Make sure that
the log is placed securely on the wedge and against the beam.
3. Depress the control valve handle so that the cylinder will drive
the log into the wedge. Extend the cylinder until the log splits
or travels to the end of its stroke. If the log has not completely
split after the cylinder has reached the end of its extension,
retract the cylinder.
NOTE: For operation in wooded areas, obtain a spark ar-
restor for the exhaust system from the manufacturer of
your engine. See also the Warnings and Safety precautions
section of this manual.
handle locked position
handle locked position
ball
hitch
under jaw
locknut
tension spring
IMPORTaNT
LEaVING THE VaLVE IN THE “aCTUaTE” POSITION aT
THE END OF THE STROkE May DaMaGE THE PUMP.
aLWayS USE ExTRa CaRE WHEN SPLITTING LOGS WITH
ENDS NOT SQUaRE.
IMPORTaNT
TO ExTEND THE LIFE OF THE HyDRaULIC CyLINDER,
aVOID “BOTTOMING OUT” WEDGE PLaTE TO THE FOOT
PIECE. TO CONFORM WITH INDUSTRy SaFETy RECOM-
MENDaTIONS, THE WEDGE STOPS TWO INCHES FROM
THE END OF THE STROkE.