Reversing the door swing of your refrigerator, Note – Avanti 18EYC User Manual
Page 8
Attention! The text in this document has been recognized automatically. To view the original document, you can use the "Original mode".
REVERSING THE DOOR SWING OF YOUR REFRIGERATOR
This refrigerator has the capability of either opening the door from the left or
right side. This unit is delivered to you with the door opening from the left side.
Should you desire to reverse the opening direction, please follow these
instructions.
NOTE:
All parts removed must be saved to do the réinstallation of the door.
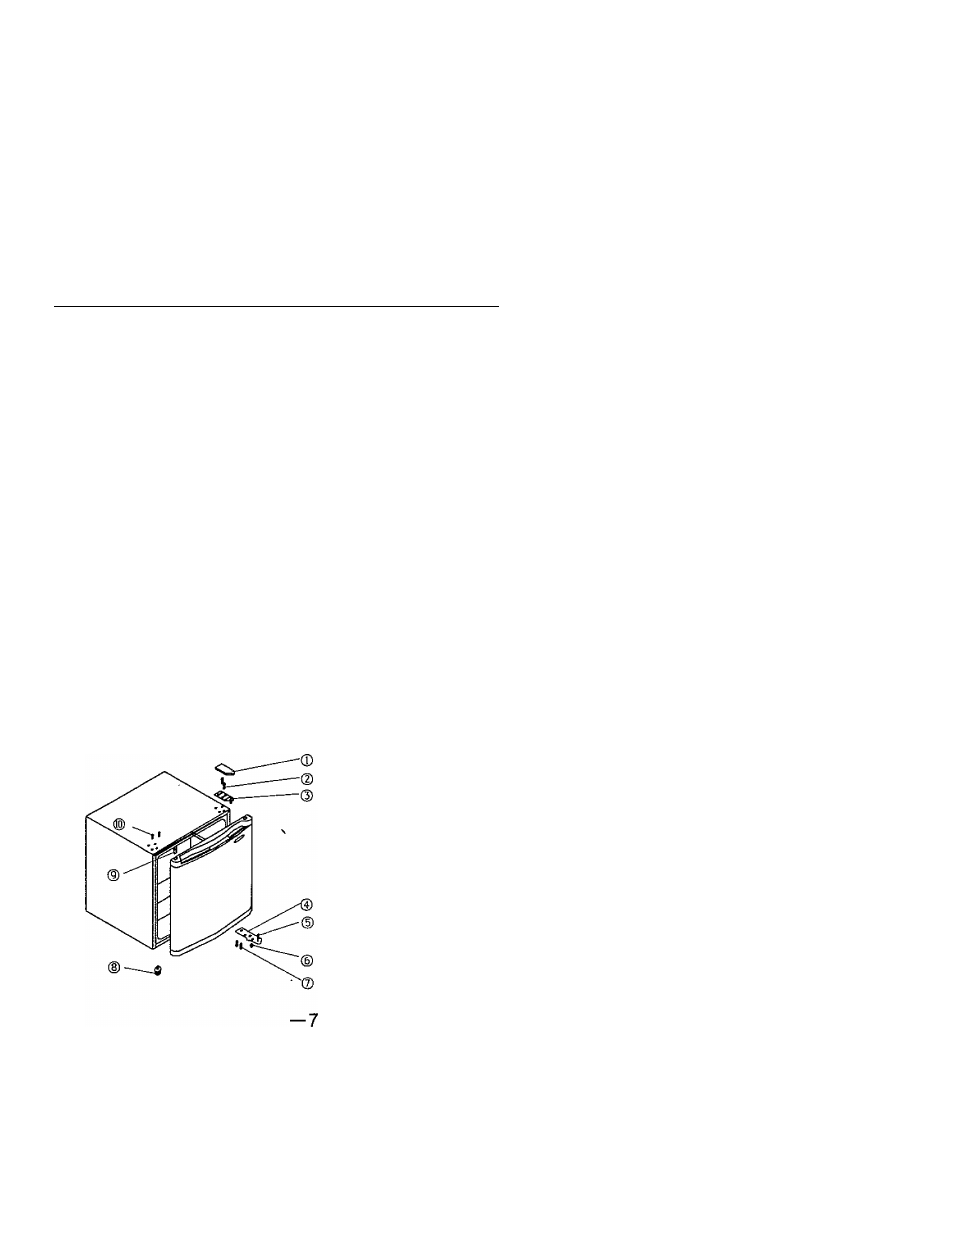
^ Reversal and Installation of the Refrigerator Door f18EYC/EYW)
• Remove the upper hinge cap (1).
• Using a sharp object, pry out the two plug buttons(10).
• Remove the two Phillips screws{2) that connect the upper hinge{3)
on the right side of the cabinet top.
• Carefully lift the door and place it on a padded surface to prevent it
from scratching. Remove the plug(9) and transfer it to the uncovered
hole at the right side. Be sure to press the button firmly into the hole.
• Remove the two bolts(7) that hold the lower hinge{4) on the right side.
• Remove the screw-type leveling front leg(8) and transfer it to the right
side as shown in the figure below.
• Secure the lower left hlnge(4) previously removed in step 5. Before
placing this lower hinge, remove the bo!t-pin(5) and screw-type short
ieg(6) and reverse the direction of the hinge.
• Insert the bolt-pin(5) and short leg(6) into the lower door hinge(4) in
the new position. Set the door into it's new place making sure the
pin enters the bushing at the lower frame section{hole).
• Secure the upper hinge{3) previously removed in step 3 on the left
side. Make sure the pin enters the bushing at the upper frame
section(hole).
• Loosely secure the lower left hinge(4) and do not tighten the bolts
until the door is in the closed position and leveled.
Insert the plug buttons(IO) on the uncovered ho!es(right side).
• Replace the upper hinge cap(1).
Figure 1
® Door Hinge Cap
(D Door hinge Screws
© Upper Door Hinge
@ Lower Door Hinge
© Bolt Pin
© Short Leg
©• Door Hinge Bolts
® Leveling Front Leg
© Hinge Plug(Door Frame)
(D Plugs