Multi-speed tach programming, Siren or horn timing, Supplementary information – Autostart Two-way 6-Button LCD Automatic Transmission Remote Starter with Full Alarm System User Manual
Page 3: Fifth relay output (2nd ign, acc or crank), Tach jumper settings, Multi-speed
Attention! The text in this document has been recognized automatically. To view the original document, you can use the "Original mode".
Multi-speed
Tach Programming
1. Flash the hood pin {see p.1) — the parking lights will stay on for up to 20 seconds.
2. Before the lights go out, press and hold the brake pedal and press the LOCK and UNLOCK buttons simultaneously—the
parking lights will flash 4 times, then the siren or horn will chirp 4 times. At that point, release the brake pedal.
3. Start up the engine and allow the vehicle to reach regular engine idle speed.
4. Once the engine is running idle, press the brake pedal and keep it down until you hear the parking lights output click 5 times
and the siren will chirp twice.
5. Release the brake pedal —^the tach programming is now complete.
The siren will chirp 1,23,3 times to indicate which tach mode has been detected.
Siren or Horn Timing
Follow these steps to program horn confirmation:
1. Ensure that the hood is up and that the ignition is off.
• Hold the hood pin down for 4 seconds.
• Release the hood pin. The parking lights will come on.
• While the parking lights are on, immediately push and release the hood pin again. — The parking lights will stay on for up to
20 seconds.
2. Press and hold the brake pedal, then simultaneously press the UNLOCK and START / STOP buttons — the horn will chirp 5
times.
3. Release the brake pedal.
4. To change the timing:
1.
To increase the Horn pulse by 3 ms, press the LOCK button.
2.
To decrease the pulse by 3 ms, press the UNLOCK button.
3.
To increase the pulse by 10 ms, press the START / STOP button.
4.
To decrease the pulse by 10 ms, press the TRUNK button.
5. To save the new settings: press LOCK and UNLOCK. If 3 chirps are returned the new settings have been saved.
Supplementary Information
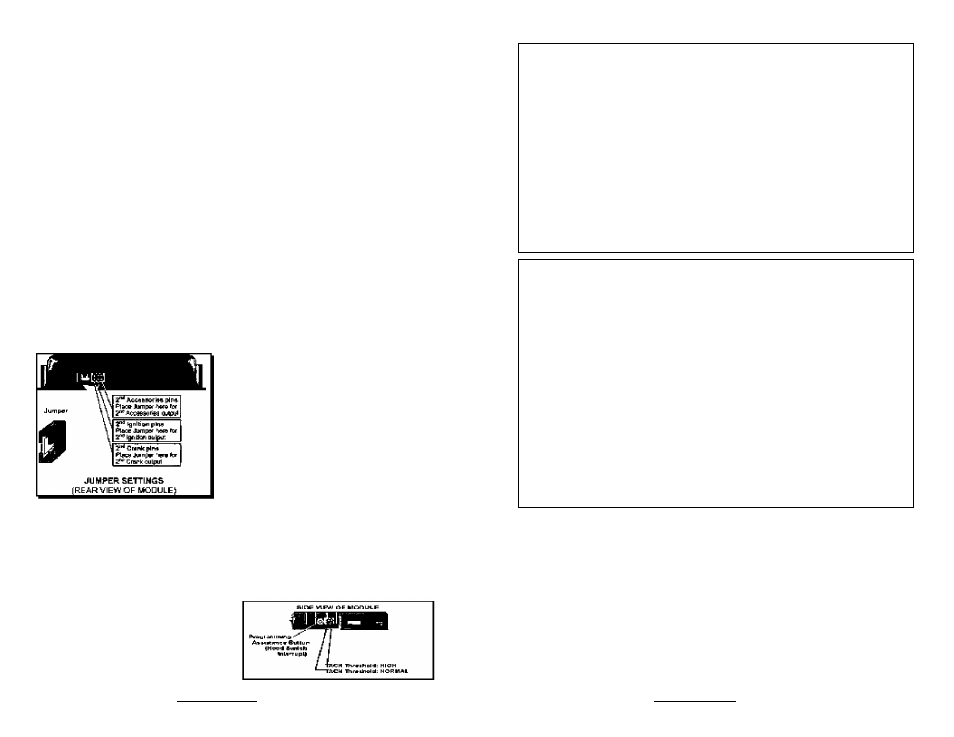
Fifth Relay Output (2nd IGN, ACC or CRANK)
Remote car starters of this series are equipped with an on-board
high-current programmable 5
th
relay that can be used to power a
second ignition, accessory or crank wire. The unit uses 3 sets of
pins; each set corresponds to a specific function of the output. In
order to activate one of the three possible functions, you must
place the jumper (supplied) on one of the three sets of pins and
connect the 14 AWG wire to the second IGN. / ACC. / CRANK
wire of the vehicle.
Caution!
Only one set of pins can be used at one time. Using more than one jumper may result in
serious damage to the vehicle. The relay output rating on this unit is 25 a at most. Defective
oem solenoid switches can sometimes draw up to 50 or 60 a, causing the 30 a fuse to
Tach jumper settings
Some new vehicles have a higher TACH voltage
threshold, which would fall out of the normal
TACH trigger circuit of the remote car starter.
Changing the jumper to TACH Threshold HIGH
will allow the module to properly detect the TACH
signal.
Installation Guide
MODE 2
”
INDICATES DEFAULT SETTING
FUNCTION 1 - Home Valet
TM
option
1
Home Valet
ÌÓ
enabled
OPTION 2*
Home Valet
TM
disabled
FUNCTION 2 - Safe start.
option
1
Safe start enabled
OPTION 2*
Safe start disabled
option
3
“Swap Start” - enhanced safe start mode with extended safety: To start the engine: press
Function button then LOCK button. To trigger AUX 2: press START/STOP
FUNCTION 3 - Engine Run Time
option
1
Run time = 3 minutes in gas mode / 8 minutes diesel mode
OPTION 2*
Run time = 15 minutes in gas mode / 20 minutes diesel mode
option
3
Run time = 25 minutes in gas mode / 30 minutes diesel mode
FUNCTION 4 - Idle/Turbo Mode
option
1
Idle/turbo mode disabled
OPTION 2*
Idle/turbo mode enabled
FUNCTION 5 - Engine Type and Cold Weather Mode
option
1
Diesel mode with 20-minute run time in cold weather mode with 30sec delay
OPTION 2*
Gas mode with 3-minute run time in cold weather mode
option
3
Diesel mode with 8-minute run time in cold weather mode with 18sec delay
option
3
Diesel mode with 8-minute run time in cold weather mode with 7sec delay
MODE 3
'
indicates
default
setting
FUNCTION 1- Siren Chirps
option
1
Warning chirps only; Lock Confirmation if the Lock button is pressed a 2
nd
time.
OPTION 2*
Chirp enabled.
option
3
Chirp enabled with Open-Zone notification (Siren warning 10 sec. after arming if a door is
left open) (Also used for vehicles with Dome Light Delay)
option
4
Chirps disabled with Lock Confirmation if the LOCK button is pressed a 2
nd
time
FUNCTION 2- Passive or active arming
option
1
ACTIVE arming.
OPTION 2*
Passive arming (30 sec.)
option
3
Passive arming (30 sec.) / no TWO-STAGE DISARM
option
4
Active arming with disarmed notification.
FUNCTION 3 - Ignition Monitoring: Siren Mode / Horn Mode
option
1
Siren Mode: Ignition Monitoring — disabled
OPTION 2*
Siren Mode: Ignition Monitoring — enabled
option
3
Horn Mode: Ignition Monitoring — disabled
option
4
Horn Mode: Ignition Monitoring —enabled
FUNCTION 4 - Shock Sense / Warn-away
option
1
Shock Sense — ignored / Warn-away — ignored
OPTION 2*
Shock Sense monitored / Warn-away monitored
option
3
Shock Sense monitored / Warn-away ignored
option
4
Shock Sense ignored / Warn-away monitored
FUNCTION 5 - Ignition Valet
option
1
Ignition Valet — DISABLED
OPTION 2*
Ignition Valet — ENABLED
MODE 4
’
indicates
default
setting
FUNCTION 1 - MULTI-LEVEL FEATURES
OPTION 1
OPTION 2*
OPTION 3
OPTION 4
FUNCTION 2 - RELOCK
OPTION 1
OPTION 2*
Multi-car Features, Basic Features, Customized Features
Basic Features, Multi-car Features, Customized Features
Customized Features, Multi-car Features, Basic Features
Basic Features, Customized Features, Multi-car Features
Relock Mode: Disabled
Relock Mode: Enabled
FUNCTION 3 - Auxiliary button
OPTION 1
Auxiliary Button is programmed as Stop Button
OPTION 2*
Auxiliary Button is programmed to activate AUX2
FUNCTION 4 - Pager Option (Pager sold separately)
OPTION 1
Enabled
OPTION 2*
Disabled
Installation Guide
P. 6
P. 3