Extension cords, Operation – Black & Decker 5027 User Manual
Page 6
Attention! The text in this document has been recognized automatically. To view the original document, you can use the "Original mode".
Extension Cords
Double-insulated tools have 2
wire cords, and can be used with 2
wire or 3 wire extension cords. Only
round jacketed extension cords
should be used. If the extension will
be used outside, the cord must be
suitable for outdoor use. Any cord
marked as outdoor can also be used
for indoor work. (The letters “WA” on
the cord jacket indicate that the cord
is suitable for outdoor use.)
An extension cord must have
adequate wire size (AWG or
Amercian Wire Gauge) for safety,
and to prevent loss of power and
overheating. The smaller the gauge
number of the wire, the greater the
capacity of the cable, that is 14
gauge has more capacity than 16
gauge. When using more than one
extension to make up the total
length, be sure each individual
extension contains at least the mini
mum wire size.
To determine the minimum wire
size required, refer to the chart
below:
Before using an extension cord,
inspect it for loose or exposed wires,
damaged insulation, and defective
fittings. Make any needed repairs or
replace the cord if necessary. Black
& Decker has extension cords
available that are CSA Certified for
outdoor use.
CHART FOR MINIMUM WIRE SIZE (AWG) OF EXTENSION CORDS
NAMEPLATE
TOTAL EXTENSION CORD LENGTH-FEET
RATING-AMPS
25
50
75
100
125
150
175
200
0-10.0
18
18
16
16
14
14
12
12
10.1 - 13.0
16
16
14
14
14
12
12
12
13.1 - 15.0
14
14
12
12
12
12
12
—
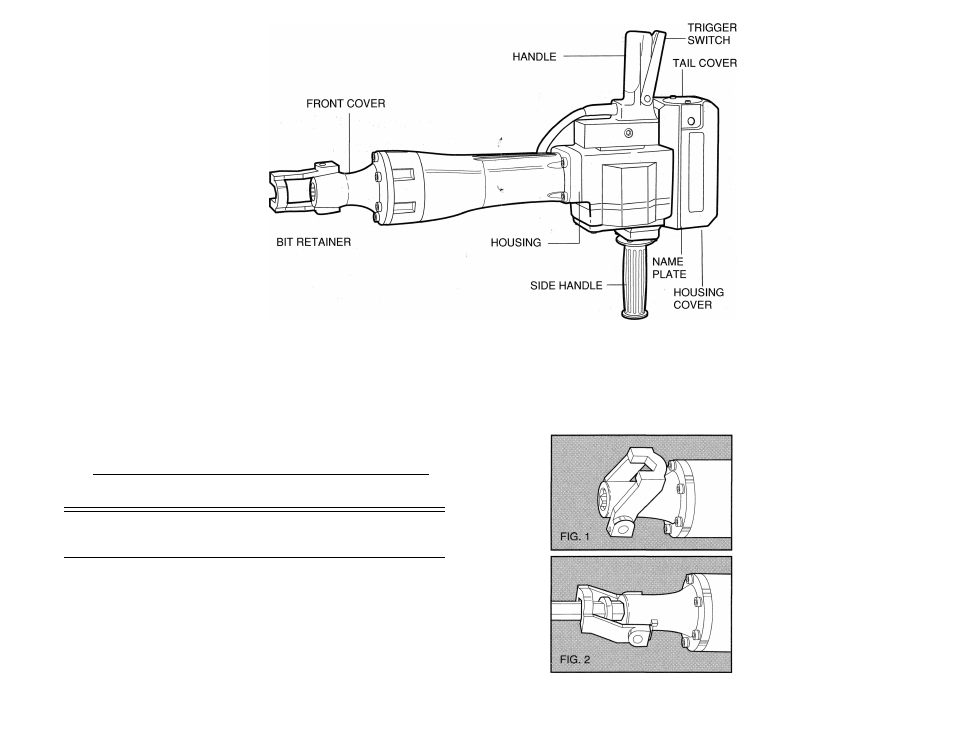
INSTALLING THE BIT
1. With the bit retainer directed
backward, insert the bit shank
into the hole in the front cover.
(Fig.1)
2. Swing the bit retainer back into
place so that it engages the bit
shank and prevents bit from
coming all the way out of front
cover. (Fig. 2)
NOTE: Use a mallet to open/
close the retainer. When removing
the bit, follow the above procedure in
reverse order.
Operation
(ALWAYS WEAR EYE PROTECTION)
Before turning the tool on,
locate the tip of the demolition bit as
desired. Rest the weight of the too!
on the bit and turn the hammer on.
Let the tool’s weight work to your
advantage; this will be easier and
more efficient. Pushing on the tool
only reduces efficiency.
Guide the tool, turning it off
whenever changing locations in
order to locate the bit at the desired
spot.
1. Squeeze the trigger switch after
applying the tip of the bit to the
crushing position. In some
cases, it is necessary to punch
the tip of the bit against the
crushing position forcibly in
order to begin the striking
stroke. This is not due to
malfunction of the tool. It means
that the safe guard mechanism
against no-load striking is
working.
2. Operate the tool by utilizing its
own weight. The performance
will not be better even if the tool
is pressed or thrust forcibly
against the work surface. Hold
the tool with a force just
sufficient to counteract the
reaction. CAUTION: Sometimes
the tool does not begin the
striking stroke even when the
motor rotates because the oil
has become thick. If the tool is
used at low temperatures or if it
is not used for a long time, the
tool should be run at no load for
five minutes in order to warm it
up.