Lubrication, Maintenance, Trouble shooting – MTD 030 thru 062 User Manual
Page 12: Cuning blaoe
Attention! The text in this document has been recognized automatically. To view the original document, you can use the "Original mode".
Minor carburetor adjustment may be required to com
pensate for differences in fuel, temperature, altii ude and
load. Refer to the separate engine manual packed /vith your
mower for carburetor adjustment information.
NOTE:
A dirty air cleaner will cause an engine to n 'n rough.
Be certain air cleaner is clean and attached to the c 3rburetor
before adjusting carburetor.
If the blade is secured to the blade adapter with two bolts,
remove the two small bolts, lock washers and nuts which
hold the blade to the adapter.
A
WARNING: Periodically Inspect the blade
adapter for cracks, especially if you strike a
foreign object. Replace when necessary.
LUBRICATION
A
WARNING: Always stop engine and dii connect
spark plug wire before cleaning, lubricating or
doing any kind of work on lawn mowei.
Blade Control—Lubricate the pivot points on the b ade con
trol handle and the brake cable at least once a se. ison with
light oil. See figure 15.The blade control must operate freely
in both directions.
Blade Control
Handle
Pivot Brake
Point Cable
FIGURE 15.
Chute Deflector—The torsion spring and pivot po nt should
be lubricated periodically with light oil to prevent a ly rust or
binding. Deflector must work freely.
Wheels—The wheels require no lubrication. Howe/er, if the
wheels are removed for any reason, lubricate the surface of
the axle bolt and the inner surface of the wheel wit i light oil.
Engine oil may also be used.
Engine—Follow engine manual for lubrication instr jctions.
MAINTENANCE
When sharpening the blade, follow the original angle of grind
as a guide. It is extremely important that each cutting edge
receives an equal amount of grinding to prevent an
unbalanced blade. An unbalanced blade will cause exces
sive vibration when rotating at high speeds, may cause dam
age to the mower and could break, causing personal injury.
The blade can be tested by balancing it on a round shaft
screwdriver. Remove metal from the heavy side until it bal
ances evenly. It is recommended that the blade always be
removed from the adapter for the best test of balance.
Before reassembling the blade and the blade adapter to the
unit, lubricate the engine crankshaft and the inner surface of
the blade adapter with light oil (or engine oil). Lubricating the
bolt holes, bolts and inner surface of the nuts is also recom
mended.
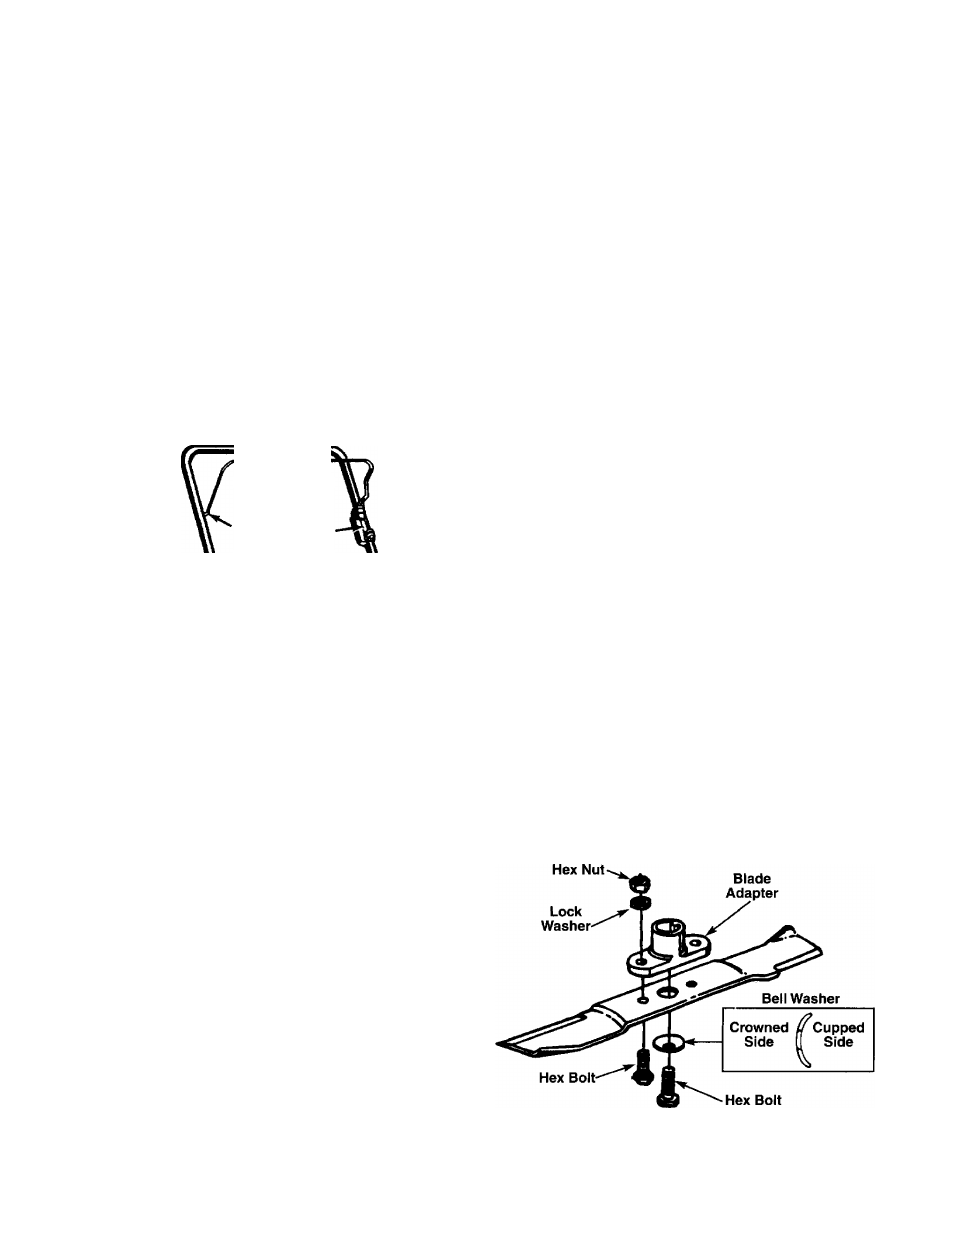
THREE BOLT BLADE MOUNTING
Install the blade to the blade adapter with the side of the
blade marked “bottom” (or with part number) facing away
from the adapter. Refer to figure 16. insert two hex bolts up
through the blade and adapter and secure with lock washers
and hex nuts. Tighten according to “Blade Mounting Torque”
section below.
Place the blade and blade adapter assembly on the engine
crankshaft.
NOTE:
If the adapter is keyed, make sure the key in the
adapter is aligned with the key slot on the crankshaft.
A
WARNING: Be sure to disconnect anc ground
the spark plug wire before perfornring any
repairs or maintenance.
NOTE:
When tipping the unit, empty the fuel tank and keep
engine spark plug side up.
TROUBLE SHOOTING
Refer to page 13 of this manual for trouble shootinji informa
tion.
CUniNG BLAOE
When removing the cutting blade for sharpening o ■ replace
ment, protect hands by using heavy gloves or a rail to grasp
the cutting blade. Remove the bolt and blade supp )rt or bell
washer which hold the blade and adapter to the engine
crankshaft. Remove the blade and adapter from t le crank
shaft.
FIGURE 16.—Three Bolt Blade Mounting
12