General informatton – Sears 390.306062 User Manual
Page 3
Attention! The text in this document has been recognized automatically. To view the original document, you can use the "Original mode".
3'.Usc this pump only for backup sump pump duty in a res
idential application. It is not designed as a primary sump
pump.
4.
A WARNING
Ha
2
ardous Voh^e. Can cause severe or
fatal electrical shock. Do not plug in or implug battery
charger while standing on a wet floor or in water. Be sure
one hand is firee when plugging in or unplugging charger.
If basement floor is wet, disconnect power to basement
before walking on floor.
5. Do not lift pump by electrical cord.
6. Pump water only with this pump.
7. Do not run pump dry. To do so will damage seals and can
cause leaking and property damage.
8. Pump is permanently lubricated at the factory. Do not try
to lubricate it!
9. Keep battery charger and battery box in a dry, cool, well
-•-ventilated area.
lO.To avoid danger of fire or explosion, keep sparks and
flame away from battery.
11
.
AWARNING
Battery acid is corrosive. Do not spill on
skin, clothing, or battery charger. Wear eye protection
when working on battery.
12. Maximum vertical pumping distance is 15 feet.
13. Make sure sump is clear of debris.
BASIC TOOLS AND MATERIALS NEEDED
Pipe Wrenches
Screwdriver
Hacksaw
1-1/4" Check Valve
Adjustable-Wrench
Teflon Tape
Knife
12-volt Battery
GENERAL INFORMATtON
The Battery-Powered Back-up Sump Pump is not a substitute
for your primary sump pump. It is designed as a backup
pump to pinch-hit for your primary sump pump during a
power outage or other problem which prevents normal op
eration. Do not use it to pump flammable liquids or chemi
cals.
Keep battery charger dry and protected from damage.
In an emergency (such as an extended power outage)
which depletes the system battery, your automobile battery
may be temporarily substituted. Be sure to replace the sys
tem battery as soon as possible.
CHARGER OPERATION
Backup pump will start automatically when sump water
level rises far enough to trip float switch. After a delay of
about 4 seconds, alarin will sound. Silence alarm by pushing
ALARM TEST/RESET.button. In normal (switch actuated) op
eration, alarm is locked out until about 4 seconds after float
switch has dropped to OFF position; cycle can then begin
again.
Test alarm by pushing ALARM TEST/RESET button when
alarm is not soimding. Alarm will then sotmd as long as but
ton is held down. Pushing ALARM TEST/RESET button to
test alarm overrides lockout, so alarm can be tested at any
time.
If alarm sounds, check operation of primary pump, which
may need service. If battery backup operation is due to a
power outage, alarm will sound, but no service is likely to
be required to primary pump.
Battery charger has capacity to run pump and charge battery
at the same time as long as power to the charger is not in
terrupted. If power to charger circuit is interrupted, the
length of time that the backup pump will run depends on
the Ampere-hour capacity of the battery used.
Extended periods of operation (for example, during an ex
tended power outage) may exhaust the battery. However,
once the load is removed, usually it will self-regenerate &r
enough to allow the charger to start. The battery charger wiU
begin charging the battery as long as the battery has a charge
of at least 1/2 volt, and power is available to the charger.
After power is restored, charger will automatically re-charge
battery fully in about six hours.
NOTICE: Some trouble conditions will cause the alarm to
sound. See chart below for causes and action:
PROBLEM
ACTION
Back-up pump has run
Push ’Reset’. Check main pump.
Power out more than
24 hours
Disconnect charger from battery.
Call power company.
Continuous charging
more than 24 hom-s
Disconnect charger from battery.
Check for defective battery.
Loose coiuiection or
no power to charger
Discoimect charger from battery.
Check plug, receptacle, and
power at main breaker.
After restoring power or replacing battery, alarm can be
reset.
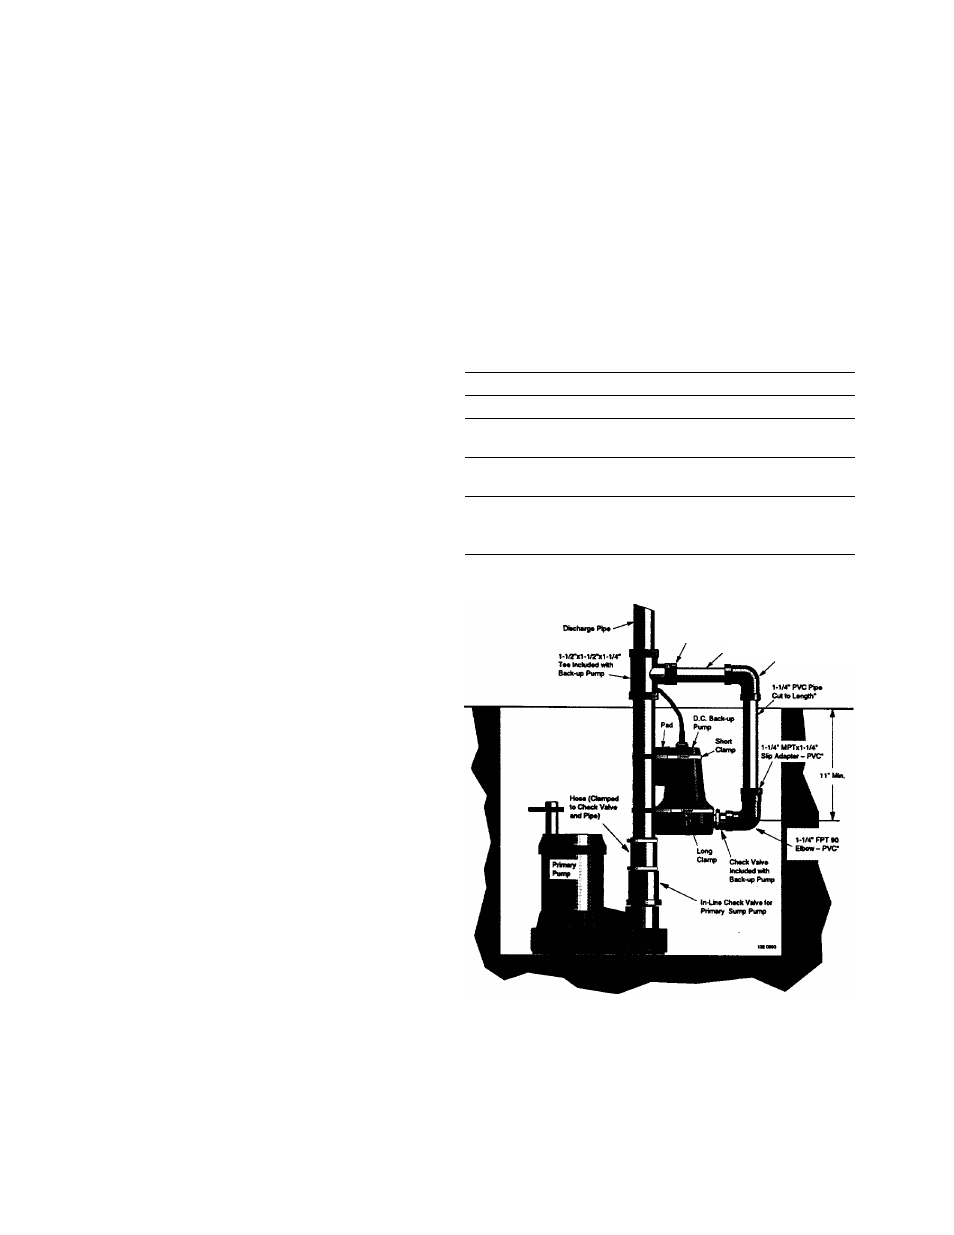
1-1/4'MPTx1-1/r Sip
Ad^tar-PVC
M/4*PVCPip4
CmtoLMgth* M/4'Sip90
Bbew-PVC
• Purchase locally.
For smaU/shallow sump pits install as illustrated above. Installation Kit 2785
includes the necessary clamps and support pad needed for this installation.
Follow other instructions in the owner's manual
Figure I - Installation in small or shallow sumps
- use Kit 2785; sump diameter is exaggerated
for clarity.