Sears 300.7271 User Manual
Page 3
Attention! The text in this document has been recognized automatically. To view the original document, you can use the "Original mode".
TOP ASSEMBLY
TOOLS REQUmED
1, Attach foam weather sbipping (A) to in^ Of Carrier top; as shown
in figure 1 and detail. DO NOT CUTI Ro# oulln one piece and trim
excess.
ASSEMBUNG TOP TO BOTTOM
Z While someone holds the top, afign the slot in the hinges (L) on the
Carrier bottom, with the Carrier top arxi attach medium screws (E),
medium flatwashets
(H)
and targe plastic insert nuts
(J). Do not
fuBy tighten at this time.
Turn carrier ipside down ^ position top
to the bottom with the same spacing in front and rear of carrier.
Tighten screws,
3.
While someorre holds the top in an open position, attach the
support asserrtolies
(0) (Note proper pos№oning as shown In
figure 1)
with
the2
large so'ews
(F), 4
large flatwasheis
(G)
and 2
large plastic insert nuts
(J).
Tighten screws until snug. Note: White
round plastic protectors in the center of the support assemblies
should be fac^ inward as shown in figure 1.
4. Attach front and back snap latches (P) to bottom with 4 small
screws (D), small flatwashers (B) and small plastic insert nuts (I).
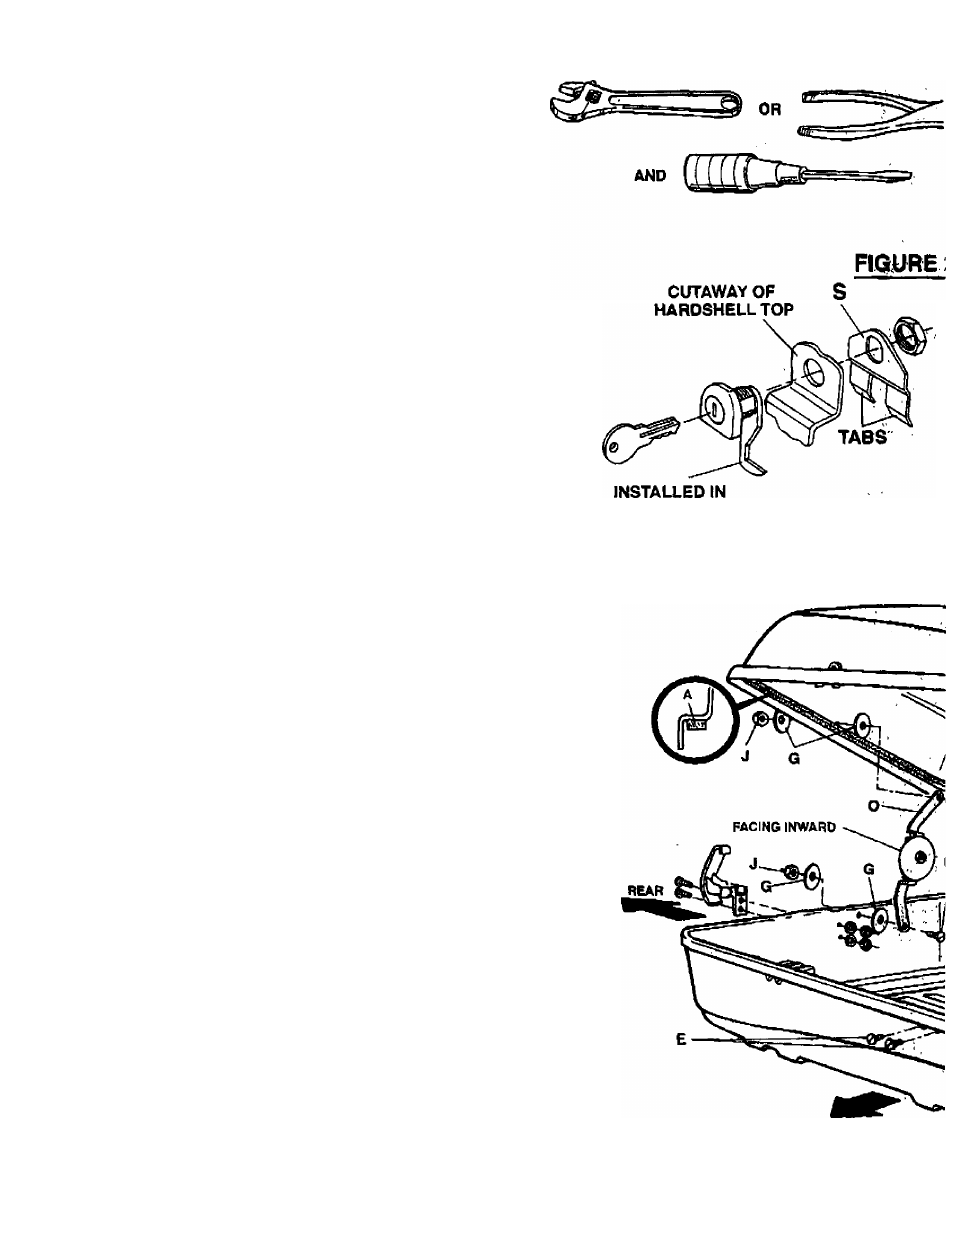
5. Install lock assemblies
(R)
as shown in figure 2. Note: The locks
need to be in the locked” position for assembly to the carrier top
and for assembly of the lock locators. Remove key to prevent
movement of lock hook. Lod^ locator (S) labs should be pointing
toward the inside of the carrier.
6. Attach lock brackets (M) to Gamer bottom on passenger side with
mediunr) screws
(E)
and large plastic insert nuts
(J).
Use lower slots
in lock brackets.
Do not fully tighten.
7. Check lock assembly alignment by dosing and looking toe Carrier
to Check for correct fit. If they align and lock property, open the
Carrier and tighten the Nnge (L) hardware and the lock bracket (M)
hardware. If they do not align and lock property, adjust boto hinges
and lock hardware unfil they align and lock. Once they are property
aligned, tighten both the hinges and lock bracket hardware,
8. To close Carrier, make sure the locks are in the open
(horizontal) position with the key removed and pull Carrier top
downward from both ends.
9. To lock Carrier, insert key, puli down on flange and turn key to
toe locked position (vertical). See figure Э. Place snap latctoes
into top flange depressions ^ push front of snap latches down
until they engage. For
safety, the Carrier locks (R) must be
properly engaged vriienever the vehicle Is in motion.
Note: Some (fistortion of the plasUc lop mey occur In shipping or
improper stoiage. It may be necessary to reshape the hardshell top
over the hanMteB ЬюРот by pressing in on the t^ fiange against toe
bottom Hange alt around the Carrier and lodang the Canier. Шт43
hours the top and bdttom will reshape and fit togettmnnore readily. The
Camer can
be used during this reshapirs period.
LOCKED POSITION
PASSENGER