Flails, Carburetor adjustment – Sears 247.797851 User Manual
Page 14
Attention! The text in this document has been recognized automatically. To view the original document, you can use the "Original mode".
•
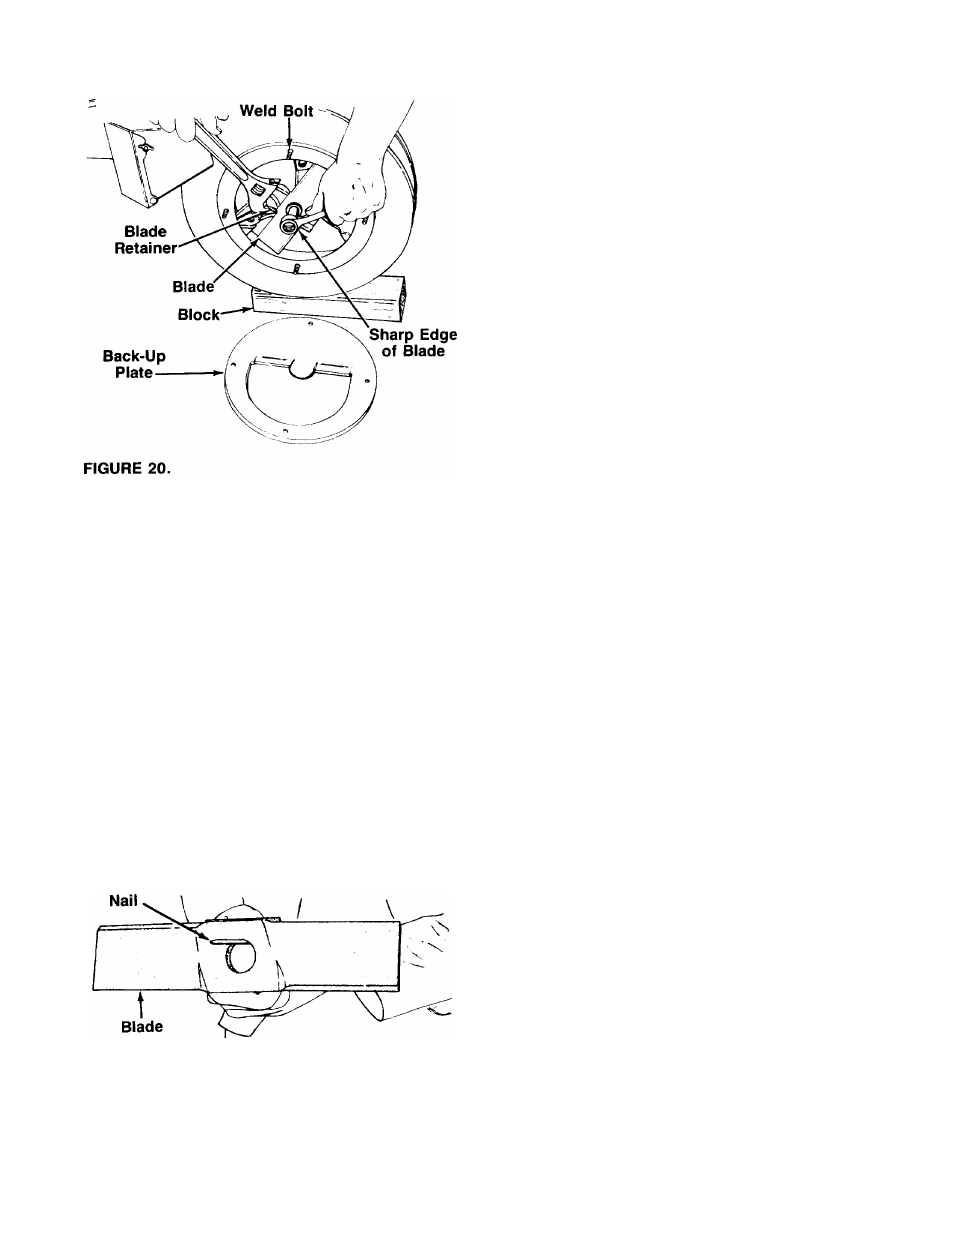
Hold the blade retainer on the impeller assembly
with an adjustable wrench to keep the blade from
turning as shown in figure 20.
• Remove the blade by removing the center bolt, lock
washer and flat washer.
NOTE: Use caution when removing the blade to avoid
contacting the weld bolts on the housing.
• When sharpening the blade, follow the original angle
of grind as a guide. It is extremely important that
each cutting edge receives an equal amount of
grinding to prevent an unbalanced blade. An un
balanced blade will cause excessive vibration when
rotating at high speeds and may cause damage to
the unit.
• The blade can be tested for balance by balancing
it on a round shaft screwdriver or nail. Remove metal
from the heavy side until it is balanced evenly. See
figure 21.
FIGURE 21.
• When reassembling the blade, tighten to between
550 and 650 inch pounds, or lacking torque wrench,
tighten securely.
FLAILS
The flails, located inside the housing, may be reversed
when they become dull. It is suggested that this pro
cedure be performed by your nearest Sears Service
Department.
CARBURETOR ADJUSTMENT
A
WARNING: IF ANY ADJUSTMENTS ARE
MADE TO THE ENGINE WHILE THE
ENGINE
IS
RUNNING
(E.G.
CAR
BURETOR),
KEEP
CLEAR
OF
ALL
MOVING
PARTS.
BE
CAREFUL
OF
HEATED SURFACES AND MUFFLER.
Minor carburetor adjustment may be required to com
pensate for differences in fuel, temperature, altitude or
load.
NOTE: A DIRTY AIR CLEANER WILL CAUSE ENGINE
TO RUN ROUGH. BE CERTAIN AIR CLEANER IS
CLEAN AND ATTACHED TO THE CARBURETOR
BEFORE
ADJUSTING
CARBURETOR.
DO
NOT
MAKE UNNECESSARY ADJUSTMENTS. FACTORY
SETTINGS ARE SATISFACTORY FOR MOST AP
PLICATIONS AND CONDITIONS.
Never attempt to change maximum engine speed. It
is pre-set at the factory and should be changed only
by a qualified service technician who has the necessary
equipment.
The carburetor may need re-adjusting if engine lacks
power or does not idle properly. If adjustments are
needed, proceed as follows.
•
Close needle valve (see figure 22) clockwise
( O ) finger tight only. Forcing may cause damage.
Then open 1V2 turns counterclockwise ( ^ ).
• Start engine and allow to warm for five minutes.
• With throttle in FAST position, close needle valve
clockwise (^ ) until engine starts to lose speed
(lean mixture). Then slowly open needle valve
counterclockwise ( jO ) until engine JUST BEGINS
to run unevenly. This mixture should be rich enough
for best performance under load.
• Place throttle control in IDLE position.
If engine idles, no further adjustment is necessary.
If engine idles too fast, turn idle speed adjusting
screw counterclockwise ( ^ ) until slower speed is
obtained.
If engine dies, turn idle speed adjusting screw V4
turn clockwise (
r\
). Place throttle control in FAST
position and restart engine.
Move throttle control to IDLE position. If engine does
not idle, repeat step c.
14