Installation • instalacion, Drain bushing, Blower belt adjustment – Sears AeroCool PD6231 User Manual
Page 3: Conexión del agua, Iuje de drenaje, Ajuste de banda
Attention! The text in this document has been recognized automatically. To view the original document, you can use the "Original mode".
INSTALLATION • INSTALACION
CUBIERTA
mWA
aoT»oR-\
V*IUA DE
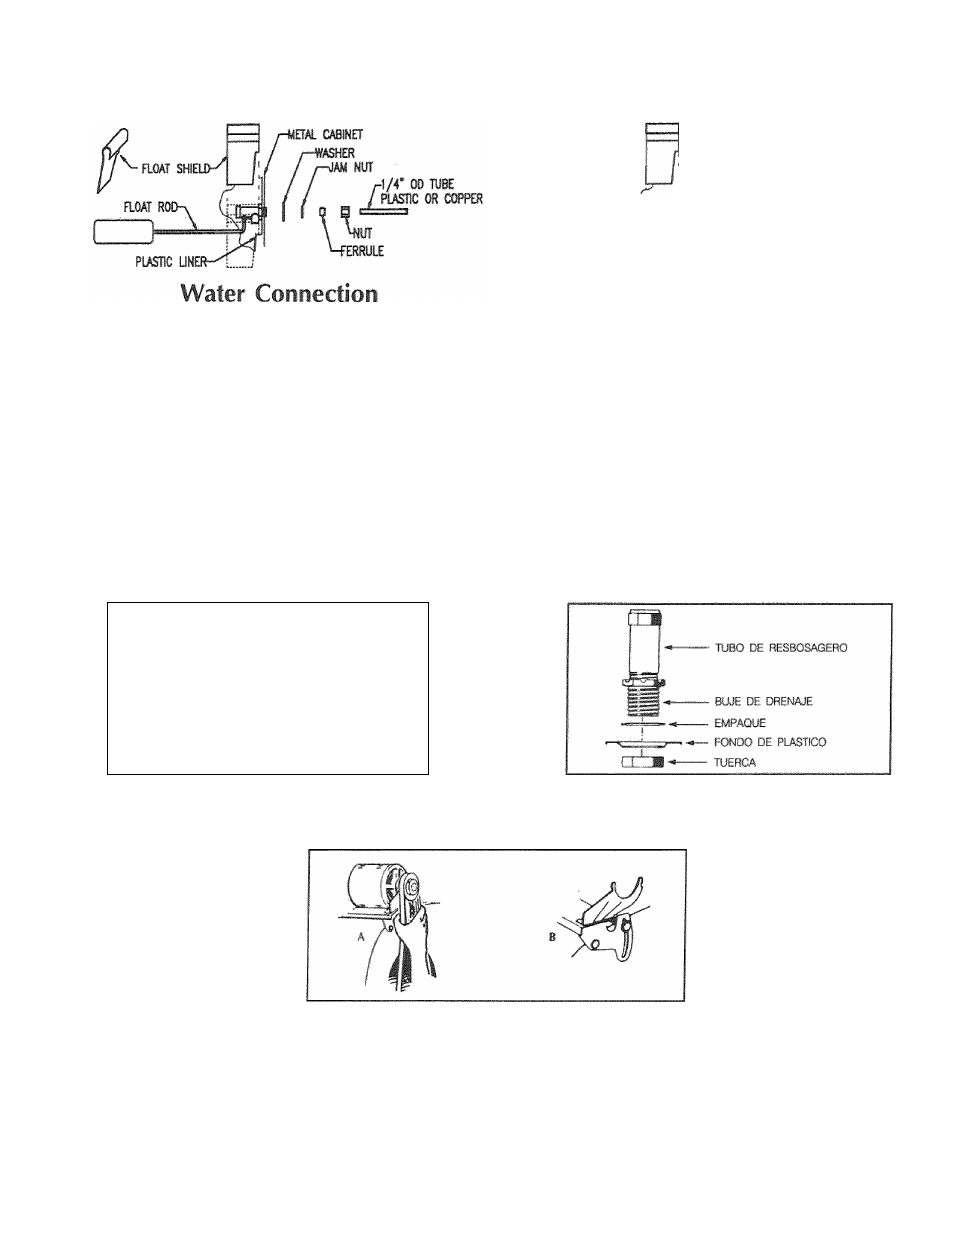
1. Install float in hnlc> in tiw* side of bottom pan opposite the
pump. See parts illustraiioti to route the water line. Connect
per above sketch.
i'urn on the water to the cooler and set float valve to
maintain 2% inch water depth. The float valve is arijusfed
by balding the float valve rod.
3. Bleed-off: Bleed off is li(;l|)ful to|)revc>nf sr^lc from building
up in the cooler. A bleed-off adapter tee and tube are
furnished w'ith the cooler for this purpose, run bleed-off
line' to a proper drain.
4. install float shiiikJ ovt'r float valve per above illustration
Nolfv Evaporative coolers should not be connected to a
"soft” M-'afer system.
Drain Bushing
н н ^
OVERFLOW STANDPIPE
DRAIN BUSHIÍlG
i
i
RUÍJBEn WASUFR
iíOI’OM PAN íPiASTiC)
—- LOCK NUI
Insert drain bushing through the hole in the cooler
bottom pan. Attach nut securely, and tighten, do not use
a wrench. Attach hose and adapter from drain pump.
See illustration on page 8.
Blower Belt Adjustment
Correct belt adjust mail and alignitHint is important as incorrect
adjustmeiil increases power consumption and shortons belt
and
motor
life.
Install
belt over
motor
and blower pulleys. (A)
Check bell leasion by s(|tiee/ing (deflecting) belt. Proper
tension will
allow deflection of
’/• to ’/i
inch.
(B)
To increase
or decrease belt tension, loosen bolt in slot of motor support
bracket. Adjust belt to desired tension and retighten bolt.
PAMa DE
1.
/-«»EÎE «EIAJS}
/
/-««DEA
/
/ /-coKTRffljœm
/ /
rWBO t/4 DE PUL»
^ W
roia
Conexión Del Agua
Instale
el flotador
en el
agujero proveído en
el lado
del
desposrto opuesto a la bomba. Conecte el tubo del agua
de acuerdo- con la figura de arriba Y guie el tubo de
acuerdo con la ilustración de partes.
2. Abra el agua Y ajuste el flotador para mantener un nivel
de 2 pulgadas de agua. El flotador se ajusta doblando la
varilla de este.
3. El desagüe ayuda a prevenir el acumulamiento de sales en
el
enfriador.
Un adaptador T' y
tubo
de
sangría están
incluidos en el enfriador para este proposito, guie la linea
de sangría a un drenaje apropiado.
4. Instale la cubierta sobre la válvula como se indica arriba.
Nota: Enfríadorm por evaporación m deben ser conectados
a m sistema de "agua blanda".
iuje De Drenaje
Inserte el liuje de drenaje atraves de el agujero en el
fondo de el enfriadtjr. Atornille la tuerca con la presión
de la m-ano, no use herramienta. Vea ilustración en
pagina 8.
Ajuste De Banda
El ajusU? com‘c;to do la tsanda y aÜneamiontu es importanío
ya que el ajuste incorrecto aumenta el consumo de corriente
y acorla la duración de ia banda y motor. In.slale la banda
sobre ambas poleas. (A) Revi.se ía tension de la banda
apretándola (deflercionandola). Una tc»ns¡on apropiada
permitirá una deflecdon de Vi a Vi de pulgada. (B) Para
aumentar o disminuir la tension de la banda afloje el tornillo
del soporte del motor. Ajuste la banda a la tension deseada
y apriete ei tornillo.
3