Operation – Sears 390.2508 User Manual
Page 8
Attention! The text in this document has been recognized automatically. To view the original document, you can use the "Original mode".
OPERATION
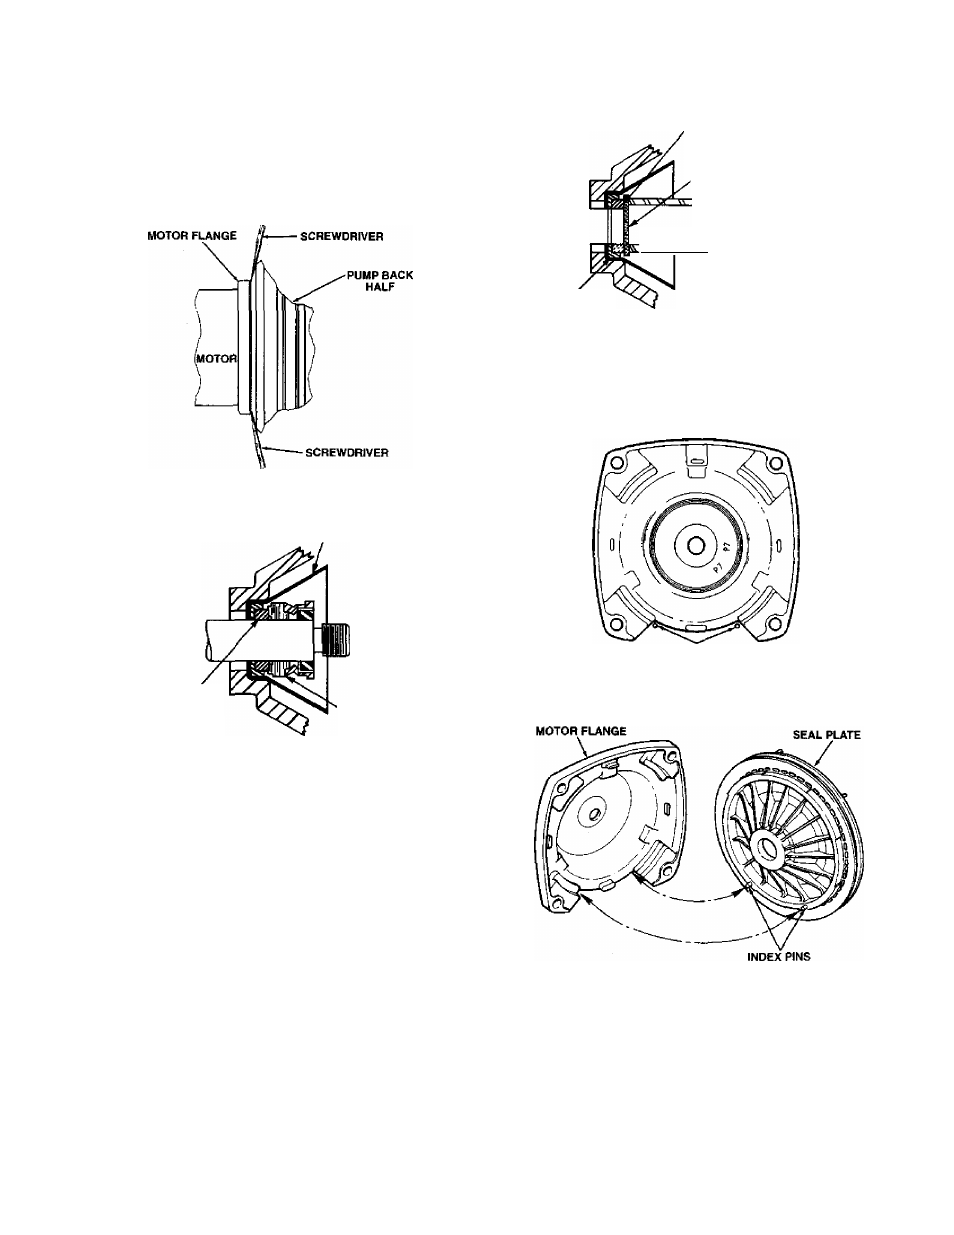
3. Remove seal plate from motor by inserting two screw
drivers between the seal plate and the motor flange. Pry
seal plate off motor flange. This will force rotating portion
of seal off shaft,
NOTE; Be sure you do not scratch shaft!
See Figtjres 7 & 8.
POLISHED SURFACE
OF FLOATING SEAL
CARDBOARD WASHER
FURNISHED WITH SEAL
vv vv y. w
3/4" PIPE
CUP SEAL
Figure 9
F. Reassemble seal plate to motor flange. BE SURE it is
right side up: index pins should be down; seal plate
is marked at top. See Figures lOA and lOB.
TOP OF MOTOfl FLANGE
Figure 7
COPPER SEAT
FLOATING
SEAT
SEAL PLATE INDEX PINS
SLIDE IN HEflE
Figure lOA
ROTATING
MEMBER
Figure 8
4. Place seal plate face down on flat surface and tap out ce
ramic seat.
NOTICE: Do not force out copper insert. If it has moved,
leakage will occur. See section on installing copper insert on
Page 9.
5- Clean seal cavity.
6. Install new seal.
A. Clean polished surface of ceramic seat with clean
cloth.
B. Wet outer edge of cup seal with petroleum jelly or de
tergent solution.
C. With finger pressure, press firmly and squarely into
cavity. Polished face of seat faces inside of pump. If
seat will not locate properly, place cardboard washer
over polished face and use piece of 3/4" standard pipe
for pressing purposes. See Figure 9.
D. Dispose of cardboard washer and clean surface of
seat.
E. Clean motor shaft.
Figure I OB
G. Apply detergent solution to inside diameter of rotat
ing seal member.
H. Slide rotating member on shaft until rubber drive ring
hits shaft shoulder.
NOTE: Be sure you do not chip or scratch seal face
on shaft shoulder or seal will leak!