Traxxas 49104-1 User Manual
Page 10
10 • T-MAXX
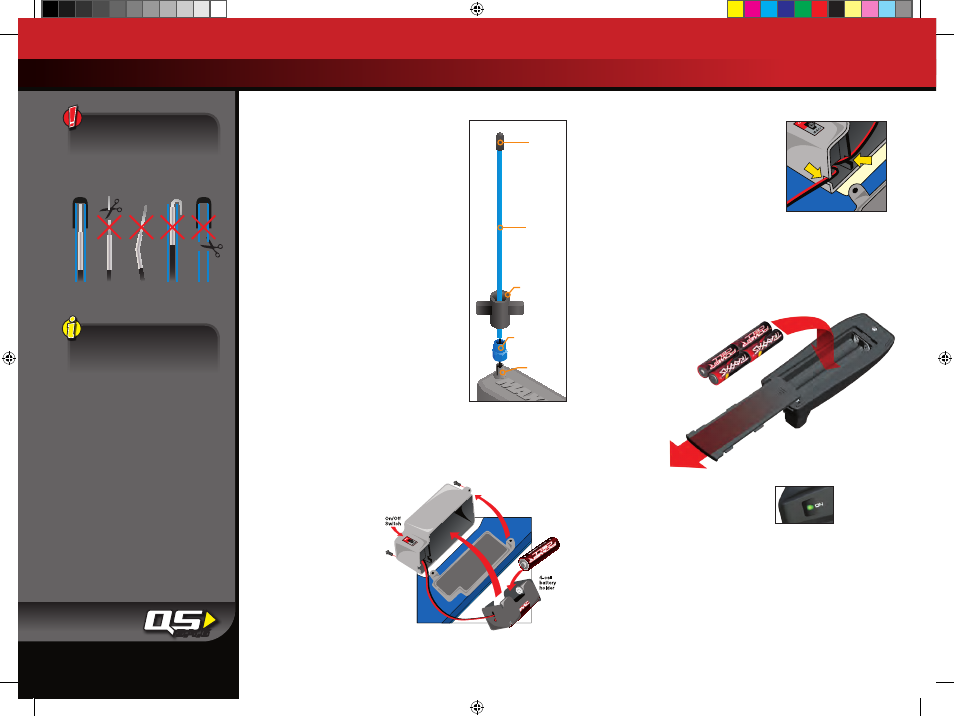
INSTALLING THE RECEIVER ANTENNA
The receiver antenna and antenna tube must
be properly installed before operating your
model. The antenna tube has been precisely
cut to match the length of the antenna wire.
Follow these steps to install the antenna and
antenna tube:
1. Slide the antenna wire into the antenna
tube until the antenna’s white tip just
reaches the tube cap. Do not crush the
antenna wire against the cap.
2. Insert the tube into the antenna post. Take
care not to crimp the antenna wire.
3. Slide the crimp nut over the antenna tube
and thread it onto the antenna post. Use
the supplied tool to thread the crimp nut
over the post until the antenna tube is
secure. Do not over-tighten the nut or
crush the antenna wire against the chassis.
Do not bend or kink the antenna wire! Do
not shorten the antenna tube. See the side
bar for more information.
INSTALLING RECEIVER BATTERIES
The radio receiver in your T-Maxx uses 4 AA batteries. The battery
holder for the receiver batteries is located underneath the battery
cover. The battery cover can be identified by the on/off switch.
1. Remove the battery cover
by removing the two
3x10mm buttonhead
cap screws from the
cover.
2. Remove the battery
holder and install 4 AA
alkaline batteries. Make
careful note of the battery
polarity by comparing
against the diagrams in the
battery holder.
3. Insert the battery holder into the battery cover.
4. Direct the battery wires through the slot
in the battery cover. Note: If the wires
are not properly routed, they may
become broken or shorted, causing
radio system failure and loss of control.
5. Reinstall the battery cover and secure
with the screws.
To prevent losing control of your model, it is important to stop
at the first sign of weak receiver batteries. Visible warning signals
include sluggish steering response and shortened radio range.
INSTALLING TRANSMITTER BATTERIES
Your TQ 2.4GHz transmitter uses 4 AA batteries. The battery
compartment is located in the base of the transmitter.
1. Remove the battery
compartment door by
pressing the tab and
sliding the door open.
2. Install the batteries
in the correct
orientation as
indicated in
the battery
compartment.
3. Reinstall
the battery
compartment door and snap it closed.
4. Turn on the transmitter and check
the status LED for a solid green light.
If the status LED flashes red, the transmitter batteries may be weak,
discharged, or possibly installed incorrectly. Replace with new
or freshly charged batteries. The power indicator light does not
indicate the charge level of the battery pack installed in the model.
Refer to the LED Codes section on page 13 for more information on
the transmitter’s status LED codes.
TRAXXAS TQ 2.4GHz RADIO SYSTEM
Use the Right Batteries
Your transmitter uses AA
batteries. Use new alkaline
batteries or rechargeable
batteries in your transmitter.
Make sure rechargeable
batteries are fully
charged according to the
manufacturer’s instructions.
If you use rechargeable
batteries in your transmitter,
be aware that when they
begin to lose their charge,
they lose power more
quickly than regular alkaline
batteries.
Caution: Discontinue running
your model at the first sign of
weak batteries (flashing red
LED) to avoid losing control.
*U.S. markets only
Antenna
Tip
Antenna
Tube
Antenna
Wrench
Antenna
Crimp Nut
Antenna
Post
To prevent loss of radio range,
do not kink or cut the black wire,
do not bend or cut the metal tip,
and do not bend or cut the white
wire at the end of the metal tip.
Correct
No
No
No
No
3,4,6
49104-1-KC2230-R00-T-Maxx-Operating.indd 10
10/30/14 5:10 PM