Soundmatters SUBstage100 Quick Setup Guide User Manual
Plug+play set-up guide, Four, Three
plug+play set-up guide
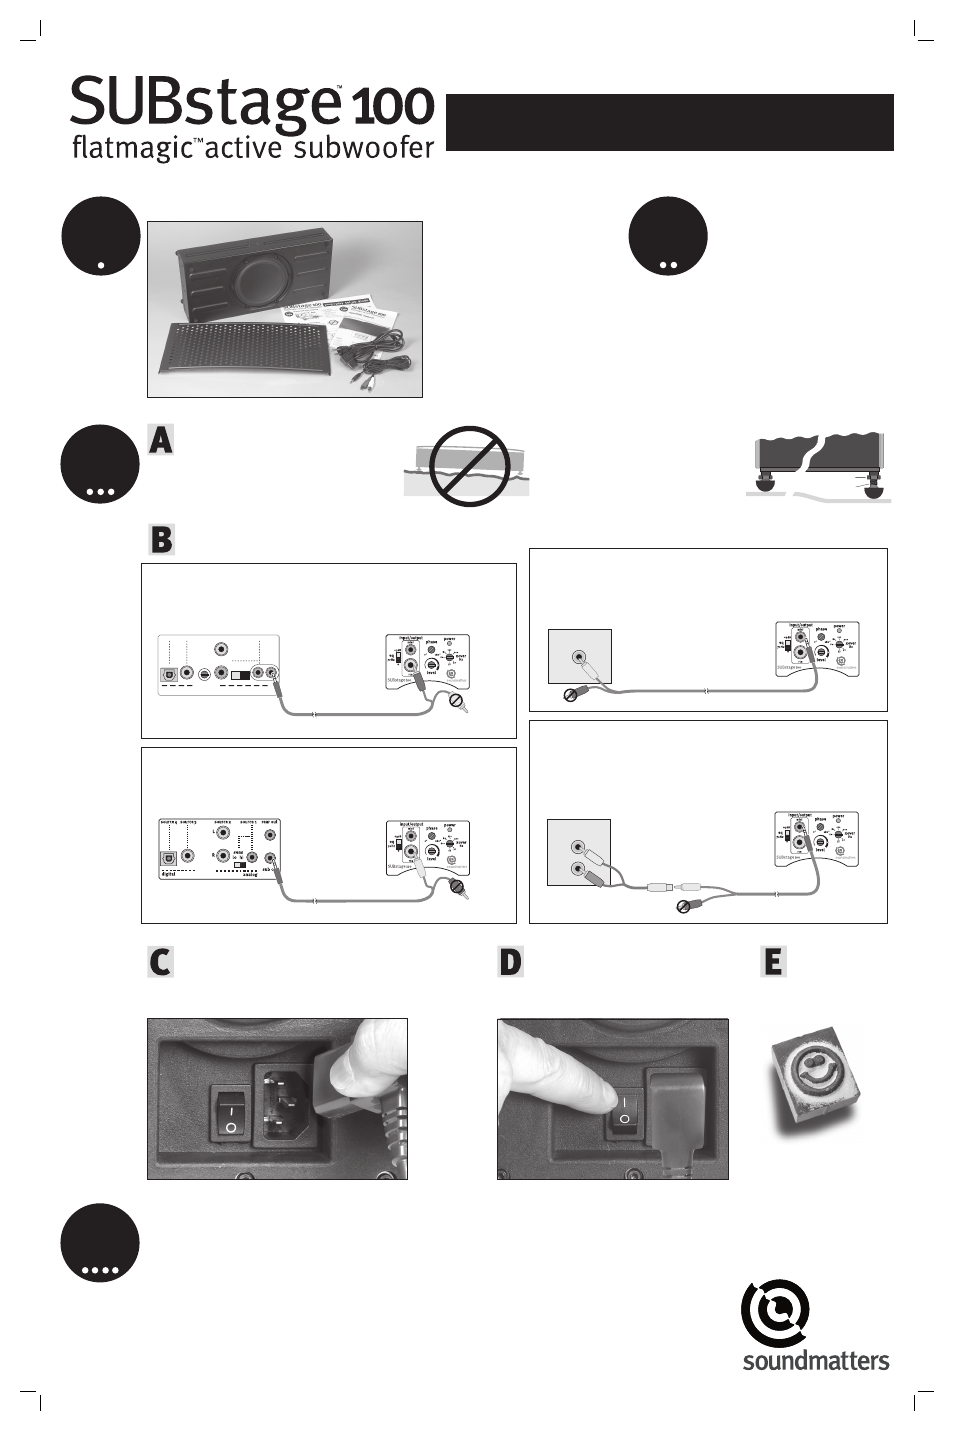
STEP
one
STEP
two
STEP
three
STEP
four
Unpack (and check contents)
Review safety
instructions
in the
Operation
Manual.
Place on Flat Surface
Place the SUBstage on a relatively flat and level
surface so it is supported by all four feet. Adjust
feet if necessary.
Connect the supplied right angle power cord into the back
of the SUBstage and connect to the wall, 95–260 Vac
Switch Master Power to on. You may hear
a thump. ( ON=
|, OFF=O )
For maximum performance, see accompanying Operation Manual
SUBstage100 Operation Manual includes: Safety information, dimensions, key features,
connection instructions, suggestions for placement options and control settings for best sound,
using multiple SUBstages, troubleshooting guide, specifications, and warranty information.
FAQ (frequently asked questions) are answered at our website
www.soundmatters.com
or by calling
800 698 soma
(7662) option: technical support
Connect Signal
(cable provided)
digital 2
digital
analog
digital 1
analog 2
sub
level
L
R
sens
low hi
sub
out
analog 1
Stereo 1/8" Mini-jack to RCA pair,
use RIGHT (red) channel only
original MAINstage Connection Panel
SUBstage Connection Panel
MAINstage “Sub Out”
1/8" Mini-jack Out
SUBstage
RCA Input
Don’t use
LEFT (white) RCA
MAINstageHD Connection Panel
Stereo 1/8" Mini-jack to RCA pair,
use LEFT (white) channel only
SUBstage Connection Panel
MAINstageHD “Sub Out”
1/8" Mini-jack Out
SUBstage
RCA Input
Don’t use
RIGHT (red) RCA
Amplifier or Receiver
Connection Panel
Subwoofer
Output
Subwoofer
RCA Output
Stereo 1/8" Mini-jack to RCA pair,
use LEFT (white) channel only
SUBstage Connection Panel
SUBstage
Mini Input
Don’t use RIGHT (red) RCA
Stereo 1/8" Mini-jack to RCA pair,
use LEFT (white) channel only
Y-adapter (Stereo RCA pair
to Mono RCA female)
Don’t use
RIGHT (red) RCA
Amplifier or Receiver
Connection Panel
Preamp
Output
L
R
Variable RCA Output
(i.e., TV audio or preamp)
SUBstage Connection Panel
SUBstage
Mini Input
Connect Power
(cable provided)
Switch Power On
•
Amp/Receiver with SUB Output
Connect Left (white) RCA out to SUBstage mini-jack (brown)
from sub output.
•
MAINstage HD or other models
Connect White RCA (red dangles) to SUBstage RCA input (white)
from sub output
•
Amp/Receiver with no SUB Output (use Variable RCA)
Convert the stereo RCA out to a single RCA using a “Y” adapter
(available from your local electronics retailer) then connect
SUBstage mini-jack (brown) from sub output.
ACCESSORY LIST
• SUBstage with attached
leveling feet
• Removable top grille
• Set-Up Guide
• Operation Manual
• Right-angle AC power cord
• 5 m stereo RCA-to-Mini-jack cable
Start movie or music
and ENJOY!
Enjoy
Locking nut
Threaded foot
If adjusting is necessary, unscrew a
threaded foot enough so it touches
the surface. Be sure to tighten the
locking nut firmly against the unit.
•
MAINstage Original
Connect Red RCA (white dangles) to SUBstage RCA input (white)
from sub output
rev i1, 03.05