Soundmatters MAINstage HD Set-up Guide User Manual
Start here – quick set-up guide, Three, Step
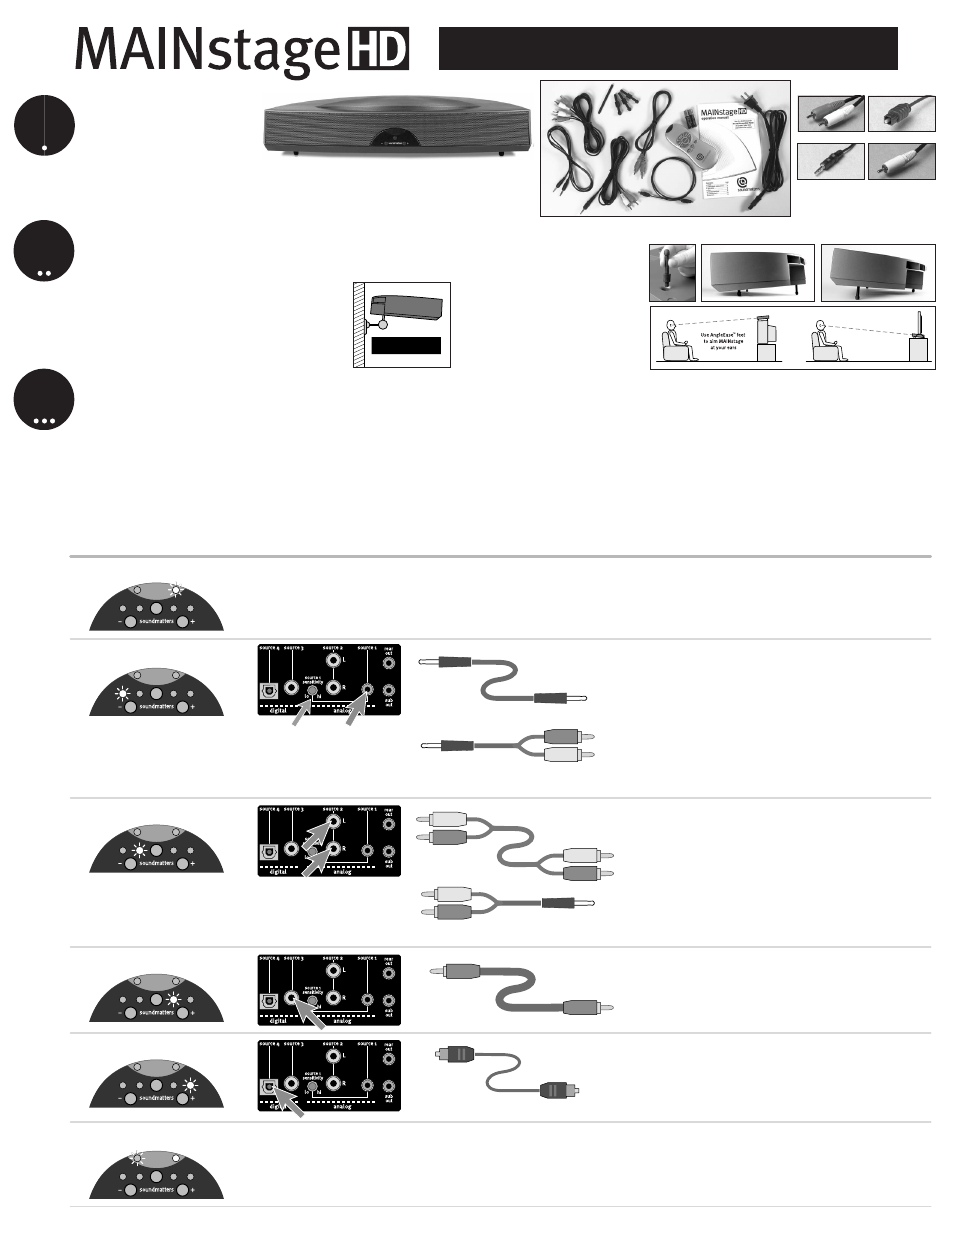
You should have: a MAINstageHD unit,
owner’s manual, remote control, batteries,
power cord, 2m optical cable, 2m coax cable,
2m stereo 1/8” mini-jack cable, 2m stereo RCA
cable, 2m stereo mini-jack-to-stereo-RCA, and three Angle-Ease
™
feet + 1 extra-long threaded post.
NOTE: We have supplied the five commonly needed connecting cables. For some applications you may need to
acquire additional cables/adapters (i.e., an additional mini-to-RCA cable. See steps below for hookup details.).
standby/mute
1/8" Mini to 1/8" Mini
1/8" Mini TO RCA adapter
RCA to 1/8" Mini adapter
Coax Digital
Optical Digital
RCA to RCA
source 1 - analog = solid 1
source 2 - analog = solid 2
source 3 - digital = solid 3
source 4 - digital = solid 4
stereo off / surround on
Front Display
Back Panel Connection
Use This Cable
Comment
There are 4 source (green) and 1 mute/standby (red) lights.
Push center Source button to toggle through these 5 options
(source 1-analog, source 2-analog, source 3-digital, source 4-digital,
mute/standby)
Connect any source with mini-headphone output. For example, iPod,
portables, or computers. This is also the suggested input to directly
connect to a TV. (see Mini 1/8" to RCA adapter below)
– OR –
Use adapter for connecting TV, satellite, VCR to analog source 1 input
source 1 sensitivity adjustment
While listening, adjust MAINstage sensitivity knob to achieve
maximum un-distorted volume level. If source has its own volume
control (i.e., TV, iPod) and you want normally use that for adjusting
output level, set sensitivity after setting source level to its maximum
normal volume position (about 70%).
Connect any source with mini-headphone output.
For example, portables or computers.
(see adapter at left)
For DVD, CD, Cable, DVR
For DVD, CD, satellite/cable, TiVo/DVR.
Remove the clear caps on cable ends and protective covers
from digital source 4 input.
Press the source button on the remote to toggle between surround
and stereo modes. An illuminated red light indicates surround mode.
When power is initially switched on, the unit defaults to surround
mode. Red light on is surround.
For TV, satellite/cable, VCR, etc.
source 1
sensitivity
adjustment
start here –
quick set-up guide
STEP
one
STEP
two
STEP
three
Unload and check contents
Location & position
RCA pair connector
Mini 1/8” connector
Optical connector
Coax connector
For optimum performance and stereo imaging, the system should
be placed directly in front of the listener(s).
Using the outermost holes, insert and adjust the included
AngleEase™ mounting hardware to angle MAINstage so the front
points directly at the listener. Mounting at or above ear level is
usually best.
Note: MAINstage
™
is magnetically shielded meaning it can
be placed close to a computer monitor or television without
distorting the image on your screen.
Making your connections
1. Simple with Best Possible Sound from All Sources
Connect the sound from all your sources (DVD, Sat/Cable,
etc.) directly to the MAINstage as shown below. Your volume
and source select will now be controlled by the MAINstage’s
remote control.
2. The Most Simple – but with Best Sound from DVD
Use this if you want best sound for your DVD movies, but aren’t quite as
concerned re: TV sound. Connect to TV as in “3. Simplest,” but also connect the
digital audio out from the DVD player. When you want to hear the digital quality
sound from DVDs, just switch to the appropriate digital input on the MAINstage
(at which point volume is now controlled by MAINstage remote). Be sure to
switch back to the TV input (typically analog 1) once you’re done.
3. Absolutely the Simplest to use
Connect all sound (audio) sources directly to your TV.
Then connect the TV output to the MAINstage analog
1. No digital sound is possible. Quality is dependent
upon TV audio circuitry. Two plusses are: the volume is
controlled by TV remote and there’s no need to switch
inputs on the MAINstage.
The first thing to decide is how you want to use your MAINstageHD.
Pick one of the three options to determine the best way to connect your MAINstage…as with many things in life, there are some trade-offs,
in this case, between Best Sound Quality and Easiest Operation. Our chart makes it easy to find the balance best suited to your tastes.
Make sure there is at least 1” of clearance above, behind, and ideally
at either side of the system to allow bass to flow into the room. Refer
to the Operation Guide FAQs for tips on maximizing bass response.
For discrete rear channel applications, see
operations manual, contact our support
department or visit DOWNLOADS at
www.soundmatters.com
For wall-mounting, a camera-type 1/4”–20
threaded hole has been provided which is
compatible with a wide-range of available
brackets.
CAUTION: Refer to manufacturer’s
setup guide and bracket instructions
for installation.