Operating the unit – Perfect Aire PAD70 User Manual
Page 9
8
Operating The Unit
Removing the collected water
There are two ways to remove collected water.
•
•
•
•
•
•
•
•
•
•
If the bucket is full when the unit is OFF, the unit will beep 8 times,
the full indicator light will flash and the digital display will show P2.
If the bucket is full when the unit is ON, the compressor will turn off
and the fan will turn off after 30 seconds. Then the unit will beep 8
times, the full indicator light will flash and the digitial diplay will show
P2.
Slowly pull out the bucket. Grip the left and right handles securely,
and carefully pull out straight so water does not spill. Do not put the
tank on the floor because the bottom of the bucket is uneven. The
bucket will fall and cause the water to spill.
Throw away the water and replace the bucket. The bucket must be
in place securely for the dehumidifier to operate.
The machine will re-start when the bucket is restored in its correct
position. The unit will take 3 minutes to restart.
NOTES:
When you remove the bucket, do not touch any parts inside of the
unit. Doing so may damage the product.
Be sure to push the bucket gently all the way into the unit. Improper
installation or failing to push it in securely may cause the unit not to
operate.
When you remove the bucket, be sure to wipe away any excess
moisture found inside the unit.
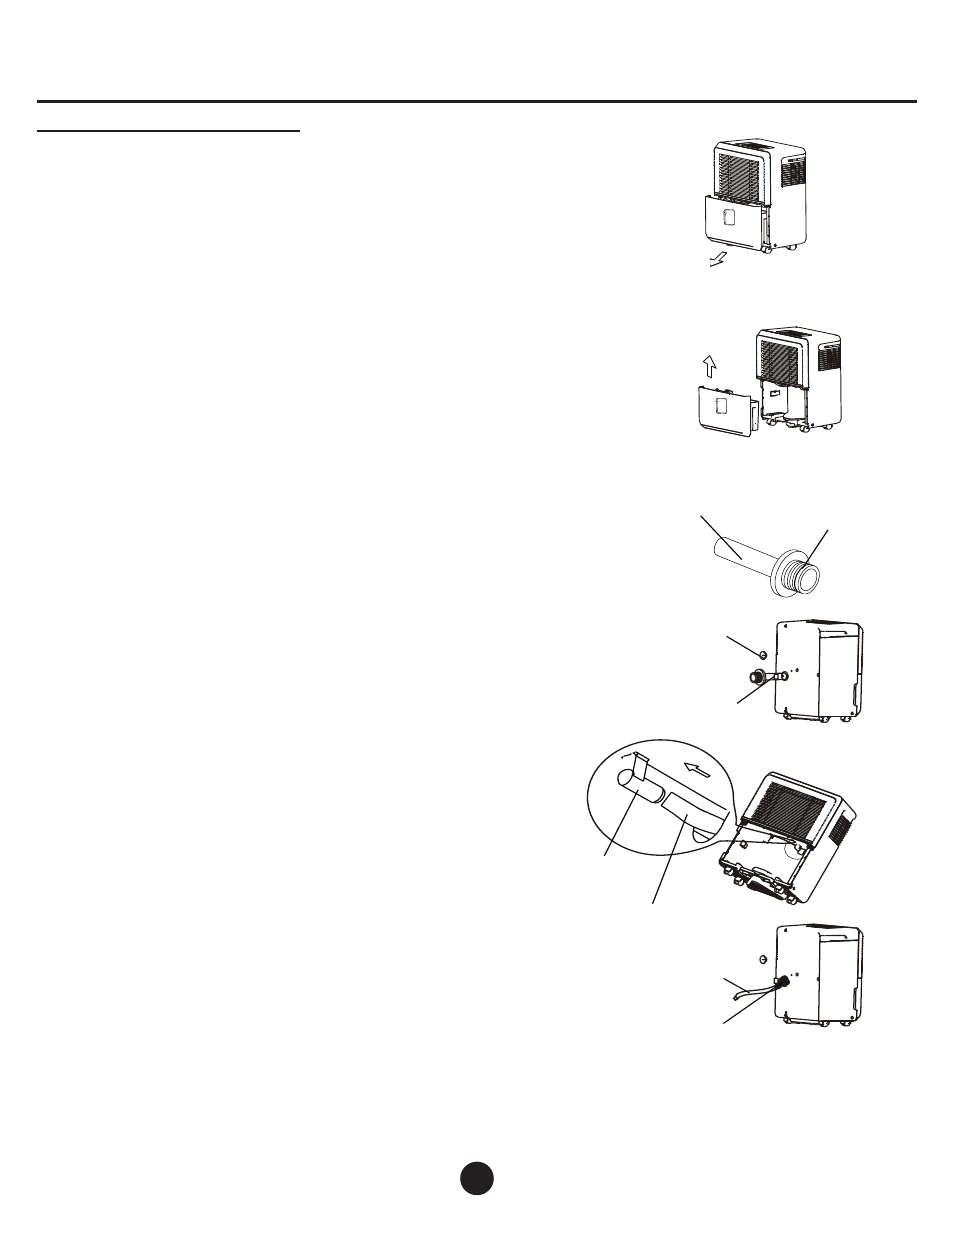
2. Continuous draining
Water can be automatically emptied into a floor drain by attaching the
unit with a water hose with a female threaded end (not included).
Install the drain hose onto the adaptor A (See Fig. 7, placed in the
bucket).
Remove the plastic cover from the back drain outlet of the unit and
set aside. Remove bucket, then insert the drain hose through the
drain outlet of the unit and securely press it into the connector, on
the front of the unit. (See Fig. 9)
Tighten the adaptor A and the unit by using the two screws
provided, which can be found in the corner of the owner’s manual
packaging.
Install the female threaded end of the water hose into the adaptor A
(See Fig. 10) then lead the water hose to the floor drain or a suitable
drainage facility.
Make sure the hose is secure to avoid leakage.
Direct the hose down toward the drain, making sure that there are
no kinks that will stop the water flow.
Place the end of the hose into the drain and make sure the end of
the hose is level or down to let the water flow smoothly. Never let
drain hose go upward against gravity.
Place the bucket back in the unit and make sure that it is correctly
placed.
Select the desired humidity setting and fan speed on the unit for
continuous draining to start.
To eliminate the use of the hose adaptor assembly and still drain
to the floor you may use tubing (5/8” O.D. 1/2” I.D.) in the length
required to go directly from the unit to floor drain.
•
•
••
•
•
•
•
NOTE: When the continuous drain feature is not being
used, remove the drain hose from the outlet and insert
drain plug. Failure to re-insert the drain plug/s will result
in unit malfunction and possible error codes.
1. Pull out the bucket a little.
2. Hold both sides of the bucket
with even strength, and pull it
out from the unit.
3. Pour the water out.
Fig.5
Fig.6
Fig.8
Plastic cover
(drain plug)
Drain hose
Adaptor A
Fig.7
Drain hose
subassembly
Fig.9
Connector
Drain hose
Fig.10
Water hose
Female thread
end
1. Use the bucket