OmniSistem SC 1216 User Manual
Page 6
SC 1216 Plus Manual
2009‐10‐01
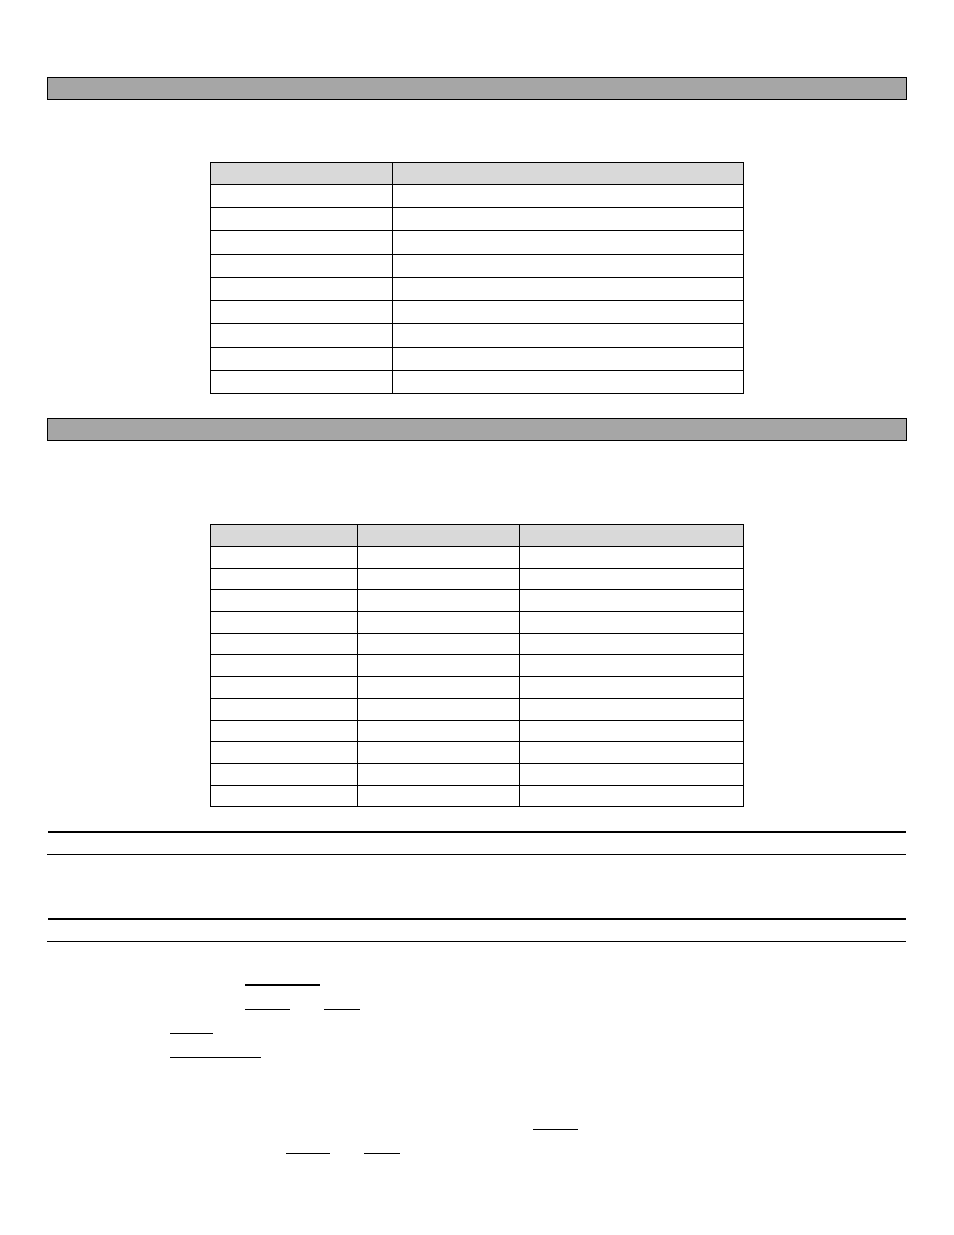
LCD DISPLAY
The LCD display contains a maximum of 2 lines 8 characters each. Definitions of abbreviations is as follows:
LCD DISPLAY
MESSAGE
SN1
SCENE 1
BK1
BANK 1
CHASE1
CHASE 1 IS ACTIVE
STEP 009
THE 9th STEP OF A CHASE
DATA 184
DMX VALUE (000‐255)
SP: 1M54s
THE CURRENT SPEED IS 1 MINUTE 54 SECONDS
TP: 4.25s
THE TIME OF THE LAST 2 TAPS IS 4.25 SECONDS
ASS 04 05
ASSIGN DMX CHANNELS 4 & 5
RES 10 13
REVERSE DMX CHANNELS 10 & 13
DMX SETUP
The SC 1216 Plus is preset to allocate 16 channels per fixture. In order to assign your fixtures to the scanner
buttons located on the left side of the controller, the fixtures must be set 16 DMX channels apart.
FIXTURE #
DIGITAL #
DIP SWITCH SETTING
1
1
1 ON
2
17
1, 5 ON
3
33
1, 6 ON
4
49
1, 5, 6 ON
5
65
1, 7 ON
6
81
1, 5, 7 ON
7
97
1, 6, 7 ON
8
113
1, 5, 6, 7 ON
9
129
1, 8 ON
10
145
1, 5, 8 ON
11
161
1, 6, 8 ON
12
177
1, 5, 6, 8 ON
ENABLING THE PROGRAM MODE:
To enable the program mode, hold the program button until LED is lit.
SETUP JOYSTICK:
1) Press and hold the PROGRAM button until LED is lit.
2) Press and hold the MODE and FINE buttons at the same time, the assigned LED should become lit.
3) Use the BANK up/down arrow keys to select the axis you wish to assign (Pan or Tilt).
4) Use the TAP/DISPLAY button to select 16 or 8 channel mode.
5) Press the button corresponding to the scanner you wish to assign.
6) While holding the mode button press the scene number corresponding to the slider controlling the movement.
(Example: If Pan is controlled by slider 4, press and hold the MODE button while tapping scene button 4)
7) When finished press the MODE and FINE buttons at the same time again to exit joystick setup.