MF Digital DirectorEC OP OptiEC Printer User Manual
Page 14
Page 14
Aligning the MF Digital OptiEC Printer
(fig. 3)
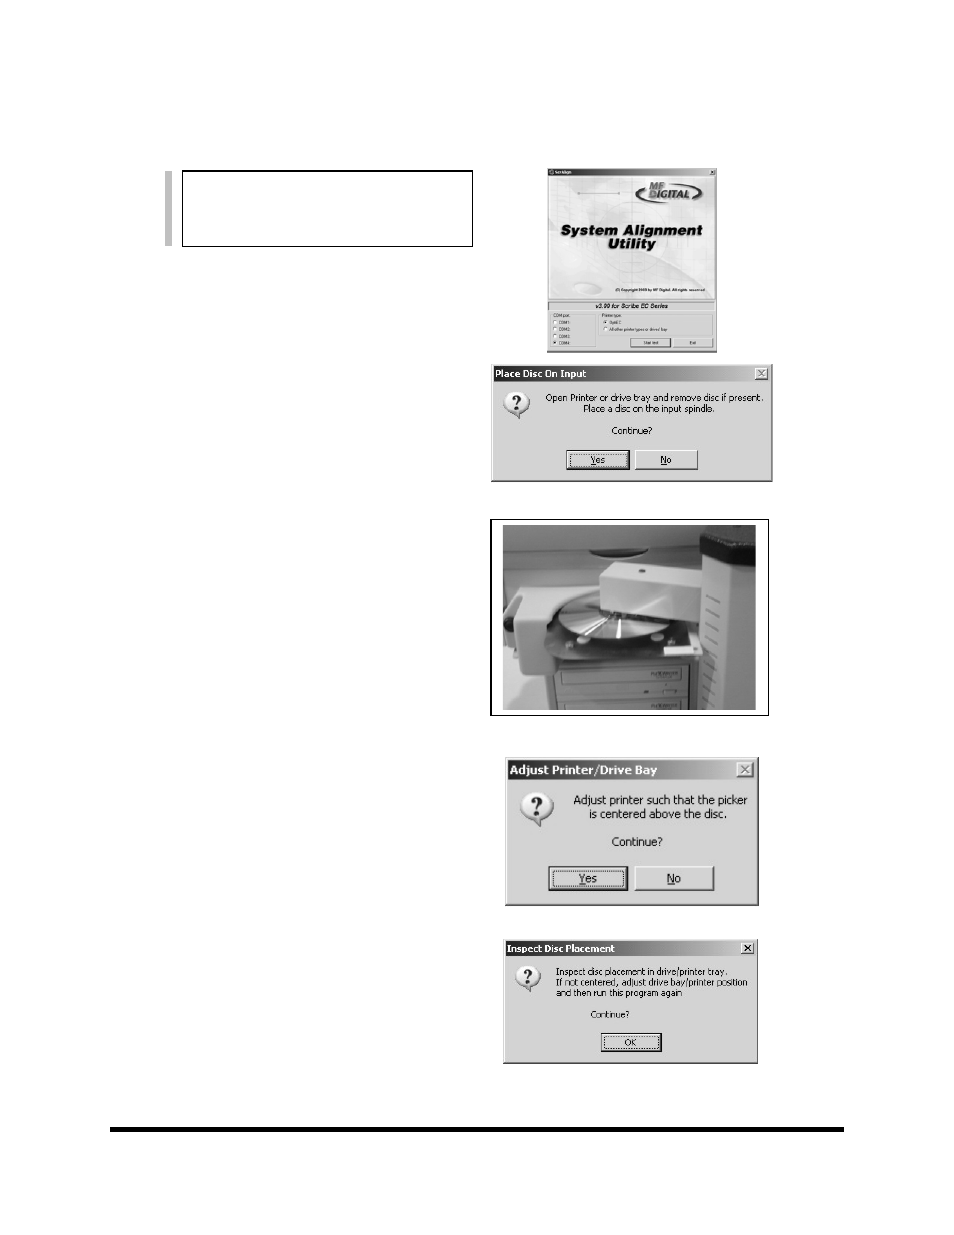
Alert:
Before starting the Alignment Utility,
position the front end of the printer on the
dotted line on the top of the drive bay.
1. From your Start Menu Open the EC Alignment
Utility (fig. 1). It will be located in the folder
designated when you installed the alignment
utility. Select OptiEC printer type. Click on
Start Test.
2.
Follow the instructions by opening the OptiEC
printer tray, and Clicking Yes (fig. 2). The
picker arm will hover a disc over the printer
tray, observe the discs position and make the
adjustments to the printer (fig. 3).
3.
Click Yes when you are satisfied with your
adjustment (fig. 4).
4. The picker arm will then place the disc onto
the printer tray. Follow the on screen
instructions and click OK (fig. 5).
5. Once you are satisfied with the printer tray
alignment, tighten the thumb-screws located
on both sides of the printer.
(fig 1)
(fig 2)
(fig. 4)
(fig. 5)
- SCRIBE 9000 (73 pages)
- SCRIBE 9000 Client (4 pages)
- DIRECTOR Series (69 pages)
- DIRECTOR Series D CLIENT (32 pages)
- DIRECTOR Developers Guide (22 pages)
- Cougar 6600 Manual (33 pages)
- Cougar 6600 Client (10 pages)
- USB SD 5000 Platform Series (16 pages)
- 5200 Live Series EventCD (21 pages)
- Rimage Prism Plus Thermal (15 pages)
- DirectorEC OP OptiEC PRO (14 pages)
- Ripstation v4.4.15.0 (34 pages)
- Ripstation DataGrabber V1.0.35.0 (23 pages)
- Ripstation MediaGrabber V1.0.35.0 (28 pages)
- SCRIBE 9600 (12 pages)
- DIRECTOR 2600 (8 pages)
- Cougar 6600 Quick Start Guide (1 page)
- Ripstation Quick Start Guide (1 page)
- 5907-VL CD/DVD Tower (23 pages)
- SCRIBE SA 3000 (72 pages)
- Ripstation Lite v4.4.11.0 (43 pages)
- Ripstation DataGrabber V1.0.29.0 (28 pages)
- Ripstation MediaGrabber V1.0.29.0 (33 pages)
- SCRIBE SA LX1 & 3102 (10 pages)
- SCRIBE SA LX1 & 3104 (10 pages)
- LX1 & 5906 (10 pages)
- SCRIBE ЕС LX1 & 3702 (10 pages)
- SCRIBE ЕС LX1 & 3704 (10 pages)
- SCRIBE ЕС LX1 & 5906 (10 pages)
- 5000 Series (65 pages)
- SCRIBE EC PC-Based Series (91 pages)
- SCRIBE EC_PC_manual (63 pages)
- Director EC Publishing Series (87 pages)
- CD-5121 (Rev: 02/16/01) (2 pages)
- CD-5400L (Rev: 08/01/02) (49 pages)
- DVD-5400 (Rev: 03/05/01) (41 pages)
- CD-5916 (Rev: 03/05/01) (64 pages)
- CD-3701 (Rev: 08/01/02) (40 pages)
- CD-QuadraPRO (Rev: 08/01/02) (55 pages)
- DVD-QuadraPRO (Rev: 08/01/02) (56 pages)
- Vantage (Rev: 06/01/02) (76 pages)
- DIRECTOR Series (Rev: 06/01/02) (105 pages)
- DIRECTOR CD/DVD Combo Series (Rev: 08/01/02) (104 pages)
- ScribeEC 3000 Series (3 pages)