English, Visual operations, Zone: 1 (front monitor lock) – Clarion VRX925VD User Manual
Page 44: Zone: 2 (rear monitor lock)
44
VRX925VD
English
Owner’
s manual
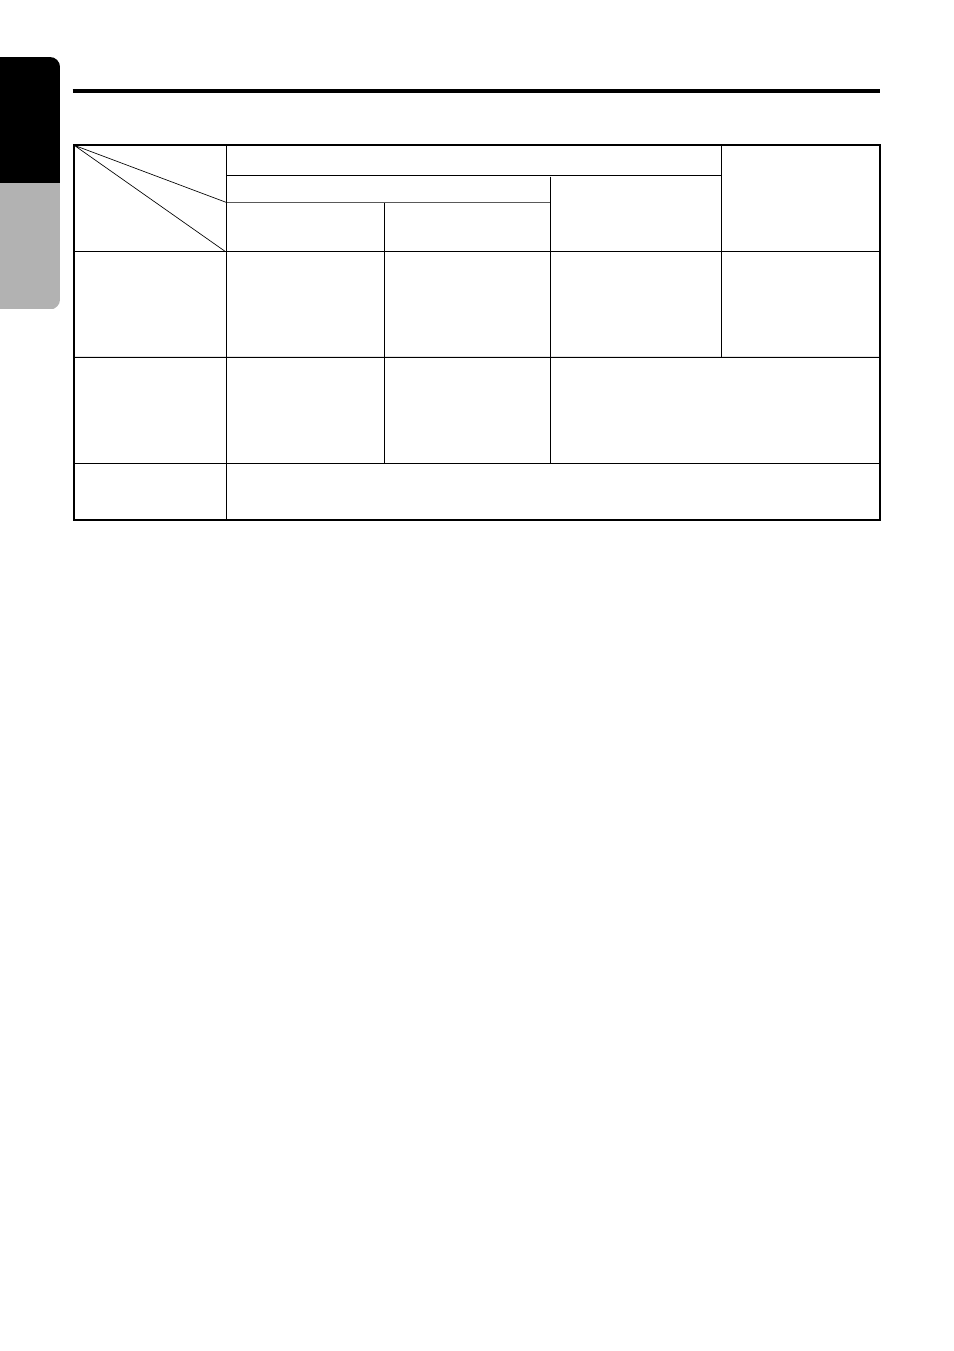
VISUAL Operations
Front image
(receiver
screen)
Rear monitor
image
(separately
sold)
Vehicle speaker
sound
Image of device
connected to the
Visual 2 terminal
(
∗
3)
Image of device
connected to the
Visual 2 terminal
Image of device
connected to the
Visual 2 terminal
(
∗
3)
Displays image of
mode selected
using the [FUNC]
button
Image of device
connected to the
Visual 2 terminal
(
∗
3)
Image of device connected to the
Visual 1 terminal
Displays image of
mode selected
using the [FUNC]
button (
∗
2)
Plays sound of mode selected using the [FUNC] button
2 ZONE
Front monitor lock
Visual 2 connection
[OTHERS]
Visual 2 connection
[NAVI]
Rear monitor
lock
3 ZONE
(
∗
1)
∗
1 A device connected to the Visual 2 terminal should be set up as described in the section “Switch-
ing Connect.”
∗
2 No image is displayed on the rear monitor when a non-image mode such as radio, SIRIUS, CD, etc.
is engaged.
∗
3 For safety reasons, this image is not displayed when the vehicle is moving. The picture can be
watched only when the vehicle is standing still and the parking brake is engaged.
2-ZONE: 1 (front monitor lock)
1. Press the [M.L] button.
2. Press the [FUNC] button to select the de-
sired mode.
3. To cancel the monitor lock, press the [M.L]
button.
The screen shows the image of the selected
mode.
∗
When the front monitor lock is engaged,
[MENU], [LIST], [KEY PAD], [ADJ] and [A-M]
button cannot be used. Cancel the monitor
lock when you wish to use these buttons.
2-ZONE: 2 (rear monitor lock)
1. Press the [ADJ] button to display the AD-
JUST MODE menu.
2. Touch the [REAR MONI LOCK] key and the
[ON] key.
3. Touch the [RTN] key or press the [ADJ] but-
ton.
4. To cancel the monitor lock, press [ADJ] but-
ton, touch the [REAR MONI LOCK] key and
the [OFF] key.
5. Touch the [RTN] key or press the [ADJ] but-
ton.
The monitor lock is now canceled.
Locking the front monitor and rear
monitor (3-ZONE)
1. Lock the rear monitor by performing the in-
structions in steps 1 to 3 above.
2. Press the [M.L] button to lock the front moni-
tor.
3. Press the [FUNC] button.
The image for the selected mode is dis-
played for about 5 seconds after which the
front monitor lock image is displayed.
4. To cancel the monitor lock, press the [M.L]
button.
5. To cancel the rear monitor lock, press the
[ADJ] button, touch the [REAR MONI LOCK]
key and the [OFF] key.
●
Lock system monitor image and sound