Save these instructions, Pool setup (continued), English page 7 – Intex 32FT X 16FT X 52IN RECTANGULAR POOL SET 2014 User Manual
Page 7
119
PO
SAVE THESE INSTRUCTIONS
(119PO) RECTANGULAR ULTRA FRAME POOL ENGLISH 7.5” X 10.3” PANTONE 295U 07/18/2013
English
Page 7
POOL SETUP (continued)
2.3
32’ X 16’
CORNER
JOINT
CORNER
JOINT
CORNER
JOINT
CORNER
JOINT
(A)
(F)
(D)
(E)
(E)
(D)
(F)
(E)
(E)
(C)
LINER
(B)
(B)
(B)
(B)
(B)
(B)
(C)
(A)
(B)
(B)
(B)
(B)
(B)
(B)
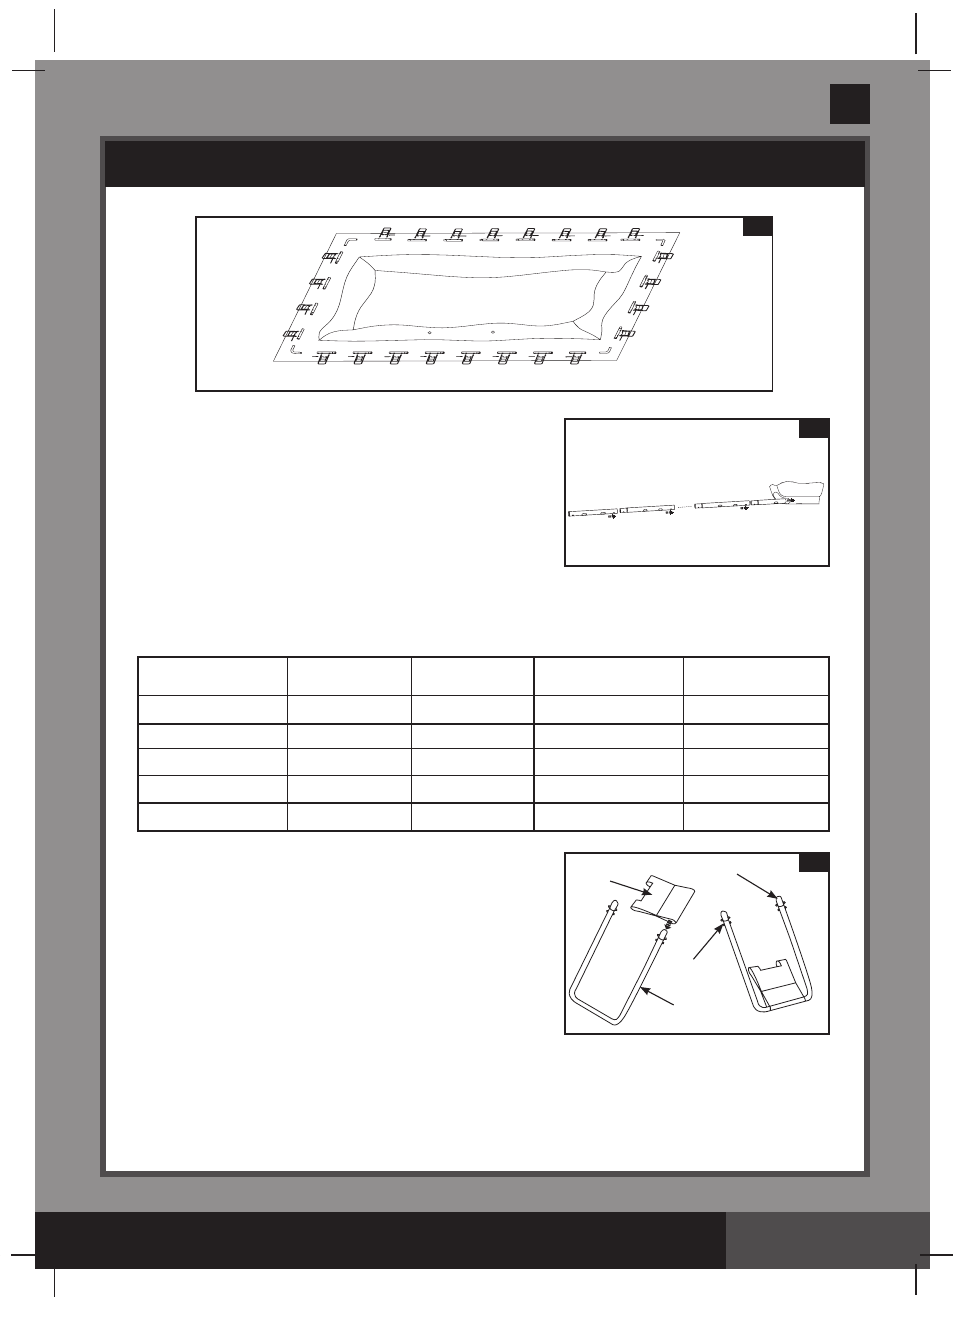
3. Be sure the liner is opened and spread out to its fullest
extent on top of the ground cloth. Starting with one side,
slide the “A” beams first into the sleeve openings located in
each corner. Continue with “B” beam snapping into the “A”
beam, and another “C” beam snapping into the “B” beam
(see drawing 3).
Keep the metal beam holes aligned with the white liner
sleeve holes.
Continue inserting all “A-B-C & D-E-F” beams into the sleeve
openings. Start the "D-E-F" combination for pool's short sides
by inserting the "D" beam first into the opening.
The combinations for beams are different for different sizes of pools, see the chart below for detail. (Be
sure all 4 sides end up with the metal beam holes aligned with the white liner sleeve holes.)
4. Slide the restrainer strap (13) onto the large U-shaped side
support
(11). Repeat for all restrainer straps and U-supports.
IMPORTANT: The liner is to remain flat on the ground
during the next step #5. This is why 5 - 6’ of clearance
space around the pool is necessary (see drawing 4).
4
13
9
10
11
3
(C)
(B)
(B)
(A)
Size of Pool
157-1/2”x78-3/4” (400 cm x 200cm)
15’ x 9’ (457 cm x 274 cm)
18’ x 9’ (549 cm x 274 cm)
24’ x 12’ (732 cm x 366 cm)
32’ x 16’ (975 cm x 488 cm)
No. of “U-shape” Leg
on longer side
4
4
4
6
8
No. of “U-shape” Leg
on shorter side
2
2
2
3
4
Horizontal Beam
Combinations on longer side
A-B-B-C
A-B-B-C
A-B-B-C
A-B-B-B-B-C
A-B-B-B-B-B-B-C
Horizontal Beam
Combinations on shorter side
D-F
D-F
D-F
D-E-F
D-E-E-F