Cub Cadet 5254 User Manual
Page 31
31
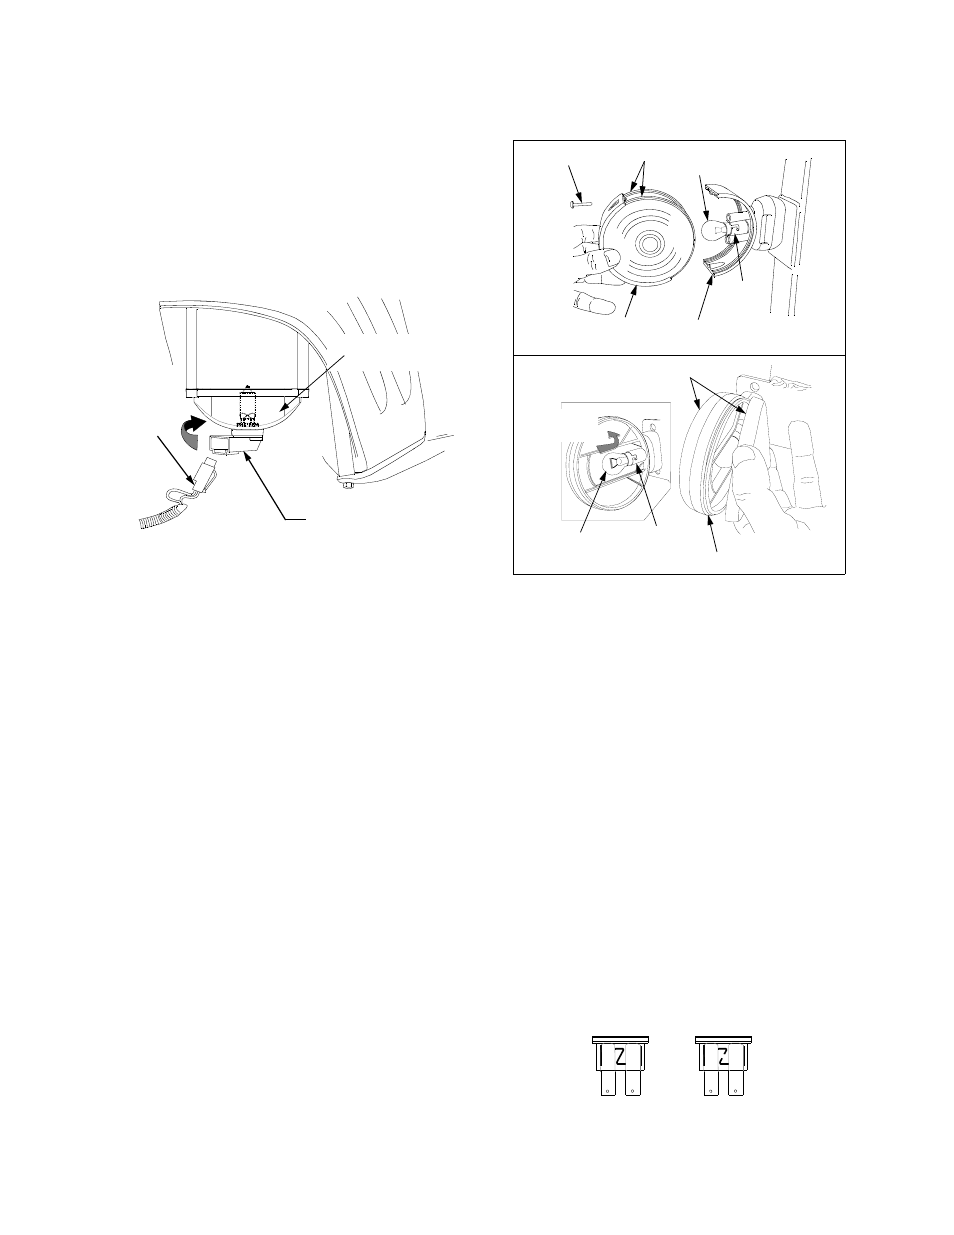
HEAD LIGHT BULB REPLACEMENT
The tractor is equipped with headlights. If one of the
bulbs should burn out, replace the bulb as follows:
•
Fully raise the hood.
•
Pull the wire harness plug from the bulb/socket
assembly to unplug the wire harness. Refer to
Figure 36.
•
Turn the bulb/socket assembly approximately a
quarter turn counterclockwise to align its tabs
with the notches of the reflector, then remove
from the reflector. See Figure 36.
Figure 36
•
Replace with a new bulb/socket assembly (Cub
Cadet No. 725-04084).
•
Align the tabs of the new bulb/socket assembly
with the notches of the reflector and insert the
bulb. Turn the bulb/socket assembly clockwise
to lock in place. Push the wire harness plug
fully into the bulb socket.
HAZARD BULB REPLACEMENT
The bulb in the hazard light assembly on each side
of the ROPS is serviceable. Your tractor may have
a hazard light assembly with a two piece housing
that is fastened by two screws. Or you may have an
assembly where the amber lenses snap into and
out of the body. Determine which type of assembly
you have. Performing only the instructions that
apply to your assembly, replace a hazard light bulb
as follows:
•
Screw fastened hazard light assembly:
Grasp the outer half of the light housing and
both the front and rear lenses. Accessing the
screws from the notches at the top and bottom
of the outer housing, remove the two screws
and remove the outer housing and lenses. See
Figure 37.
•
Snap together hazard light assembly: Insert
a thin bladed screwdriver, or similar tool,
between an amber lense and the hazard light
body, then twist to separate the lense from the
body. See Figure 37.
•
Push the bulb inward and turn counterclockwise,
then pull the bulb outward to remove from the
light socket. See Figure 37.
Figure 37
•
Align the new bulb with the socket slot, push
the bulb into the socket, and turn clockwise to
lock it in the socket.
•
Screw fastened hazard light assembly:
While making certain the lenses engage the
front and rear grooves of the inner housing,
install the lenses and outer housing. Secure
with the two screws.
•
Snap together hazard light assembly:
Position the lense on the hazard light body and
push the lense onto the body until it snaps
firmly into place on the body.
SERVICING ELECTRICAL SYSTEM
Fuses are installed to protect the tractor’s electrical
system from damage caused by excessive amper-
age. Always use the same capacity fuse for
replacement. If the electrical system does not func-
tion, check for blown fuses. See Figure 38
If you have a recurring problem with blown fuses,
have the tractor’s electrical system checked by your
Cub Cadet dealer.
Figure 38
BULB/SOCKET
ASSEMBLY
WIRE
HARNESS
PLUG
REFLECTOR
Screw
Push in
and Turn
Socket
Bulb
Lenses
Inner
Housing
Outer
Housing
Amber Lense
Body
Bulb
Socket
GOOD
BAD