Great Planes Edge 540 3D Indoor EP ARF - GPMA1128 User Manual
Page 6
6
❏
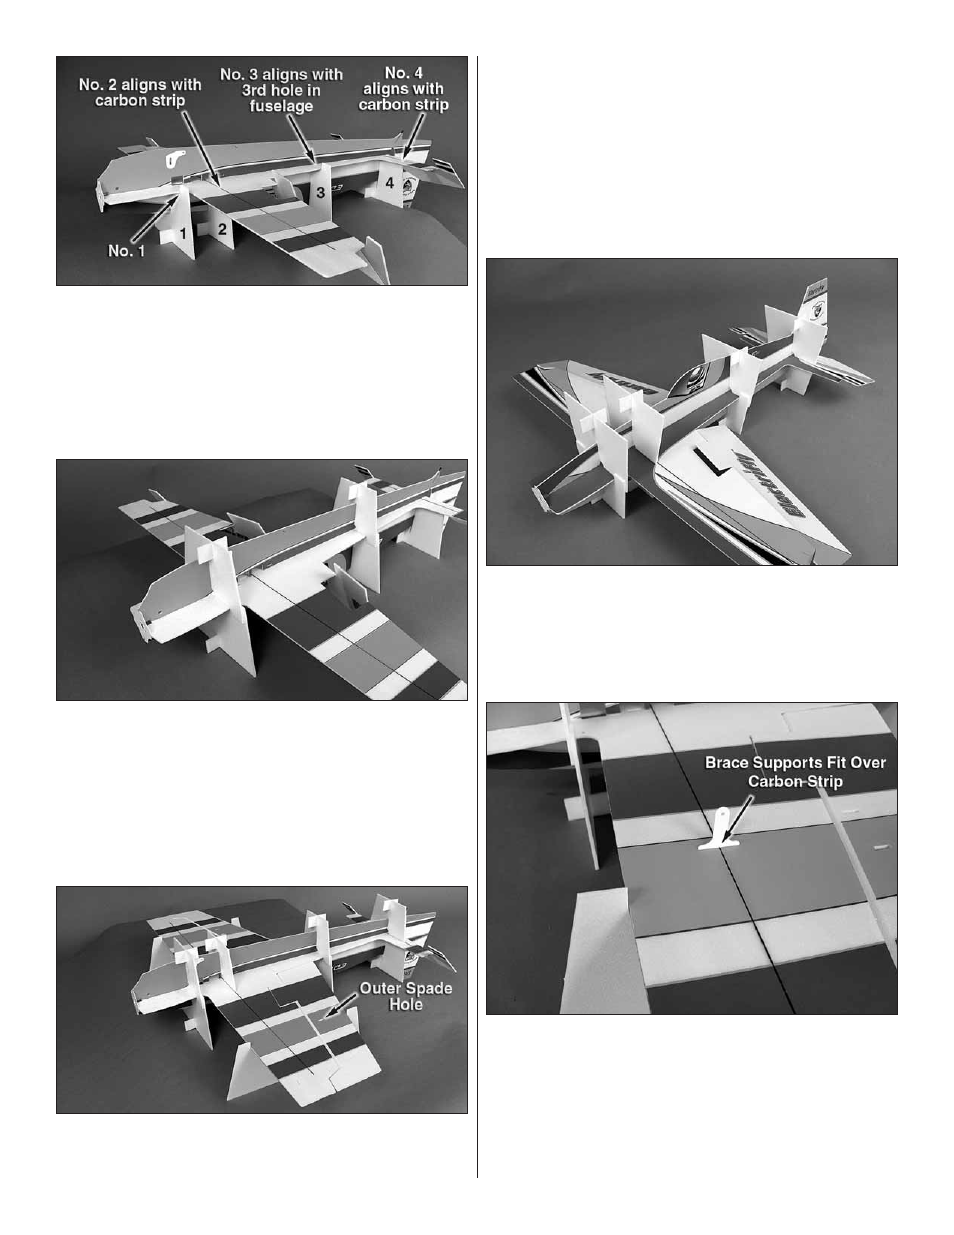
6. On your building table, place the four top crutches with
the feet on them underneath the fuselage in the locations
shown. Note that the plane is positioned upside down and
the vertical fi n is hanging over the edge of the table. Crutch
#1 is positioned in front of the radius at the front of the wing.
#2 is positioned under the carbon fi ber strip in the wing. #3
is positioned at the third hole in the side of the fuselage and
#4 is positioned under the carbon fi ber strip in the stabilizer.
❏
7. Test fi t the #1 and #3
bottom crutches
over their
corresponding top crutches. Install the ABS
motor mount
onto the front of the fi rewall, but
DO NOT
glue it in place at
this time. Check that all the crutches are seated against the
fuselage and the horizontal and vertical fuselages are keyed
together. Then, glue the top and bottom of crutches #1 and #3
together by applying a small amount of foam-safe CA to the
tabs of the crutches.
Be careful not to glue the crutches
to the fuselage.
❏
8. Position the two wing tip crutches under the wing tips at
the outer spade hole in the aileron and the bottom crutches
#2 and #4 over the carbon fi ber strip in the wing and stabilizer.
❏
9. Make sure the horizontal and vertical fuselages are keyed
together and the crutches are fl at on your building table. Glue
the horizontal and vertical fuselages together by applying thin
foam-safe CA along the joint on the bottom of the horizontal
and vertical fuselages. Be careful when gluing around the
crutches.
DO NOT
glue the crutches to the fuselage. Allow the
CA to cure for a few minutes before moving the plane. The use
of foam-safe accelerator will quicken the curing of the CA, but
use it sparingly. Excessive amounts of accelerator can cause
the CA to cure quickly, causing it to get hot and melt the foam.
❏
10. Carefully turn the Edge 540 over and position the
bottom crutches #2 and #4 under the carbon fi ber strips in
the wing and stabilizer. Check that the crutches are fl at on
the building table and the horizontal and vertical fuselages
are keyed together. Use thin foam safe CA to glue the top of
the horizontal and vertical fuselages together.
❏
11. Turn the plane back over so that it is sitting upside down.
Locate the two
ABS brace supports
. There is a slot located
in the center of each wing. Glue the ABS brace supports
into the slots, perpendicular to the underside of the wing. It
is possible that, during manufacturing, some glue may have
gotten into the slot. If this has happened,
DO NOT FORCE
the supports into the slot. Use a sharp hobby knife to remove
any excess glue.