Pro tip – Great Planes Extra 330SC EP ARF - GPMA1129 User Manual
Page 14
14
on both sides of the fuselage. Apply narrow (1/16" [1.5mm])
strips of tape over the lines so you will be able to feel them
when lifting the model with your fi ngers.
This is where your model should balance for the fi rst
fl ights. Later, you may experiment by shifting the C.G. 3/16"
[5mm] forward or 1/4" [6mm] back to change the fl ying
characteristics. Moving the C.G. forward will improve the
smoothness and stability, but the model will then be less
aerobatic (which may be fi ne for less-experienced pilots).
Moving the C.G. aft makes the model more maneuverable
and aerobatic for experienced pilots. In any case, start at
the recommended balance point and do not at any time
balance the model outside the specifi ed range.
❏
2. Place the motor battery on the top of the fuselage on
the recommended CG. Lift the model from the bottom at the
recommended CG.
❏
3. If the tail drops, the model is “tail heavy.” Move the
motor battery forward to get the model to balance. If the nose
drops, the model is “nose heavy.” Move the motor battery aft.
Once you have determined the battery location required to
balance the plane, note the location and where the battery
would need to be attached on the bottom of the fuselage.
❏
4. Apply the remaining hook and loop material to the side
of the fuselage at the approximate location for the motor
battery. Attach an opposite piece of hook and loop material
to the battery. Trial fi t the motor battery to the side of the
fuselage and recheck the CG.
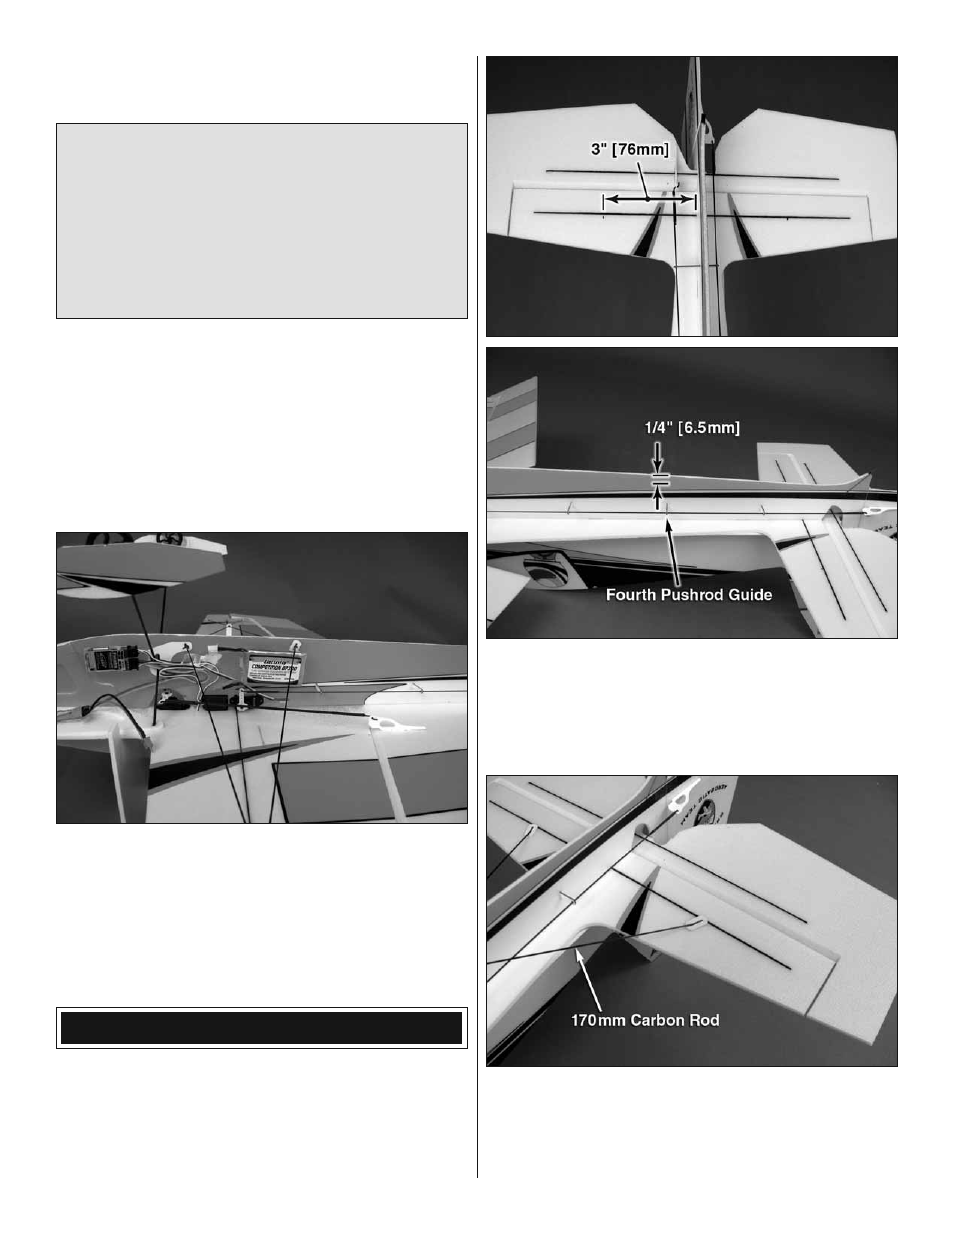
PRO TIP
For the most demanding rolling maneuvers, some of our
team pilots prefer to use some additional carbon tail bracing.
We have included additional lengths of carbon rods and
short ABS brace doublers that allows you to set-up your
Extra 330SC like the pros.
❏
1. Position one of the 1
×
170mm carbon rods so that
it is 3" [76mm] from the vertical fuselage, on the carbon
strip in the stabilizer and below the 4
th
pushrod guide. Note
the angle and cut a small slot in front of the carbon strip
in the stabilizer and ¼" [6.5mm] above the bottom of the
vertical fuselage.
❏
2. Slide two of the short ABS brace doublers onto the
170mm carbon rod. Insert the rod into the slots and slide one
of the doublers onto the stabilizer. Use foam safe CA to glue
the brace doubler and carbon rod to the stabilizer. Do not
glue it to the vertical fuselage.