Mk600 in dash fitting instructions, Templ a te – GME GX600 User Manual
Page 13
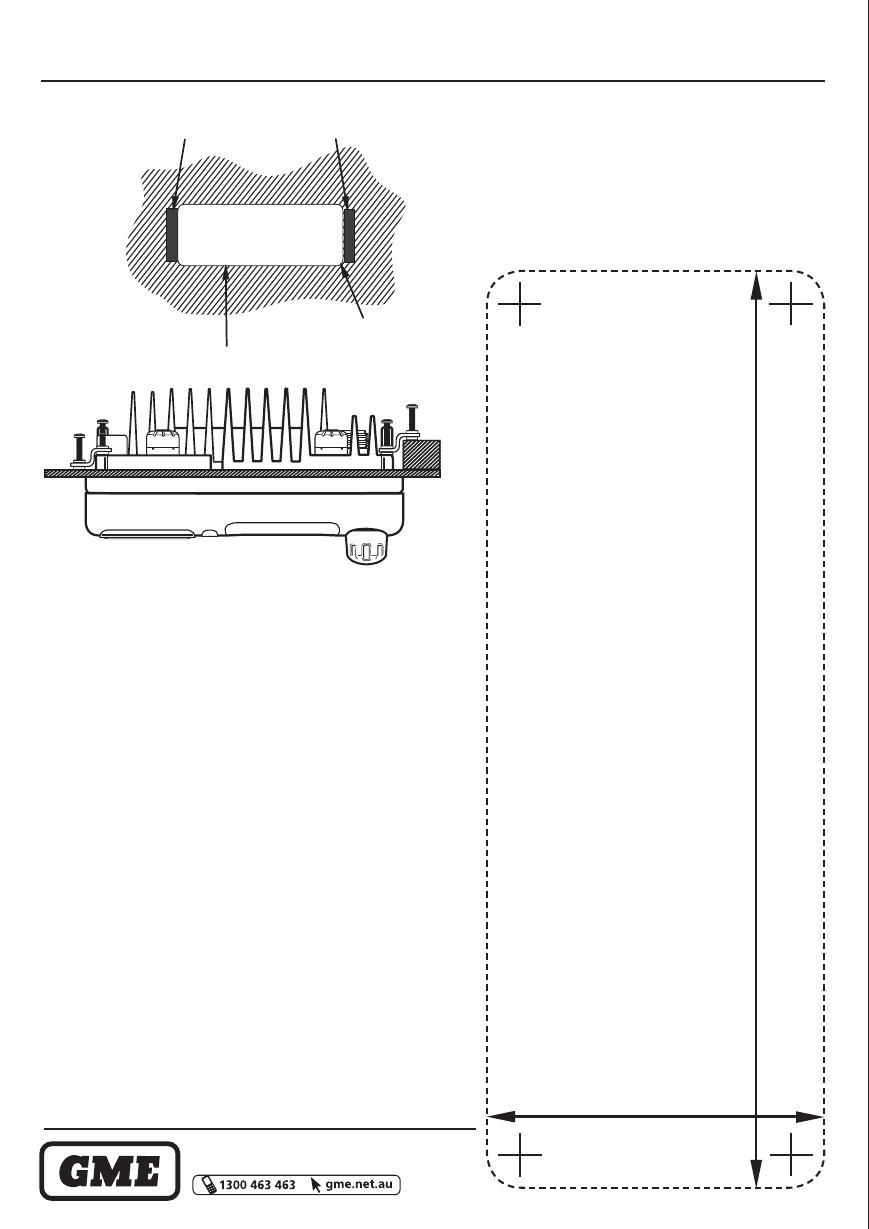
REAR VIEW
Cut Out 156 mm x 58 mm
6.0 Radius
Adhesive Backing Plate
Ensure that the location selected for in dash mounting is convenient
for the operator and that there is sufficient space behind the panel to
accommodate the body of the radio and allow a free flow of air.
Refer to page 13 of the Instruction Manual for more hints.
Once the most suitable location has been selected, mark and centre
punch the cross hair in each corner and drill a 12 mm diameter hole.
Mark a straight line from the outer edge of each hole to form a
rectangle. Cut to the inside edge of these lines.
Remove the backing paper from the metallic backing strips exposing
the self adhesive surface and fix them in position vertically at either end
of the hole on the rear side of the dashboard flush with the edge.
See figure 1
Place the GX600 through the hole. If the dashboard is subject to water
spray it may be beneficial to apply a thin bead of sealant to prevent
any water ingress between the body of the radio and
the dashboard.
The S/S brackets can now be fastened to the rear panel of the GX600
with the 4 S/S self tappers supplied. Note that the brackets can be
reverse mounted to allow for varying thicknesses of dashboards.
See figure 2
Insert the remaining metal-thread screws so that they bear down on
the two metallic backing strips and tighten until the GX600 is held
firmly in place.
Connect the power lead and antenna lead as illustrated in the
Instruction Manual.
Contents:
2 S/S brackets
2 adhesive backing strips
4 S/S self tapping screws
4 S/S metal-thread screws
MK600 IN DASH FITTING INSTRUCTIONS
Figure 2
Figure 1
✂
✂
✂
✂
58 mm
157 mm
TEMPL
A
TE
D.
N.
42261-3
P.N.
310226
Head Office: PO Box 96, Winston Hills, NSW 2153, Australia
A division of Standard Communications Pty Ltd.