Microphone, Antenna installation – GME TX2720 User Manual
Page 9
TX2720
INSTRUCTION MANUAL
PAGE 9
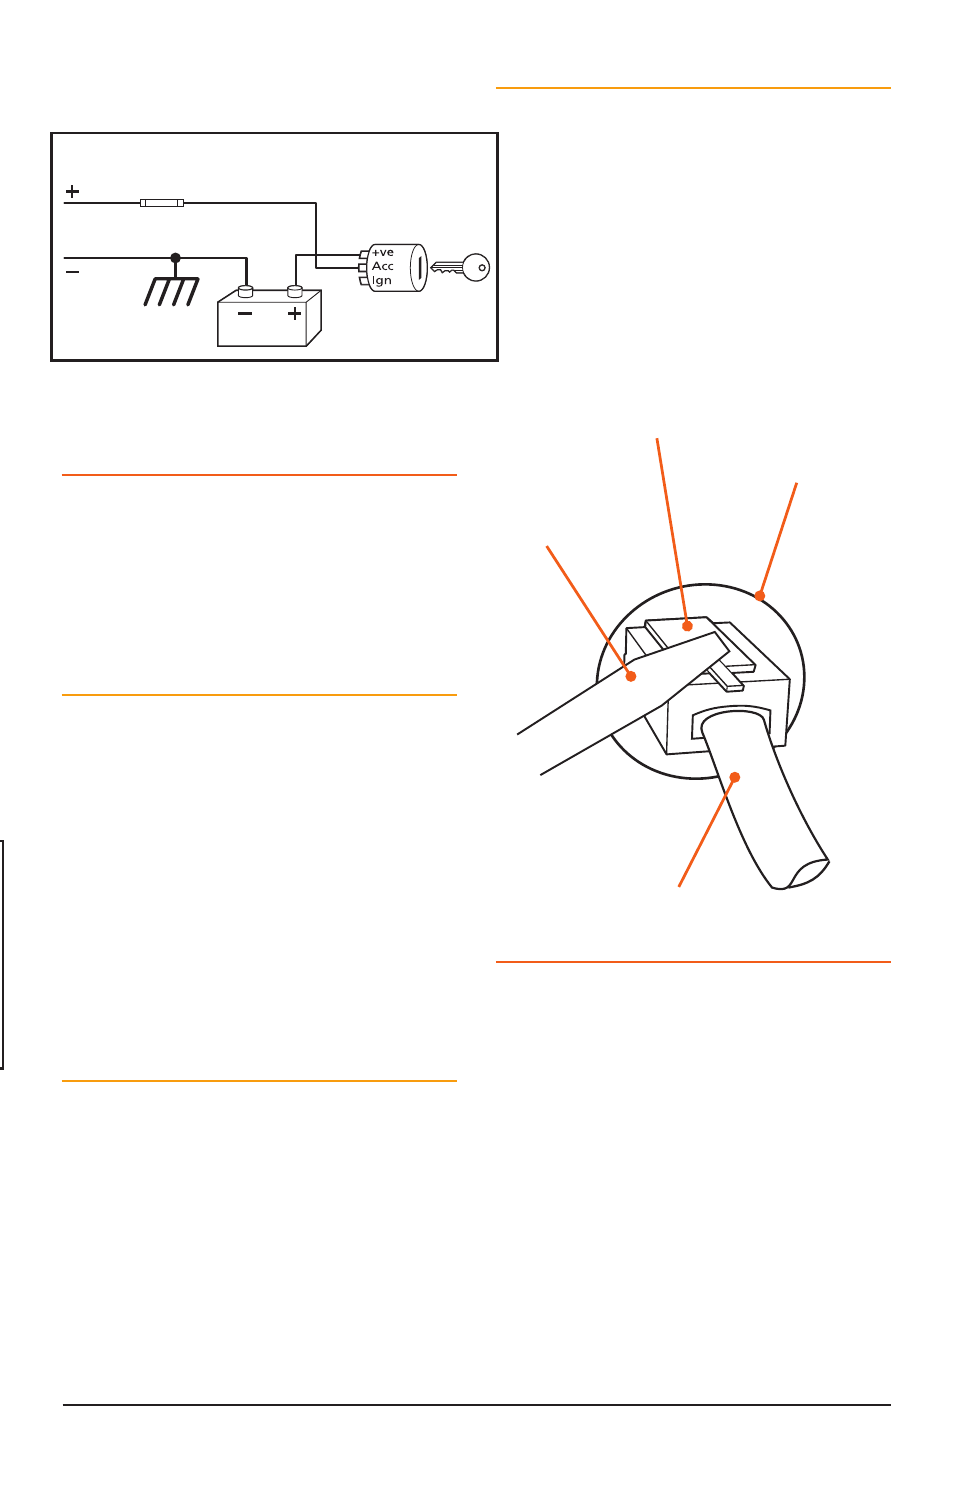
supply +13.8 volts ONLY when the ignition is
switched ON or in the ACCESSORY position
The radio should now switch ON and OFF
automatically with the vehicle’s ignition switch.
MICROPHONE
The TX2720 is fitted with two microphone
sockets – one on the front panel and one on
the rear. The 6 pin microphone connector can be
plugged into either socket. In fact, if the situation
requires it, two microphones can be connected
simultaneously.
Front
The front microphone socket is fitted with a
hard protective cover. The cover is a press fit. To
remove the cover insert a paper clip or similar
into the small slot in the edge of the cover and
lift the cover away from the panel. Retain the
cover in case you require it later on. Position
the microphone plug so the plastic tab faces
upwards then press the plug into the socket until
it ‘clicks’. Gently press the rubber strain relief
grommet into the hole surrounding the socket
so that the slot around the grommet fits neatly
inside the lip inside the hole.
Rear
If using the rear microphone connection you should
obtain the optional LEM6P rear microphone
extension lead. Mount the extension lead’s
socket on a convenient location and feed the
plug through the dashboard to the DIN cavity.
Remove the rubber grommet from the rear
microphone socket and retain in case you require
it later on. Position the microphone plug so the
plastic tab faces upwards then press the plug
into the socket until it ‘clicks’.
Removing the Microphone
For the front panel connection, first squeeze the
grommet to disengage it from the slot then
slide it along the microphone cord.
Now squeeze the microphone plug’s plastic
tab towards the plug to unlock it while gently
pulling on the microphone cable. The plug
should release from the socket. If the plug
does not come out easily, the tab has not been
released fully – squeeze the tab again.
ANTENNA INSTALLATION
It is essential to install a good quality, high
efficiency, 27 MHz antenna. A poor quality
antenna or one not designed for the specific
frequency band will give very poor performance.
GME have a large range of suitable 27 MHz
antennas to suit most installations and
applications. We recommend you contact your
local GME dealer for advice.
After mounting the antenna, feed the antenna
cable to the DIN cavity in the vehicles console or
dashboard before mounting the radio. Connect
the antenna cable to the rear antenna socket
using the PL259 connector.
Radio remains ON when ignition switch is OFF
RED
Fuse
Fuse
BLACK
Chassis
Car battery
Ingnition Switch
Radio turns ON and OFF with ignition switch
RED
BLACK
Chassis
Car battery
Ingnition Switch
To Radio
To Radio
Radio remains ON when ignition switch is OFF
RED
Fuse
Fuse
BLACK
Chassis
Car battery
Ingnition Switch
Radio turns ON and OFF with ignition switch
RED
BLACK
Chassis
Car battery
Ingnition Switch
To Radio
To Radio
Cable Entry
Screwdriver
Locking Lever – push
down to release plug
Microphone Cable