Atria, Installing the mounting hardware, Assembling – Casablanca Fan Company Atria C18GXXXF User Manual
Page 9: Attaching the crossbar mounting bracket
Atria
™
9
Assembling
1
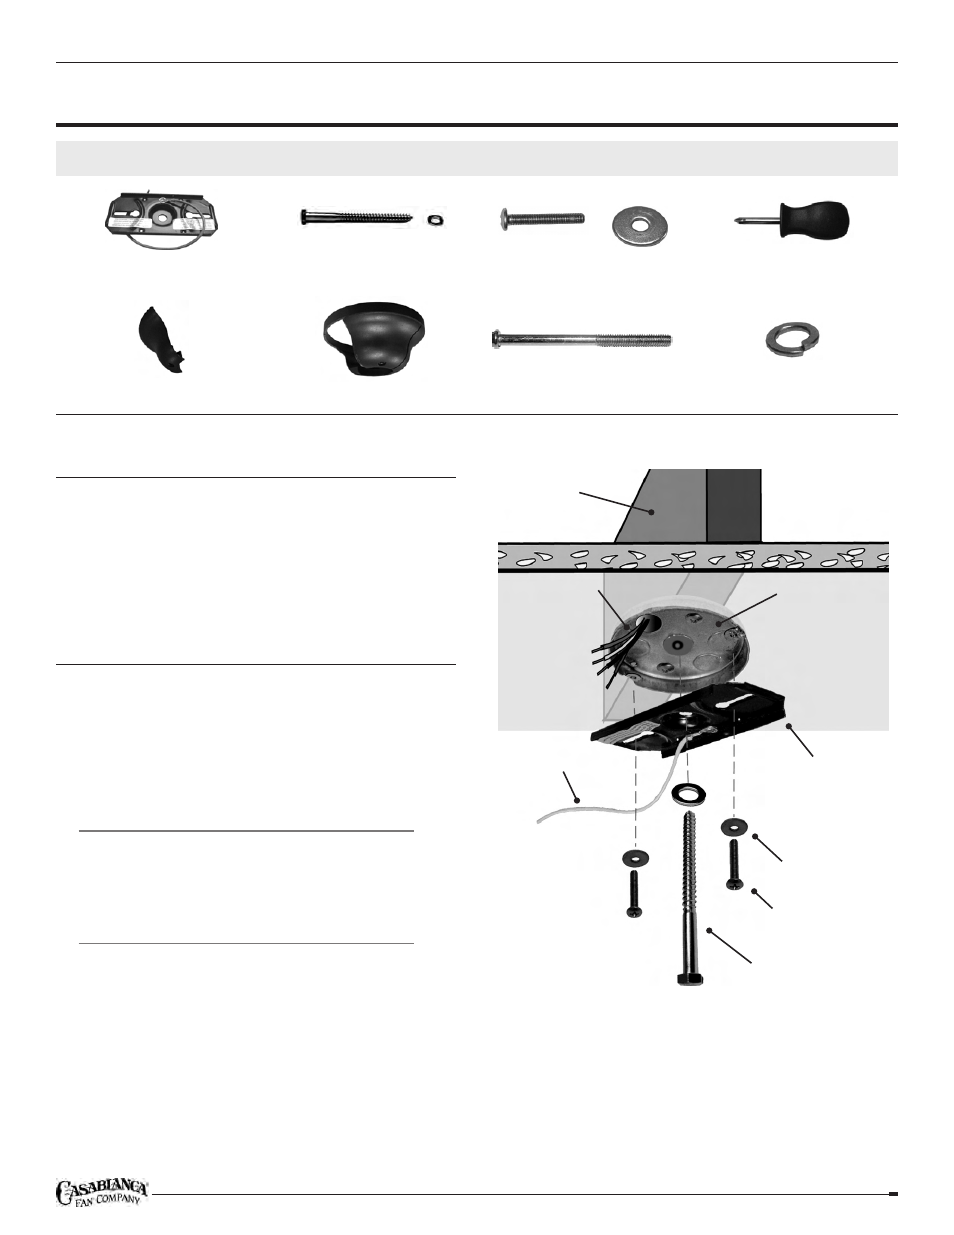
Prepare the ceiling fixture outlet box for the lag screw
by removing the plug in the center. If the outlet box does
not have a plug, drill a ½-inch hole in the center of the
box. After drilling a hole in the outlet box, drill a ¼-inch
hole 3 inches deep into the joist used to support the fan.
Attaching the Crossbar Mounting Bracket
2
To install the crossbar mounting bracket, route the
outlet box wires along side of the crossbar mounting
bracket. Attach the crossbar mounting bracket to the
outlet box with the set of two round-head screws and
washers. Use caution when installing the screws and
washers. Do not pinch the outlet box wires in the washers.
CAUTION:
Ñ
To reduce the risk of personal
injury, use only the mounting hardware
provided with an approved outlet box (not
included) to install the crossbar mounting
bracket.
3
Pass the lag screw through the center hole in
the crossbar mounting bracket and the ceiling fixture
outlet box. Secure the lag screw into the guide hole in
the joist, tightening until the outlet box and mounting
bracket are mounted firmly to the support beam.
Installing the Mounting Hardware
Hardware (not to scale)
Crossbar Mounting
Bracket (1)
Lag Screw and Washer (1)
1” x 8-32 Round-Head Screws
and Washers (2)
Phillips Screwdriver
Canopy Hatch (1)
Canopy (1)
2½” x 8-32 Canopy Screws and Lock Washers (3)
STEPS 3-4
Joist
Ceiling fixture
outlet box
(ceiling fan rated)
Crossbar mounting
bracket
(ridge side down)
1” x 8-32 Round-
Head screws (2)
Washers (2)
Ceiling wiring
GREEN ground wire
Lag screw and
washer (1)