Installation requirements installation hardware, Installation, Installation requirements – Kenmore 580.76100 User Manual
Page 5
Attention! The text in this document has been recognized automatically. To view the original document, you can use the "Original mode".
INSTALLATION
INSTALLATION REQUIREMENTS
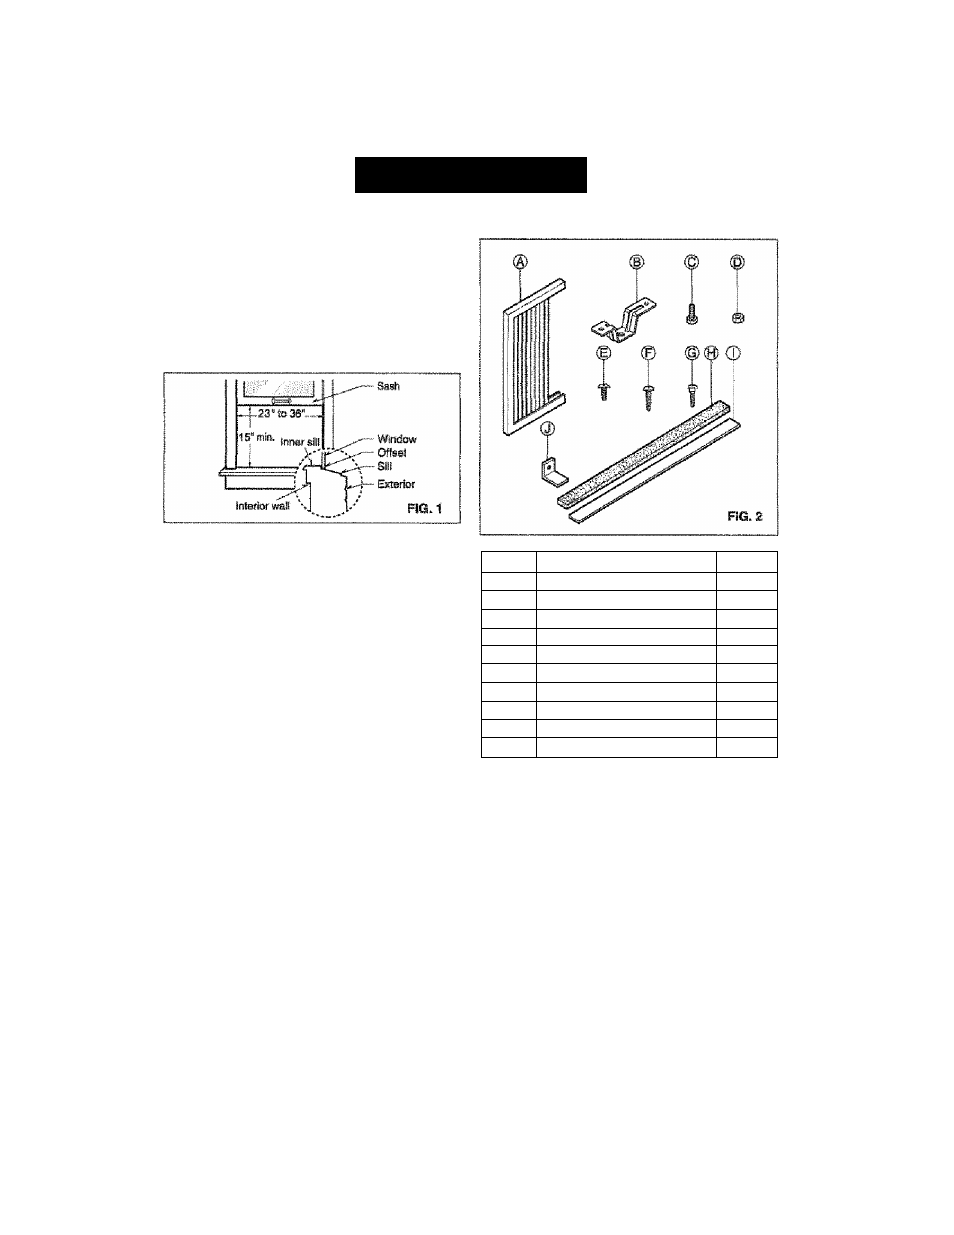
INSTALLATION HARDWARE
Your air condlliotier wil Ifisteft into stancbfd ctotiWe hursg
windows wifi actual clear opaning wiciis of 23 to 38 inches
(584mm to 914mm) (RG. 1).
Lower sash must open suffictently to allow a clear
vertical opening of 15 inches (381mm). Side louvers
and the rear of the air conditiotier must have dear
air space to allow enough airflow through the
condenser for heat removal, The rear of the unit
must be outdoors, not inside a building or garage.
ELECTRICAL SERVICE
Check your av^iiabte electrital service. The power
supply available must be the same as that shown
on the unit nameplate (iound on right side of cabinet).
AH models are ecfuipped with a S^irong service plug
t) provide proper service and safe positive
grounding. Do not chKigs plug in; any way. Do. not
use an adapter plug. If your present wail outlet does
not match your pli^, call a qualified electrician to
mate the necessary correc^ons.
SAVE CARTON and
this
OWJER'S MANUAL
for
future reference. The canon Is the
best
way to
store
Unit during winter or when
riot In
use.
To avoid risk of personal injury, property damage,
or product damage due to toe weight of this
device and sharp edges toai may be exposed:
‘ Air conditioners covered in tois manual pose an
excessive weight hazard. Two or more peopfe
are needed to move and ittotaif the unit.
To prevent Injury or strain, ше proper Bfting and
carrying tertoniques when moving uni.
» Carefully IrtsiMci iocalion where sir tondiitoner
will be installed, Be sure it will support the
weight of toe unit over an extended period of
ime.
• Handle air conditioner with care. Wear
protective gloves whenever llffing or carrying toe
unit. AVOiD toe sharp meiaf fins of front and
rear cdls.
*
Make sure air conditioner does not fall during
instellation.
ITERS
NAME OF PARTS
Q'TY
A
SIDE CURTAiN
2
в
SILL SUPPORT
2
c
BCDLT
2
D
LOCK
NUT
2
E
SCREW; 2SiB4“
13
p
SCREW: 5/8"
3
e
SCREW: 5/8"
5
H
FOAM STRIP
1
1
FOAM SEAL
1
j
L BRACKET
1
REQUIRED TOOLS:
• Tight Fitting gloves
«Standaid screwdriver
• Philips screwdriver
• Pliers
• Sharp knife
• 3/84nch open end wrench or adjustable wrench
• 1 /4-ineh hex socket and ratehat
"Tape measure
• Eiectrfc drill
• 1/4-tnch drill bit
- 5 -