Introduction, Install drain adapter kit, Step 2 - install ro drain under sink – Kenmore REVERSE OSMOSIS 625.38556 User Manual
Page 9: Under the sink installation
Attention! The text in this document has been recognized automatically. To view the original document, you can use the "Original mode".
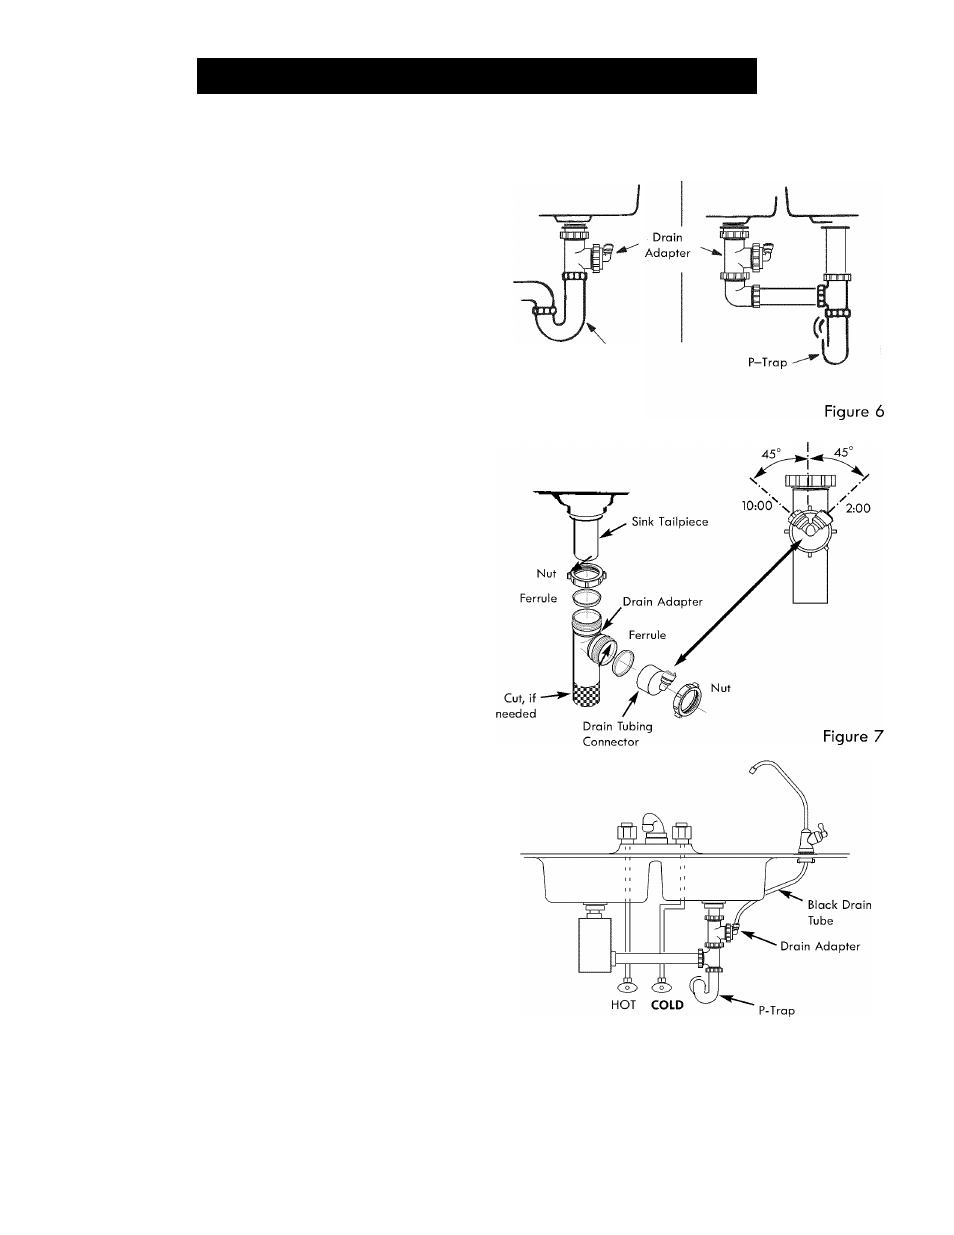
Step 2 - Install RO Drain Under Sink
INTRODUCTION
A suitable drain point is needed for the reject water from
the Reverse Osmosis Filter. You have two options to
choose from:
■ Install the Drain Adapter included with your unit
See Figures 6, 7 & 8. This is used in under the sink
installations. The drain adopter kit is installed onto
your sink drain pipe above the P-trap. See Figure 6.
■ Use another existing drain in your home
This is usually used in remote location type installa
tions. The drain tube from the Reverse Osmosis Filter
runs directly to an open drain. See Figures 9 & 10.
NOTE:
Local code may dictate which type of drain instal
lation is used. Other than local code, either drain installa
tion types may be used. Consult o plumber if you are not
familiar with plumbing procedures.
INSTALL DRAIN ADAPTER KIT
(Under sink Installation)
In an under the sink installation, you normally use the
P-trap drain adopter. A drain adopter kit is included in
your package. Review the drain adapter kit ports in
Figure 8. The drain adapter is always installed in the sink
drain pipe, above or ahead of the P- trap. See Figures 6
& 8. Be sure to comply with your local plumbing codes.
The drain adapter fits 1-1/2" sink drain pipes. Other drain
pipe fittings, purchased locally, may be needed in addi
tion to the adapter.
1. Slowly disassemble the sink drain pipe between the sink
P-trap and the sink tailpiece. See Figures 6 & 8.
2. Cleon the sink tailpiece to assure a leak-tight fit.
3. Install drain adapter directly onto the sink tailpiece
using the ferrule and nut. Snug the nut, but do not tight
en. See Figure
7.
4.
Assemble the drain tubing connector to the drain
adapter using the ferrule and nut. Snug the nut, but do
not tighten. See Figure
7.
NOTE:
Locate so drain tubing from the Reverse
Osmosis faucet will moke a straight run to the adapter,
without dips, loops, low spots or kinks. See Figure 8.
5. Turn the connector to about 45° (10:00 or 2:00 posi
tion). See Figure 7. Tighten the nut securely.
6. Assemble the P-trap to the drain adapter, and other
drain pipe fittings as required to complete the drain
run. See Figure 6.
NOTE:
If needed, you can cut the unthreaded end of
the adapter to make it fit. Do not cut too short or the
adapter will not make a leak-tight seal with the con
necting fitting.
7. Tighten all connections, but do not over tighten plastic
connections.
Under The Sink Installation
Single trap
Double Trap
P—Trap
IMPORTANT: Locale drain adapter so when the black drain tube
from the Reverse Osmosis Faucet is installed later on, it
will make a straight run to the adapter, without dips,
loops, low spots or kinks.
Figure 8
Questions? Call The Kenmore Water Line 1-800-426-9345 or visit KenmoreWater.com