Read and save these instructions, Operating instructions, Converting to ventless iwitches – Kenmore 51840 User Manual
Page 3: Cleaning, Jght bulb replacement, Filter removal, Llowmo, Filter
Attention! The text in this document has been recognized automatically. To view the original document, you can use the "Original mode".
READ AND SAVE THESE INSTRUCTIONS
ARNING
REDUCETHE
nSKOFFmE,ELECTinCALSHOCK,OniHJURVTO
persons
,
OBSEnVETHE
•LLOWmO:
U
m
this unit onV In tha manner Intended by the menutaoturor. H you have quesdom, contect the
minufeduiw at tha address or telaphono number Haled In the wairanty.
Before servicing or cleaning unit, switch power oti at service panel and lock service panel to prevent
power from being swAchsd on scdderrtaly.
Inatalatlon work and alecirical wiring must be done by a qualified petson^s) In accordance with all
applcabla codes and standards, including fire-rated ocnslnictlon codes and standards.
Sullliilent ak Is needed for proper oombustlan and aidiaustlng of gases through the Ilua (chimney)
of fuel burning equipment to prevent back drafting. Follow the heating equipment manulaclufat's
gukfofina and saf^ standards such as those published by the National Fke Protection Assoclalion
(NFPA), and the American Soclely lor Heating, Refrigeration and Ak Conditioning Engineers
(ASHRAE), and the local code authorlUea.
When culling or drilling kilo Wat or calling, do not damage electrical wiring and other hidden utiliUes.
Ducted fans must always be vented to the outdoors.
To reduce the risk ol fire, use only metal rfuetwork
This unit must be grounded.
REDUCE THE RISK OF A RANGE TOP GREASE FIRE;
Jta high range aaltings on range only when necessary. Heat oil slowly on low to medium setting.
Don't leeve rarige unattended when cooking.
Ahrays use mokwere and utensHs appropriate lor the type and amount cl food being prepared.
WARNING
TO REDUCE THE RISK OF BUURV TO PERSONS m THE EVENT OF A RANGE TOP QRU«E
'F
ire
, OBSERVE THE FOLLOWNO:*
f \
1. SMOTHER FLAMES wHh
a
cfoee-liltinglld, cookie sheet, or metal tray, then turn off the buni
.
CAREFUL TOPREVEHTBURNS.lt the flamea do not go out Immedlalely. EVACUATE AND CALL
THE FIRE DEPARTMENT.
2. NEVER PICK UP A FIAMIHG PAN - You may bo burned,
3r DO NOT USE WATERy Includtng wet ctohdottwe or towels • s violent sleam skploslon wM result
4. Use S sxUngulshsr ONLY H:
A. You krtow you hsvs s CIsss ABC sxtlngiilsher end you already know how to operate H.
6. The fire is small and oontaineal in the area where It started.
C. The fire department la being caned
D. You can right V>e fire wHh your back to an aidt.
* Based on 'Kitchen FNesataty Tipe' pubHshod by NFPA.
CAUTION_______________________________________________
1. For general ventilating use only. Do not use tosxhaust hazardous or exploelvs mstertals and vapors.
2. To avoid motor bearing darrage and rwlsy sr»d/or unbalanced Impelers. keep drywaH spray,
constructksn dust. sic. oH power unit.
3. For best capture of cooktog unpuritlea, your range hood should be mounted 16-24* above the cooking
surface.
4. Please read spedtication label on product for further informatkKi arxt requirements.
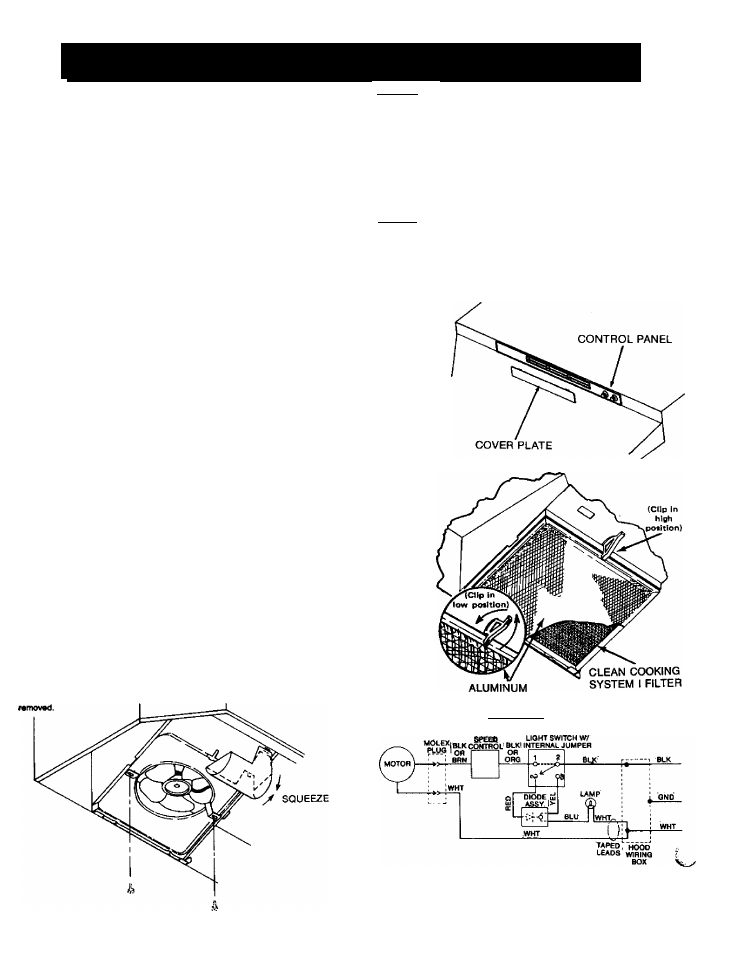
OPERATING INSTRUCTIONS
CONVERTING TO VENTLESS
iWITCHES
'M blower and the light are controlled by rotary
witches on the control panel. The btower switch
a solid state speed control which turns “on” in
• ctockwtee direction. The blower speed starts at
igh
and
dials
down
to
obtain
etiiciont
vapor
Niioval at the quietest speed. The light switch has
5 poeMons. Turn It clockwiso to the first position
K normal lighting. Continue to the second posi
on tor a "night light”.
CLEANING
hvays
disconnect
the
electricity
from
the
range
cod before servicing. Keep your range hood dean
y ushtg a mlM detergent that is sultabis for clean-
ig pdntad surfaces. The power unit is designed
) be easily removed for cleaning. Be careful not
> bend or damage the fins on the blade as this
WMJld put them out of balance.
Juminum filters may be washed in the dishwasher,
ut
extremely
caustic
cleaning
agents
should
be
ivoided
as
they
will
discolor
the
aluminum,
tentless
installations
also
use
Clean
Cooking
iystem I Rlters. Clean CooMng System Filters are
lOt washable. Replace the filters whenever the blue
ride becomee noticeabty cfirty or discolored. Clean
^yoking System 1 Filters will last up to twelve
fionths with normal use.
JGHT BULB REPLACEMENT
Tie light bulb (not supplied with hood) should be
;S watt maximum. The tens covering the bulb is
amoved
by
pressing
the
two
extending
tabs
ogelher until they release from the retaining slots.
TO REMOVE FAN ASSEMBLY
Be
sure
power
Is
disconnected.
Remove
filters.
Remove two screws holding motor bracket to range
twod and unplug fan assembly. Be caieful rx}t to
allow tan assembly to drop when screws are
1.
Use a thin blade tod, such as a table knife, to
carefully pry off the cover plate located in the
center section of the control panel. Discard the
cover.
2.
Order a F50183 Ventless Filter Kit, which con
tains one Clean Cooking System I filter, from
any
Sears
retail
or
catalog
store.
Place
the
Clean
Cooking
System
I
Filter
under
the
aluminurn filter, widi the blue side next to the
fan blade. Turn the fitter retainer dip so that the
high end of the dip holds both fiKers in place.
3.
Discard
the
damper/duct
connector
assembly
supplied with the hood. It will not be needed for
the ventless version.
FILTER REMOVAL
Filters are rennoved by turning the fitter retaining
dip to die side and lifting the filter or filters out. In
the vented version, turn the filter retaining dip to
one side and place tha aluminum filter under the
embossed letalning tabs on the back of the (an
housing. Turn the filter dip so that the low end of
the dip holds the single filter firmly in place.
In the ventless version, place both the aluminum
filter and the Clean Cooking System 1 Fitter under
the tabs on the back of the fan housing. Make sure
that the blue side of the dean Cooking System
Fitter is next to the fan blade. Tum the fitter retainer
dip so that the high end of the dip holds both filters
In place. Make sure that the Clean Ccoktng System
I RIter is next to the fan Made and the aluminum
filter is facing out.
NOTE: Make sure that the arrows on the filter re
taining dip point toward the back and the front of
the hood.
FILTER
WIRING
d i a g r a m
MOtOR'
Note • If any of the original wire on the hood has to be replaced, it
should be replaced by widng having equivalent insulation and
temperature rating (105°C Thermoplastic AWM, U.L. Listed).