Leakage checkpoints, Awarning – Kenmore 153.331492 User Manual
Page 35
Attention! The text in this document has been recognized automatically. To view the original document, you can use the "Original mode".
if the flame is absent. This unit is also equipped with a thermal
switch, designed to shut off the gas supply in the event the
water heater has been exposed to flammable vapors (e.g.,
spilled gasoline), poor combustion caused by a blocked vent or
insufficient combustion air. If the thermal switch opens:
1. Check the flame-arrestor for signs of high temperature (blue
or black discoloration). See Figure 37.
2. If there are signs of high temperature or that the thermal switch
has opened, inspect your installation for problems with venting,
combustion air supply, or a possible flammable vapor event.
(See “Pilot Light Troubleshooting Flowchart” section.) Correct
any issues prior to resetting the thermal switch. If you suspect
a flammable vapor incident has occurred, do not use this
appliance. Immediately call a qualified technician to inspect
the appliance. Water heaters subjected to a flammable vapors
ignition will require replacement of the entire water heater.
3. Reset the thermal switch by depressing the small button in the
center of the thermal switch. Follow the Lighting Instructions
found on the front of your water heater. A high temperature limit
switch or ECO (Energy Cut Off) in the tank is used to shut off the
unit if the water temperature exceeds 195°F (91 °C). The ECO
is a single-use switch, which, if activated, requires complete
replacement of the entire gas control valve/thermostat. If the
ECO should activate, the water heater cannot be used until
the gas control valve/thermostat is replaced by a qualified
technician. Contact Sears at 1-800-4-MY-HOME (1-800-469
4663) to request service.
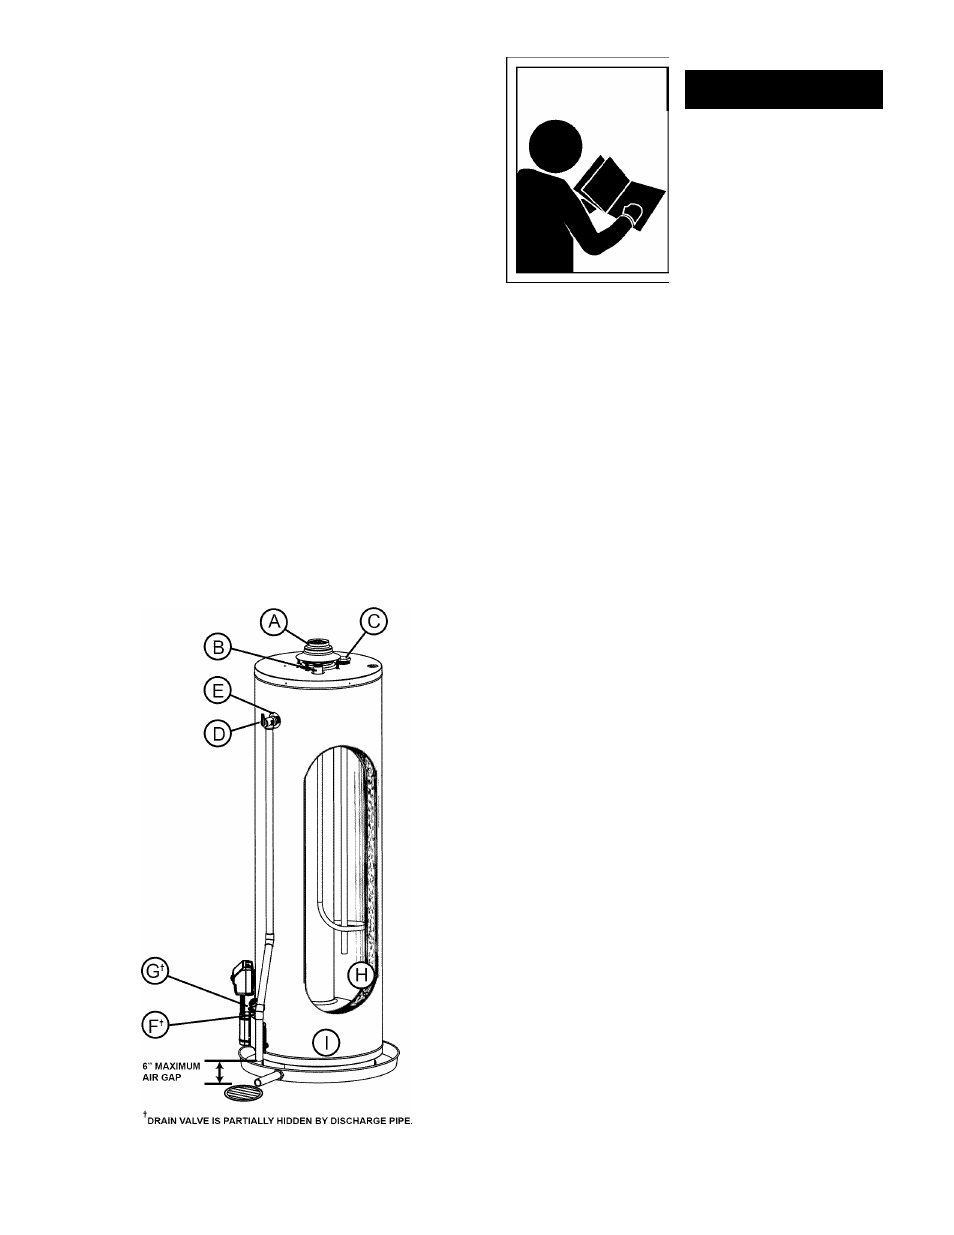
Leakage Checkpoints
AWARNING
Read and understand instruction
manual and safety messages
before installing, operating or
servicing thiswater heater.
Failure to follow instructions and
safety messages could result In
death or serious Injury.
Instruction Manual must remain
with water heater.
FIGURE 42.
Read this manual first. Then, before checking the water heater,
make sure the gas supply has been turned “OFF”, and never
turn the gas “ON” before the tank is completely full of water.
Never use this water heater unless it is completely filled with
water. To prevent damage to the tank, the tank must be filled
with water. Water must flow from the hot water faucet before
turning “ON” gas to the water heater.
A. Water at the draft hood is water vapor which has condensed
out of the combustion products. This is caused by a
problem in the vent. Contact a qualified technician.
B.
‘Condensation may be seen on pipes in humid weather or
pipe connections may be leaking.
C. *The anode rod fitting may be leaking.
D.
Small amounts of water from temperature-pressure relief
valve may be due to thermal expansion or high water
pressure in your area.
E.
*The temperature-pressure relief valve may be leaking at
the tank fitting.
F.
Water from a drain valve may be due to the valve being
slightly opened.
G. *The drain valve may be leaking at the tank fitting.
H.
Combustion products contain water vapor which can
condense on the cooler surfaces of the tank. Droplets form
and drip onto the burner or run on the floor. This is common
at the time of start-up after installation and when incoming
water is cold.
I.
Water in the water heater bottom or on the floor may be
from condensation, loose connections, or the relief valve.
DO NOT replace the water heater until a full inspection
of all possible water sources is made and necessary
corrective steps taken.
Leakage from other appliances, water lines, or ground seepage
should also be checked.
* To check where threaded portion enters tank, insert cotton
swab between jacket opening and fitting. If cotton is wet, follow
draining instructions in the “Draining and Flushing” section and
then remove fitting. Put pipe dope or teflon tape on the threads
and replace. When you are finished, follow the steps in “Filling
the Water Heater” in the Installation Instructions earlier in this
manual.
35