Oven shelves, Broiler pan & rack, Oven light bulb replacement – GE JGKS16GEH User Manual
Page 13: Adjusting the oven thermostat
Attention! The text in this document has been recognized automatically. To view the original document, you can use the "Original mode".
Oven Shelves
Oven shelves may be cleaned with
>a mild abrasive cleanser following
manufacturer’s directions. After
cleaning, rinse the shelves with clean
water and dry with a dry cloth. To
remove heavy, bumed-on soil, soapy
metal pads may be used following
manufacturer’s directions. After
scrubbing, wash with soapy water,
rinse and dry.
Broiler Pan & Rack
After broiling, remove the broiler
rack and carefully pour off the
grease. Wash and rinse the pan
and rack in hot, soapy water.
If food has burned on, sprinkle
the broiler rack while hot with
r
l
O
n
r
l
11/Af «Or\Af
ciiivi
w 11.11
towels or a dish cloth. That way,
burned-on foods will soak loose
while the meal is being served.
Do not store a soiled broiler pan
and rack in the oven or broiler
compartment.
Oven Light Bulb
Replacement
Before replacing any light bulb,
disconnect electric power to the
range at the main fuse or circuit
breaker panel. Let the bulb cool
completely before removing it. Do
not touch a hot bulb with a damp
cloth—the bulb will break.
The light bulb in your oven is
located in the upper right corner.
Reach m and unscrew it after taking
precautions mentioned above.
Replace it with a high-temperature
appliance bulb of the same wattage.
Adjusting the
Oven Thermostat
The temperature control in your
new oven has been carefully adjusted
to provide accurate temperatures.
However, if this oven has replaced
one you have used for several years,
you may notice a difference in the
degree of browning or the length
of time required when using your
favorite recipes. Oven temperature
controls have a tendency to “drift”
over a period of years and since
this drift is very gradual, it is not
readily noticed. Therefore, you
may have become accustomed to
your previous oven which may
have provided a higher or lower
temperature than you selected.
Before attempting to have the
temperature of your new oven
changed, be sure you have followed
the baking time and temperature of
the recipe carefully. Then, after
you have used the oven a few times
and you feel the oven is too hot
or too cool, there is a simple
adjustment '^ou can make '^ourself
on the OVEN TEMP knob.
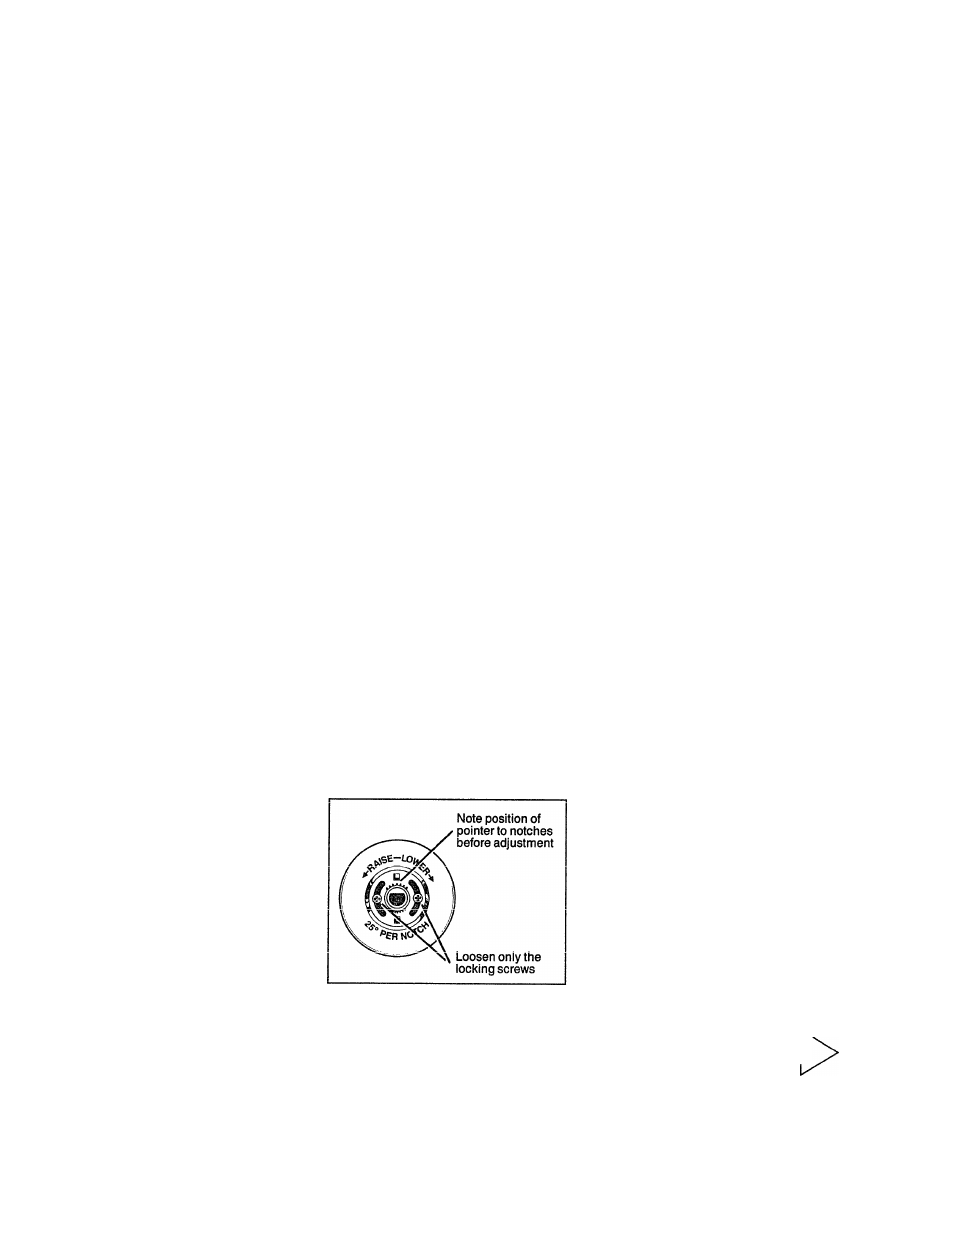
Pull the knob off the control shaft
and look at the back side. There is
a disc in the center of the knob skirt
with a series of notches on the inner
edge next to the knob shaft. One of
these notches is positioned over a
pointer on the side of the knob shaft.
Note which notch the pointer is
located in. To make an adjustment,
carefully loosen (approximately
one turn), but do not completely
remove the two screws that hold the
skirt to the knob. Hold the knob in
one hand and with tlie other hand
carefully tilt the skirt until the notch
in the disc clears the pointer on the
knob shaft.
To raise the oven temperature, turn
the dial in the direction of the
arrow for “Raise!’ To lower the
tpmnpratiirp turn thp Hial in th<»
--------- w.,..
... W.V-
direction of arrow for “Lower!’
Each notch will change the oven
temperature approximately 25°F.
We suggest that you make the
adjustment one notch from the
original setting and check oven
np.rfnrmanrp hpfnrp mainino anv
J ------------------------------------------------------------
additional adjustments.
After the adjustment is made, make
sure the pointer on the knob shaft
is aligned with the notch in the disc.
Press skirt and knob together and
retighten screws so they are snug,
but be careful not to overtighten.
Re-install knob on range and
check performance. Note: After
an adjustment has been made the
“Off” and “Broil” positions will
not line up with the indicator mark
on the control panel as they
previously did. This condition
is normal and will not create
a problem.
(continued next page)