Now start, Warning, Truck only from rear to prevent product damage – Whirlpool LTE5243DQ User Manual
Page 5
Attention! The text in this document has been recognized automatically. To view the original document, you can use the "Original mode".
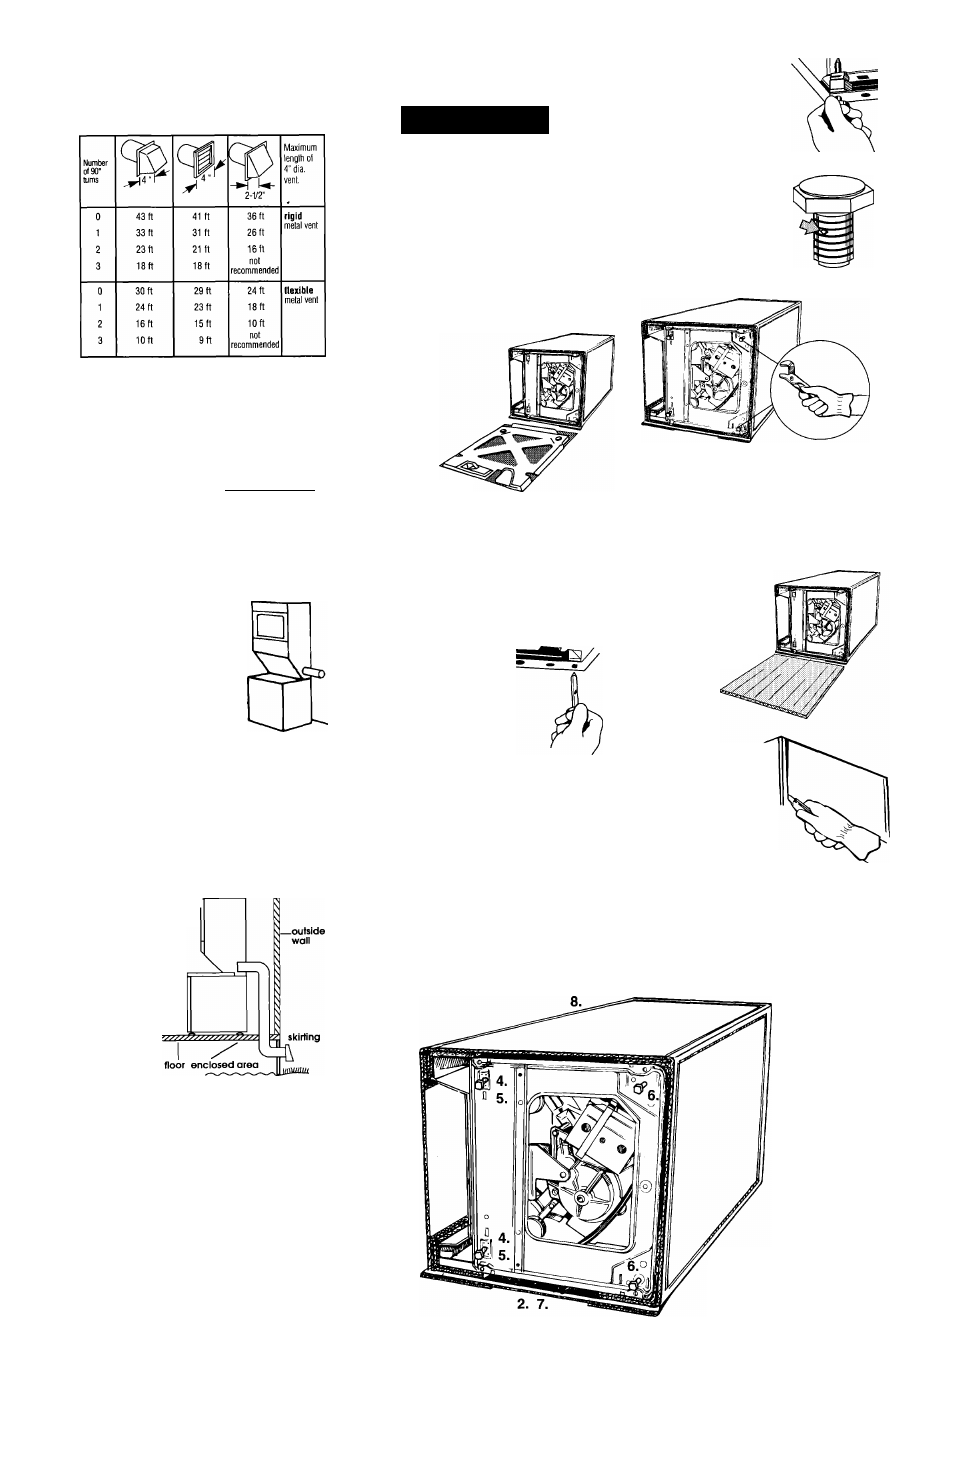
Maximum length of the exhaust system
depends upon the t/pe of vent used,
number of elbows and the type of
exhaust hood. The maximum length for
both rigid and fiexible vent is shown in the
chart.
The maximum length using a 2" x 6" rectangular
vent with 2 elbows and a 2-1 /2" exhaust hood is 8 ft.
For exhaust configurations other than
those listed in the chart, the back
pressure MUST NOT exceed 0.2 inches
water column at the back of the
washer/dryer. The back pressure should
be checked by a qualified technician.
For exhaust systems not covered by the
exhaust length chart, see Service Manual,
Part No. 603197, available from your
authorized parts distributor.
Four-inch exhaust hood is preferred.
However, a 2-1/2-inch exhaust hood may
be used. A 2-1 /2-inch exhaust hood
creates greater back pressure than other
hood types. For permanent installation, a
stationary exhaust system is required.
Exhausting the dryer
through the side of the
washer/dryer requires the
use of Side Exhaust Kit, Part
No. 279823, available from
your authorized parts
distributor. Follow kit
Installation Instructions for
proper exhaust installation.
Mobile home installation
This washer/dryer is suitable for mobile
home installations. The installation of the
washer/dryer must conform to the
Manufactured Home Construction and
Safety, Title 24 CFR, Part 3280 (formerly the
Federal Standard for Mobile Homes
Construction and Safety, Title 24, HUD Part
280, latest edition).
Mobile home exhaust requirements: The
washer/dryer must have an outside
exhaust. If the dryer
is exhausted
through the floor
and the area
under the mobile
home is
enciosed, the
exhaust system
must terminate
outside the
enclosed
area.
Extension
beyond the
enclosure will prevent lint and moisture
buildup under the mobile home.
Now start...
with washer/dryer In laundry area.
^WARNING
Excessive Weight Hazard
Use two or more people to move and
install washer/dryer.
Failure to do so can result in back or
other injury.
Truck only from rear to prevent product
damage.
1
.
Put on safety glasses and gloves.
I
Remove
shipping cardboard base.
• 4 legs
• 1 drain hose clamp
• 1 plastic beaded
strap
4 flat, water-
hose washers
1 small clamp
Remove parts from plastic
package. Check that all parts were
included.
■ Insert a rear-leveling
leg into the hole in the rear
corner on the bottom of
the washer/dryer. Push leg
in until it snaps into place.
Do the same same thing
with the other leveling leg
In the other rear corner.
■ Push up one leg;
check to see that the other
leg goes down. Check the
other leg the same way. (If
legs do not adjust, repeat
Step 4.)
■ With one of the
front legs in hand, check
the ridges for a diamond
marking. That's how far the
leg is supposed to go into
the hole. Start to screw the
legs into the holes in the
front corners by hand.
Use slip-joint pliers to finish turning the
front legs until you reach the diamond
mark.
Slide washer/dryer onto cardboard or
hardboard before moving across floor to
prevent damage to floor covering.
m Place a piece of
cardboard or
hardboard in front of
carton. Now stand the
washer/dryer upright.
Slide washer/dryer
onto cardboard or
hardboard.
8
To prevent product
damage, do not
remove corner
posts inside the
carton before
cutting.
With the corner posts in place,
cut the carton down one corner.
Remove carton.
Numbers
correspond
to steps.
Panel D