Maintaining the lawn mower, Warning – Cub Cadet Time Save User Manual
Page 22
WARNING
Maintaining
the Lawn
Mower
IMPORTANT: The belts
on the mower are spe-
cially designed to engage
and disengage safely.
Substitute (non-OEM)
belts can be danger-
ous by not disengaging
completely. For a proper
working machine, use
factory approved belts
WARNING: Always stop
engine, disconnect spark
plug, and remove ignition
key before performing
any type of maintenance
on the mower. Failure to
follow this instruction
could result in personal
injury and/or property
damage.
WARNING: Avoid the
possibility of a pinching
injury. Do not place your
fingers between belts and
pulleys.
Replacing the Blade Timing Belt
WARNING: Before performing any type of maintenance on the machine, wait for all parts to stop
moving, and disconnect the spark plug wire. Remove the ignition key from the ignition switch (if
equipped). Failure to follow this instruction could result in personal injury or property damage.
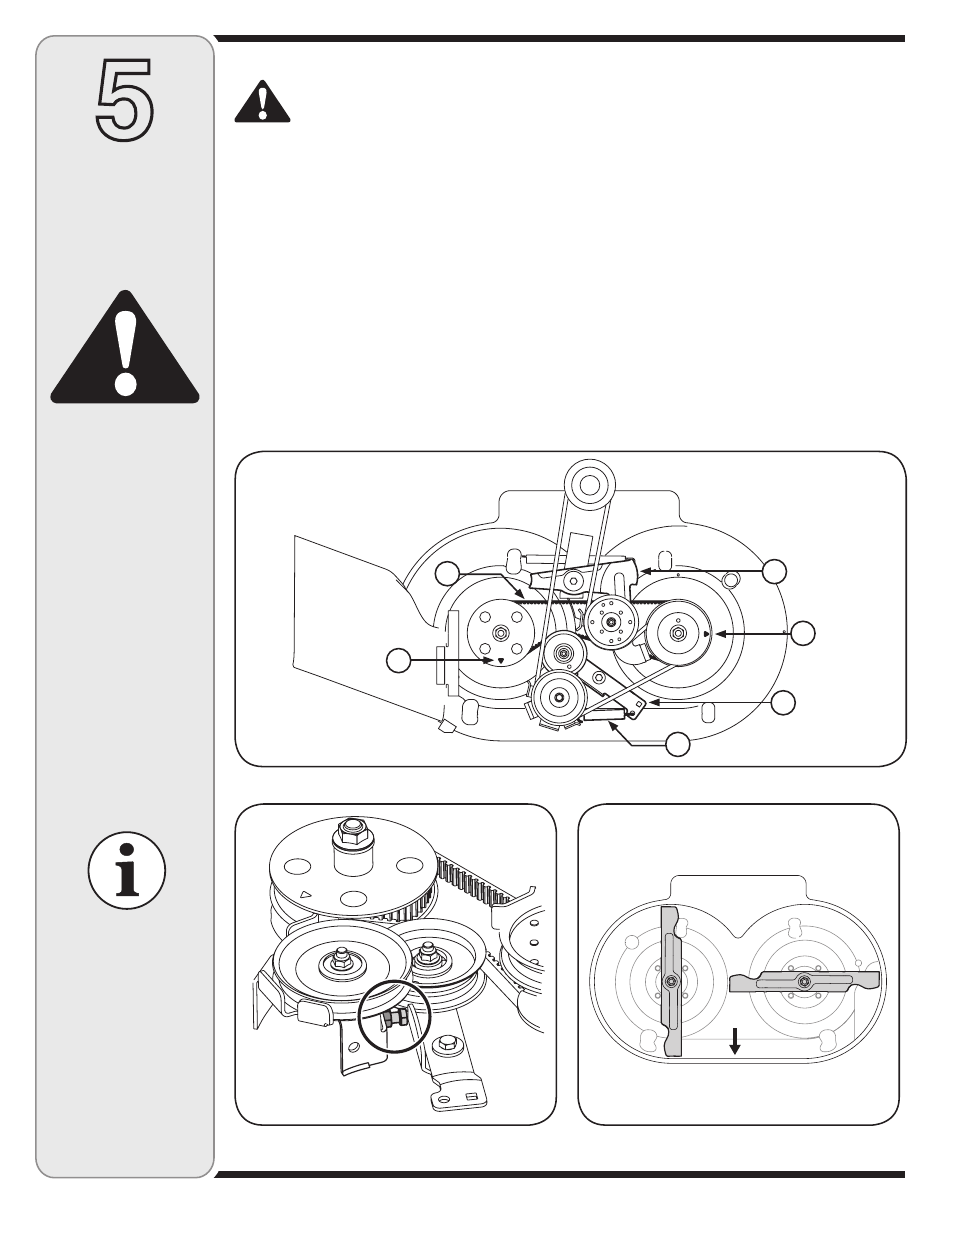
Figure 5-17: Top view of blade timing belt orientation.
Stop engine, wait for all parts to stop moving, and
disconnect spark plug wire.
Release all mower controls.
Remove belt cover as instructed earlier in this
section.
Removing the Timing Belt
Remove spring (A) from timing bracket and deck,
Figure 5-17.
Loosen 3/8-16 screw and nut attached to deck
mount, Figure 5-18.
Pivot idler timing bracket (B) to route belt around
idler pulley, Figure 5-17.
Pivot idler arm assembly (C) and remove belt (D)
from spindle assemblies, Figure 5-17.
1.
2.
3.
4.
5.
6.
7.
Figure 5-18: Loosen the screw and nut on deck mount.
Installing the Timing Belt
Before installing a replacement timing belt, the
marks on each spindle assembly must be positioned
in such a way as to ensure the blades are perpen-
dicular to each other, Figure 5-19.
Turn the spacer spindle assembly (E) so that
the arrow punched on the spindle is facing the
front of the mower, Figure 5-17.
Turn the drive spindle assembly (F) so that the
arrow punched on the spindle is facing to the
outside of the cutting deck, Figure 5-17.
Route the new belt around pulleys making sure to
tighten nuts and bolts. Install the spring removed in
step 4.
Replace the belt cover.
8.
a.
b.
9.
10.
Figure 5-19: Blades must be perpendicular to each other after
installing new timing belt.
A
B
C
D
E
F
Front