Night time star collimating – Celestron Advanced Series C8-N User Manual
Page 46
46
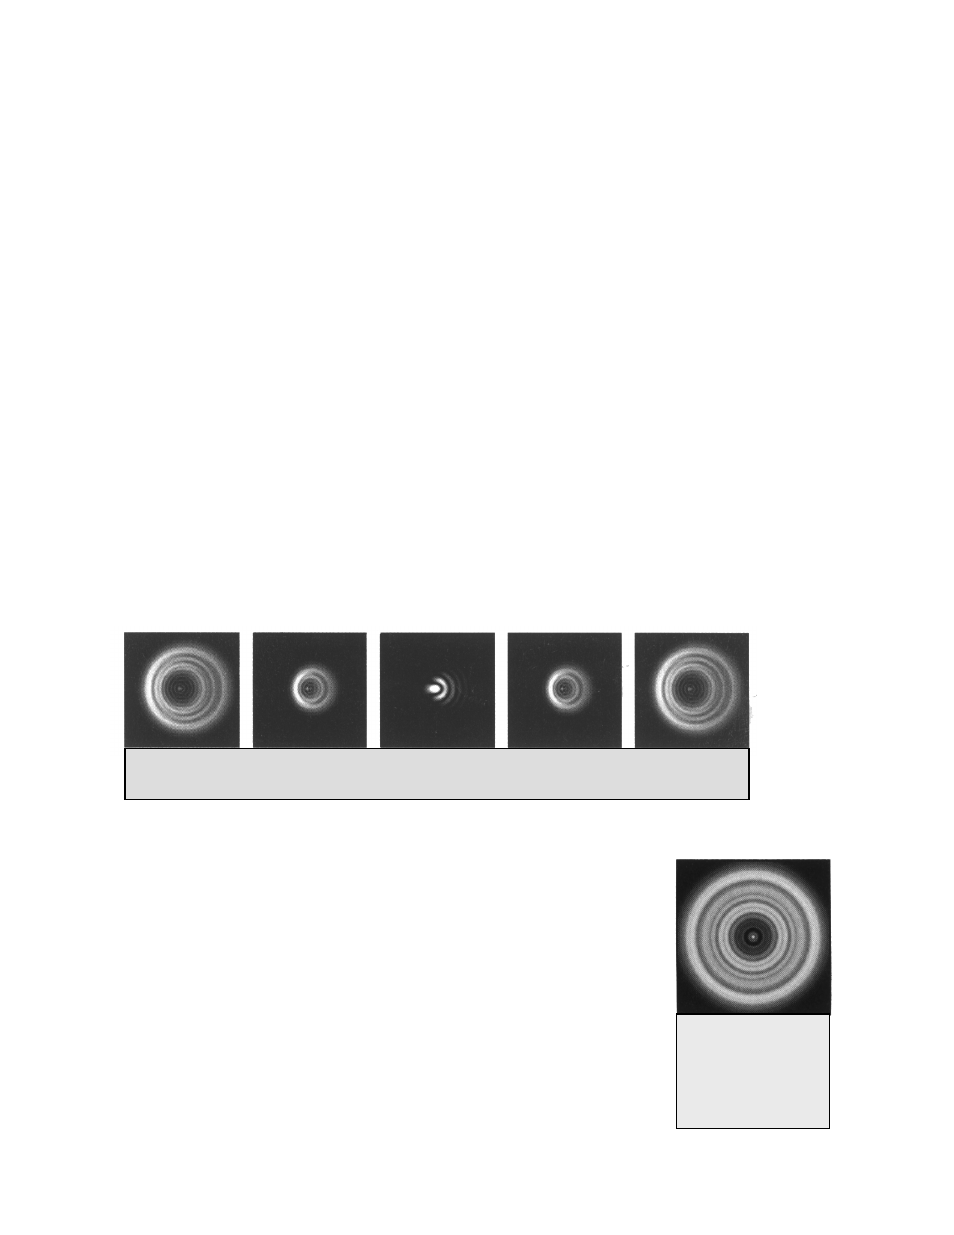
Figure 8-2
A collimated telescope
should appear as a
symmetrical ring pattern
similar to the diffraction
disk seen here.
Night Time Star Collimating
After successfully completing daytime collimation, night time star collimation can be done by closely adjusting the
primary mirror while the telescope tube is on its mount and pointing at a bright star. The telescope should be set up
at night and a star's image should be studied at medium to high power (30-60 power per inch of aperture). If a non-
symmetrical focus pattern is present, then it may be possible to correct this by re-collimating only the primary
mirror.
Procedure
(Please read this section completely before beginning)
To star collimate in the Northern Hemisphere, point at a stationary star like the North Star (Polaris). It can be found
in the north sky, at a distance above the horizon equal to your latitude. It’s also the end star in the handle of the Little
Dipper. Polaris is not the brightest star in the sky and may even appear dim, depending upon your sky conditions.
Prior to re-collimating the primary mirror, locate the collimation screws on the end of the telescope tube. These three
screws are to be adjusted one at a time. Normally, motions on the order of an
1
/
8
turn will make a difference, with
approximately a
1
/
2
to
3
/
4
turn being the maximum required.
With Polaris or a bright star centered within the field of view, focus with either the standard ocular or your highest
power ocular, i.e. the shortest focal length in mm, such as a 6mm or 4mm. Another option is to use a longer focal
length ocular with a Barlow lens. When a star is in focus it should look like a sharp pinpoint of light. If, when
focusing on the star, it is irregular in shape or appears to have a flare of light at its edge, this means your mirrors
aren’t in alignment. If you notice the appearance of a flare of light from the star that remains stable in location, just
as you go in and out of exact focus, then re-collimation will help sharpen the image.
Take note of the direction the light appears to flare. For example, if it appears to flare toward the three o'clock
position in the field of view, then you must move whichever screw or combination of collimation screws necessary
to move the star’s image toward the direction of the flaring. In this example, you
would want to move the image of the star in your eyepiece, by adjusting the
collimation screws, toward the three o'clock position in the field of view. It may only
be necessary to adjust a screw enough to move the star’s image from the center of the
field of view to about halfway, or less, toward the field's edge (when using a high
power ocular).
Collimation adjustments are best made while viewing the star's position in the field of
view and turning the adjustment screws simultaneously. This way, you can see exactly
which way the movement occurs. It may be helpful to have two people working
together: one viewing and instructing which screws to turn and by how much, and the
other performing the adjustments.
Fig 8-1 Even though the star pattern appears the same on both sides of focus, they are asymmetric. The dark
obstruction is skewed off to the left side of the diffraction pattern indicating poor collimation.