Wallet guide, Guía pequeña, 6iv. setting your combination – Kidde 001017 Combination Instructions User Manual
Page 2: Limited warranty, Dial combination, Limitation of liability, Garantía limitada, Limitación de la responsabilidad, Iv. definir su combinación, Accesspoint
6
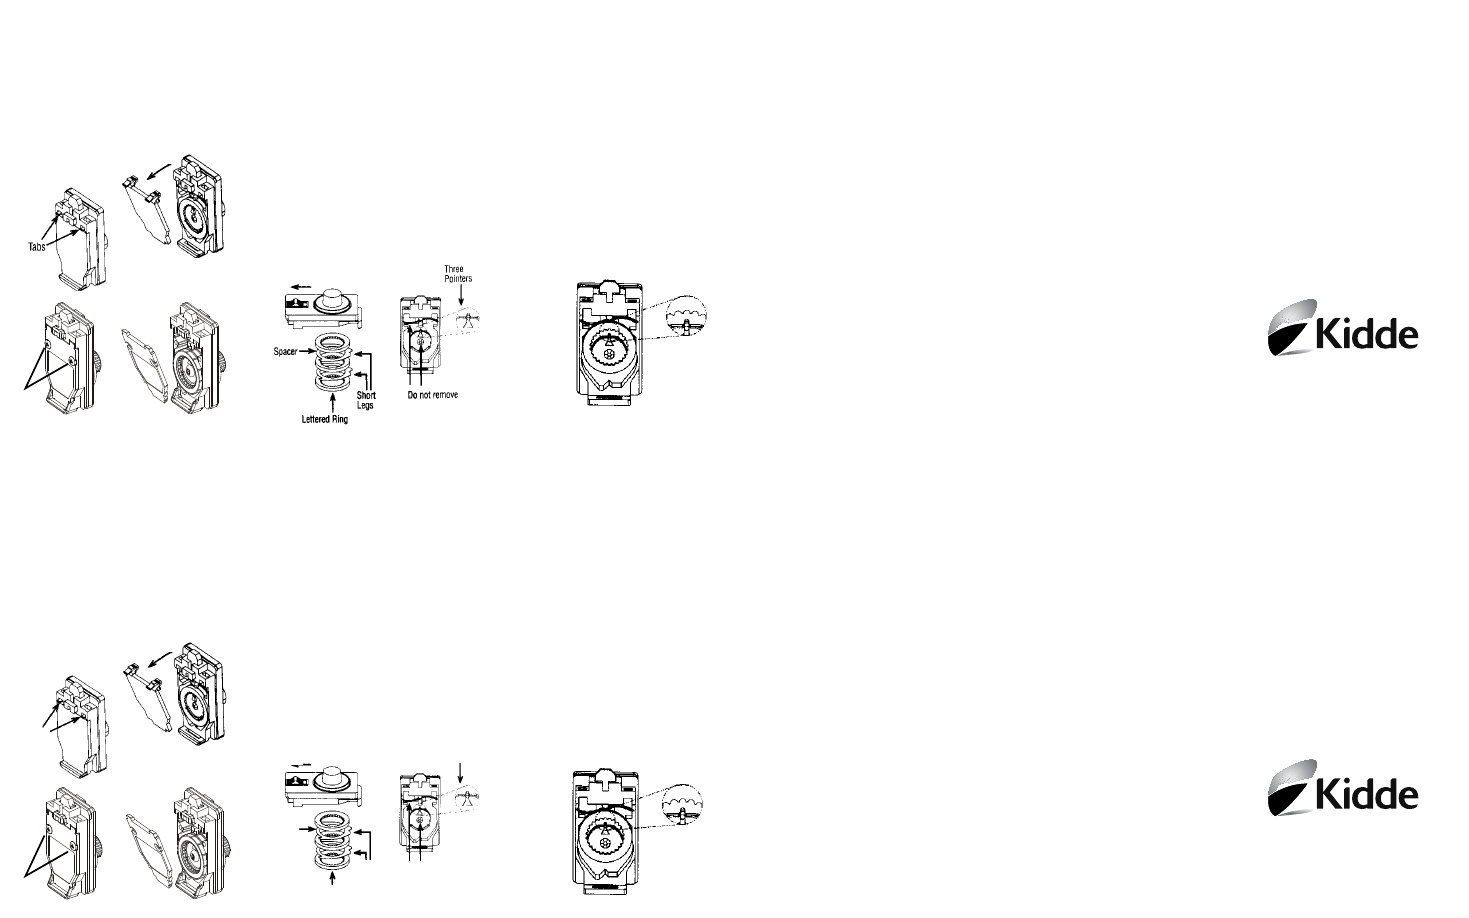
IV. Setting your combination
You must remove the combination lid from
the keybox before proceeding. See Section I
for instructions on opening the keybox.
1. If the keybox has a metal back, unscrew
both screws on the back of the keybox. If it
has a plastic back, push both tabs down.
2. Pull the back out.
3. Remove the back from the bottom slot.
4. Snap the black release button all the way
up.
5. Spin the dial in any direction. The 3
lettered rings and the 2 metal spacers will
drop from the lock.
6. Spin the dial to line up all three pointers.
Keep them aligned during step #7.
7. a. Place a lettered ring over the pointers at
your first letter choice.
b. Next, place a metal spacer with short
leg on the right.
c. Place a lettered ring over the pointers
at your second letter choice.
d. Place the last spacer next with short leg
on the right.
e. Place the last lettered ring over the
pointer at your third letter choice.
Limited warranty
Disclaimer of implied warranty
UTC Fire & Security Americas Corporation,
Inc. (“UTCFS”), 4001 Fairview Industrial Drive
SE, Salem, Oregon 97302 (800.547.0252) is
a licensee of Kidde, and the provider of this
warrantee. UTCFS warrants to the original
buyer of its products for a period of one year
after the date of purchase that the products
are free from defects in workmanship and
materials. This warranty does not cover
forgotten or incorrectly set combinations.
UTCFS will, without charge to the buyer,
repair or replace, at its option, any defective
product returned by the original buyer to
UTCFS (at the buyer’s cost) at its service and
repair facilities located at the above address
within one year of the date of purchase.
The foregoing warranty does not cover
damage caused by abuse or misuse and is
the exclusive remedy for damage arising from
defects in its products. Except to the extent
prohibited by any applicable federal law, all
other warranties, express or implied, including
warranties of merchantability and fitness for
particular purpose, are excluded.
Dial combination
Complete instructions for
operating, mounting, and
changing combinations
8. Slide the bottom of the back into slot.
9. If the keybox has a plastic back, snap the
lid closed by pressing between the tabs. If
the keybox has a metal back, replace the
back and tighten the screws. The back
must be fully in place and tightened to
secure the combination.
10. Before replacing the lid, try your new
combination and push the button down.
Important: The black button must remain
down after dialing the combination. If not,
repeat Section IV.
To lock the lid, you must push the button up
and spin the dial.
See Section I for opening instructions.
Warranty does not cover lost or incorrectly set
combinations.
Limitation of liability
Except to the extent that such limitation may
be prohibited or limited by federal or state
law, the foregoing repair/replacement remedy
is the exclusive remedy for defects in products
(this is an “as is” sale except for the foregoing
warranty) and all other liability, whether based
on contract, negligence, strict liability, or
otherwise, and all other remedies, as well as
all commercial, special incidental, and conse-
quential damages, are hereby excluded.
Screws
Garantía limitada
Renuncia de la garantía implícita
UTC Fire & Security Americas Corporation,
Inc. (“UTCFS”), 4001 Fairview Industrial Drive
SE, Salem, Oregon 97302 (800.547.0252)
garantiza al comprador original que, durante
un período de un año desde la fecha de
compra, sus productos están libres de defectos
en la fabricación y en los materiales. Esta
garantía no cubrirá el producto en caso de
que se olviden las combinaciones o se las
establezca erróneamente. UTCFS, reparará o
reemplazará, a su elección y sin cargo para
el comprador, los productos defectuosos
devueltos por el comprador original (con
cargo al comprador) a las instalaciones de
asistencia y reparación de UTCFS, ubicadas
en la dirección arriba indicada, dentro de un
año desde la fecha de compra. La garantía
anterior no cubre los daños causados por el
abuso o uso incorrecto, y es el único remedio
para los daños producidos por los defectos
de los productos. Excepto en lo prohibido por
las leyes federales aplicables, todas las demás
garantías, expresas o implícitas, incluidas las
garantías de comerciabilidad e idoneidad para
un propósito determinado, quedan excluidas.
Espaciador
Anillo con letras
Limitación de la
responsabilidad
Excepto en lo que prohibe o limita la ley
federal o estatal, el anterior remedio de
reparación/sustitución es el único para los
productos defectuosos (es decir, ésta es una
venta “como está” excepto para la garantía
anterior) y todas las demás responsabilidades
por contrato, negligencia, responsabilidad
estricta u otras, y todos los demás remedios,
así como todos los daños comerciales,
especiales, accidentales, o derivados, quedan
aquí excluidos.
8. Deslice la parte inferior de la cubierta
posterior en la ranura.
9. Si la caja de seguridad tiene posterior de
plastico, cierre y ajuste la tapa presionando
entre las pestanas. Si la caja de seguridad
tiene posterior de metal, atornille el
posterior y apriete los tornillos. El posterior
debe estar completamente en su lugar y
apretado para asegura combinacion
10. Antes de volver a colocar la tapa, pruebe la
nueva combinación y presione el botón.
Importante: El botón negro debe permanecer
presionado después de introducir la combi-
nación. En caso contrario, repita la sección IV.
Para bloquear la tapa, debe presionar el botón
hacia arriba y girar el disco.
Consulte las instrucciones de apertura en la
sección I. La garantía no cubre las combinacio-
nes perdidas o definidas incorrectamente.
IV. Definir su combinación
Es necesario retirar la tapa de la caja de
seguridad antes de continuar. Consulte las
instrucciones de la sección I.
1. Si la caja de seguridad tiene posterior de
metal, destornille ambos tornillos en el
posterior de la caja de seguridad. Si la caja
de seguridad tiene posterior de plastico,
presione ambos pestanas hacia abajo.
2. Tire de la cubierta posterior hacia fuera.
3. Extraiga la cubierta posterior de la ranura
inferior.
4. Mantenga el botón negro hacia fuera todo
el tiempo.
5. Gire el disco en cualquier dirección. Los 3
anillos con letras y los 2 espaciadores de
metal se soltarán.
6. Gire el disco hasta alinear los tres punteros.
Manténgalos alineados durante el paso 7.
7. a. Sitúe un anillo con letras sobre los pun-
teros, seleccionando la primera letra.
b. A continuación, sitúe un espaciador de
metal con el brazo corto a la derecha.
c. Sitúe un anillo con letras sobre los
punteros, seleccionado la segunda letra.
d. A continuación, sitúe el último espacia-
dor con el brazo corto a la derecha.
e. Coloque el último anillo con letras sobre
el puntero, seleccionando la tercera
letra.
AccessPoint
™
Wallet Guide
43363-04 Rev C • September 2012
© 2012 Kidde.
Combinación de disco
Instrucciones completas de
funcionamiento, instalación, y
cambio de las combinaciones
AccessPoint
™
Guía Pequeña
43363-04 Rev C • Septiembre 2012
© 2012 Kidde.
Pestañas
45
7
23
1
6
Screws
45
23
1
Brazos cortos
No quitar
Tres
punteros
7