4ghz binding, Aux channel function (ch3, Handling procedure for batteries – OFNA Racing Hyper 10TT User Manual
Page 7: Power switch (turn on) bind (press and hold), Step 2 step 1
AUX Channel Function (CH3
)
Handling Procedure For Batteries
•Battery Replacement
1) Remove the battery cover from the transmitter by sliding it in the direction of the arrow.
2) Remove the used batteries.
3) Load the new 8 AA size alkaline, or Nickel Metal Hydride (NimH) rechargeable batteries,
and pay very close attention to the polarity marking on the batteries.
4) Slide the battery cover back onto the case.
5) If you use rechargeable batteries OFNA make this charger 10210 it will charge your Transmitter
9.6v at 100mA and Receiver battery 4.8v-6v at 100mA at the same time.
•Caution
Always make sure you reinsert the batteries are in the correct polarity order. If the batteries are loaded
incorrectly, the transmitter may not work or can be damaged.
When the transmitter is not used for a long period of time remember to remove the batteries. If the batteries
do happen to leak, clean the batteries case and contacts thoroughly and make sure the contacts are free of
corrosion.
•Battery Disposal
Some countries and state require special handling of used batteries, please contact the agencies responsible
for recycling hazardous wastes in your local area.
•Battery low voltage alarm indicator. LED Power light will flash.
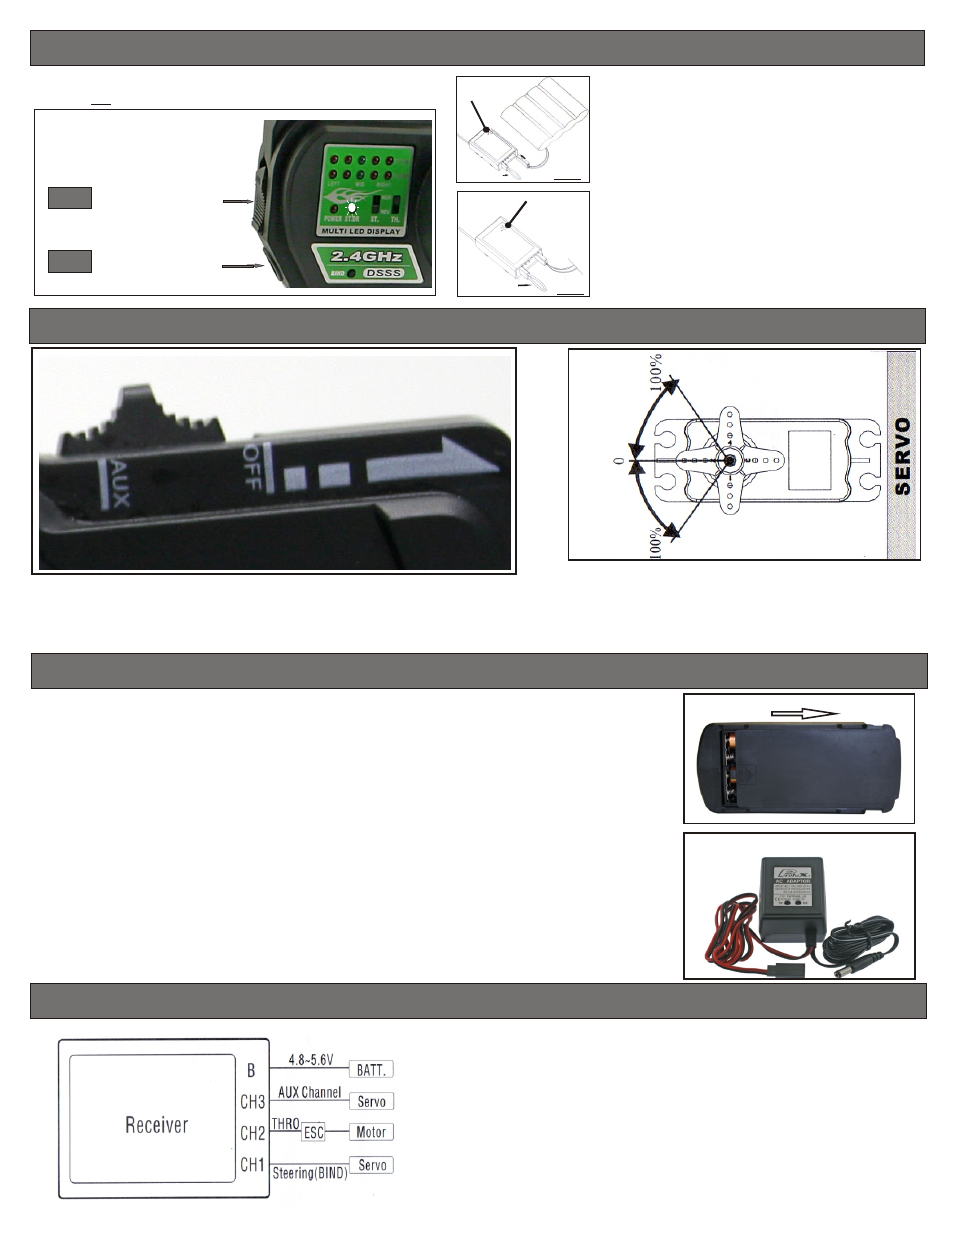
Receiver Connection Diagram
Handling Procedure For Batteries
Specification Data
•Transmitter
Channels: 3
Frequency: 2.4Ghz
Power DC: 9.6V - 12V
Measurement: 280 x 190 x 85mm
(Packing Meas.)
Net Weight: 510g
•Receiver
Channels: 3
Frequency: 2.4Ghz
Power DC: 4.8 - 5.6V
Net Weight: 13.5g
•This switch control the transmitter’s third channel. A servo plugged in this Channel 3 will move to full travel in one direction when
the switch is in the “AUX” position, then move the switch to the “OFF” position the servo will move in the opposite position . This
channel can be use to turn on all sort of things in your vehicle. For example, lights, on board camera etc.....
l
10210 - DUAL CHARGER, 4.8V-6V/9.6V TRANSMITTER AND RECEIVER
NOTICE THE DIRECTION OF BATTERY COVER
2.4Ghz Binding
•Press and hold the bind button on the front of the transmitter while
turning ON the power switch button until the (ST.DR) LED Flashes.
STEP 2
STEP 1
Power Switch (turn on)
Bind (Press and hold)
Flashing LED
Receiver
Binding cable
Plug In
Solid LED
Receiver
Binding cable
2. With the system hooked up as shown, insert the binding cable in
the charging plug receptacle. Turn on the power of the receiver
(4.8 - 5.6V), and now the LED should be flashing indicating
that the receiver is ready to bind.
3. The LED should go solid, indicating the system
has connected. Now turn off the receiver and
remove the binding cable.
(Not included)