Wilbur Curtis DHG User Manual
Service manual – single and dual hopper grinders, Ilbur, Urtis
FOR THE LATEST SPECIFICATIONS AND INFORMATION GO TO WWW.WILBURCURTIS.COM
1. Lift open the top cover of the grinder and fill with fresh whole bean coffee. Close the cover.
2. Place a new paper filter into the brewcone.
3. Insert the brewcone into the basket holder arms on the grinder.
4. Press the grind switch. The grinder will start to grind coffee. Allow the
motor to come to a complete stop before removing the brewcone.
5. Transfer the filled brewcone to the brewer and press the desired brew
button. The brew cycle is complete when the brew light stops flashing.
ADJUSTING THE GRINDS*
1. Empty hopper of coffee beans. Run grinder to clear grinding burrs of coffee.
2. Open housing cover to locate adjustment screw (8) and lock nut (7). Loosen lock nut.
3. Run motor during adjustment. Turning adjustment screw clockwise will result in
a finer grind (if, while turning, you hear the grinding burrs starting to touch, im-
mediately, back off 1/8th turn). Turning counter clockwise will produce a coarser
grind.
4. With a screwdriver holding the adjustment screw in place, tighten the locknut.
5. Run some coffee beans through the machine to check the grind adjustment.
6. Replace front cover on machine.
*This adjustment may change the amount of ground coffee dispensed.
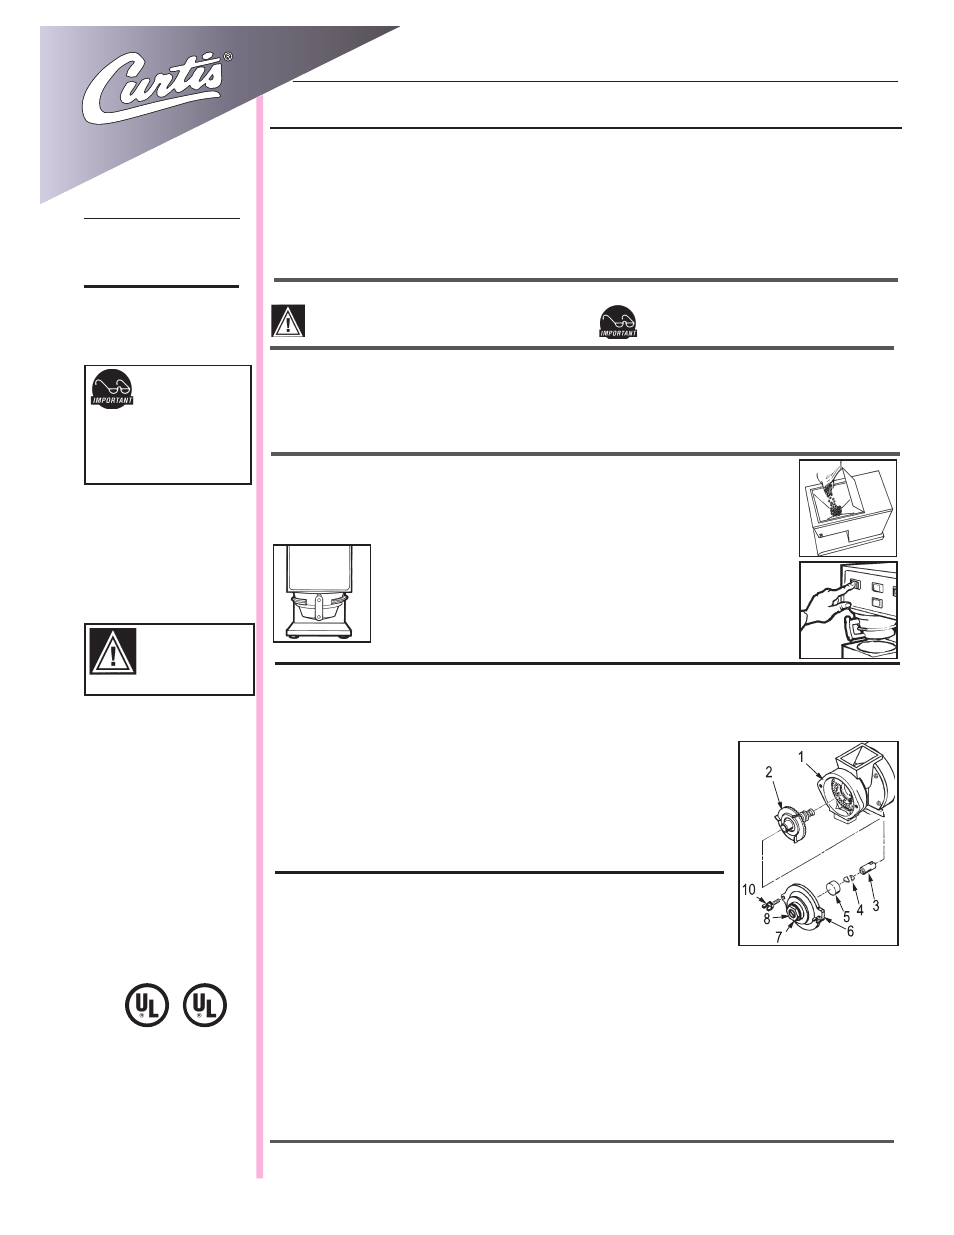
CHANGING A BROKEN SHEAR DISK
1. Unplug the power cord.
2. Empty the hopper of beans.
3. Take out the thumb screws (10) to remove the grind cap (6).
4. Pull out the grinding burr/feed worm assembly (2). Half of the grinding burr set will remain within the housing.
5. Separate the shear cap (5) and shear drive (3). The snapped shear disk (4) should fall from the shear drive.
6. Inspect and brush out the housing (1).. Especially look for anything that may have broken the shear disk.
7. Insert the feed worm and grinding burr onto the motor shaft.
8. Push the shear drive through the burr/feed worm assembly and align it with the tongue on the motor shaft.
9. Rotate the burr/feed worm assembly to align the slot with narrow slot on shear drive.
10.Insert a new shear disk into the slot. Cover with the shear cap.
11.Replace the grind cap and two thumb screws.
1
Important Safeguards/Conventions
CAUTION: Please use
this setup procedure
before attempting to
use this grinder. Failure to follow
the instructions can result in injury
or the voiding of the warranty.
WARNING TO AVOID
SCALDING, Do not
remove brewcone whil
brew light is flashing.
C
Service Manual – Single and Dual Hopper Grinders
This appliance is designed for commercial use. Any servicing other than cleaning and maintenance should be
performed by an authorized Wilbur Curtis service technician.
• Do NOT immerse the unit in water or any other liquid
• To reduce the risk of fire or electric shock, do NOT open top panel. No user serviceable parts inside.
• Keep hands and other items away from hot parts of unit during operation.
• Never clean with scouring powders or harsh chemicals.
SYMBOLS
WARNINGS – To help avoid personal injury
Important Notes/Cautions – from the factory
QUICK START & SETUP
SETUP
1. Install the grinder on a firm, level base in a location where it can be connected to a grounded electrical outlet
of 120VAC, rated at 15 amps minimum.
2. Test the unit by running some whole bean coffee through the grinder. If any problems are encountered, refer
to the troubleshooting section complete at www.wilburcurtis.com or call Technical Support at 800-995-0417.
OPERATING INSTRUCTIONS
W
ilbur
C
urtis
C
ompany
, i
nC
.
Models Included
SHG
DHG
ISO 9001:2008
Wilbur Curtis Company
Montebello, CA 90640
Tel: (323) 837-2300
www.wilburcurtis.com